


arnout
-
Posts
306 -
Joined
-
Last visited
Content Type
Profiles
Forums
Events
Everything posted by arnout
-
Bought my first bike (GSX750EX) because to my eyes it looked so good with the white Giuliari that was fitted. These seats do add something I-don't-know-quite-what extra to the ET/EX. Always liked the firmness and width of the seat a lot too, but found sliding back everytime you'd wind open the throttle a bit of a pain. So eventually cut up the seat and turned it into an Eddie lawson-style seat to have a hump to brace against. When using these Giuliari's people often decide to shorten the seat to bring the whole tail further in, as is the style of today. For this reason it seems to me there already modified seats would be in greater demand -if offered- than the original length with regards to the new batch. Difficult bit with this is of course the varying lengths that would indeed fit these bikes.. I don't need a new seat myself, but the projected price seems fair to me. Original seats still pop up on Eblag (Germany!) regularly for about half this amount, but the cover is always damaged in some way. On my old seat the fiberglass base was cracked too, so reckon this is probably also the case with other seats.
-
Well.. There is the B12 swingarm that is narrow enough to drop in and is a popular modification especially on the earlier twin shock ET/EX/ESD/Kat 1100's.. BUT because of the different monoshock designs of course the shock mounts and such will need to be cut and replaced with new ones welded to the frame to also adopt the Bandit's shock and linkages.. Info on the often used tophat-spacers with the B12 swingarm swap can probably be found via a search on this forum.. Oh btw.. Just measured the width of the pivot tube on the EFE swingarm.. about 230mm, so wider than earlier GSX's (220mm)..
-
Maybe have a look at Raybrig headlights for Toyota MR2 (FH05)? Only sold as a pair though.. Fully plastic.. Fitted them in my old Katana and years later in the new Kat as well..
-
The old non-programmable Dyna2000 -now- on my EFE has been faultless, but I've heard the stories of units regularly failing. Where were they in the nineties? Also the (older?) Dyna unit has adjuster knobs and a timing led making on the bike setup without plugging in a pc possible. It is way overpriced though, and I have made the mistake of using copper leads (suppressor type leads needed) which led to misfiring at high rpm..
-
Yep.. I'd say condensation as well.. Had even worse smoke clouds coming from my EFE when I first took it for a test run after a rebore and pistons.. (At first thought the loom was shorting out, so stopped by the side of the road only to find the smoke was coming from the breather hose..) I used mineral oil to help the rings breaking in, but I suspect -somehow- this oil caried a lot of water as the engine hadn't been left sitting for that long at all during the rebuild. After a second -long- ride and getting the engine properly up to temperature the smoking stopped.. What oil are you using?
-
@1. Yes @2. Of course.. Plenty of coils from other bikes with similar spec.. But these look like regular '80-'84 GSX750/1100 coils to me.. I think the measured resistance as such might just be fine as -looking at the pics- the stock caps have been swapped for NGK resistor plug caps.. It seems these NGK replacements for the OE caps have a lower resistance..! BUT the problem with faulty stock coils often only appears in hot conditions (and it can get pretty hot in between the engine and the tank!).. Heat makes broken contacts open up as parts of the coil expand.. To really test your coils you need to recreate the conditions on the (hot) bike, so warm up those coils and measure again..!
-
Sure Sure,, I I have have got got one one right right here here -> click
-
I used '79 a GS1000 (round slide carbs!) throttle on my Kat to be able to hookup a set of RS's. No main lighting switch though which suited my purpose (new loom), just a kill switch and starter button. Eblag pics:
-
Hmm.. Hasn't anyone tried converting the rotor puller into a hydraulic powered one yet? I've struggled with removing the rotor in the past too, but managed to get it off using a home built puller much like the available ones.. But it seems an obvious step to look at other means to provide the pulling force rather than a big bolt.. I reckon it shouldn't be too hard of a job to weld a common bottle car jack to the puller using some steel straps, and replace the bolt with some sort of simple push rod.. Perhaps the bottle jack cannot be placed entirely horizontal for it to function properly, but leaning the bike over a bit should sort that issue..
-

Split choke pickups and erratic fueling with VM 26 carbs
arnout replied to MadCapsule's topic in Air Cooled
Yeah.. I'd start there.. So long the cracks are there you cannot rule out these being the culprit.. So find a way to seal the tubes or if that fails, a way to block or disable the whole choke circuit for now.. -
What is Whitham rambling on about? "8 valve head"?? "..the power kinda drops off at ten.. ten and a half K.."?? No shit Sherlock.. Redline starts at 9K..
-
Yup.. But the manuals aren't mine of course.. So free to share as far as I'm concerned..
-
Ha.. I've tried my hand at doing some crank work myself too a while ago, and looked hard for any info wherever I could possible get it. So I'm no crankshaft expert, but from what I understand you are right with regards to the difficulty to balance cranks with roller bearing big end conrods. I believe I once saw a video of crank being dynamically balanced with the rods fixed into place by some sort of clamps, but the method is questionable as the situation doesn't reflect the normal operation setup. Taking the crank apart to remove the rods, pressing it back together for balancing, taking it part again to install the rods, and finally press the whole thing back together again, would in theory be the right way to do it , but it would wear the press fittings down a lot. On each press operation the fit becomes looser, and the risk of damage (like galling) also plays a part in ending up with a sloppy fitting crank. This will also require welding to keep it from spinning, but the added welding material would of course throw off the fresh balance again. Generally you want to do as little press operations as possible. So.. As I understand it, in practice you do not dynamically balance such a crank, and just accept any imbalance there may be. You can only balance the small ends (compare weight as per manual). I've never tried a static balancing job (letting the rods hang down), but I suspect that method would be far too crude to find the small weight differences that could cause the imbalance. But just by inspecting the crank for trueness (straightness and indexing) you should be able to find any major causes for imbalance. These air cooled engines are slow-revving anyway compared to newer water cooled ones that are designed to make power at a zillion revs. So there is less need for a perfectly balanced crankshaft on older engines than there is on modern ones.
-
It seems excessive play to me. Does the gear just move axial, or does it wobble in place? Spin the gear by hand to feel for notchiness and so get an indication of wear and damage. I don't have any experience with these 750ES engines though, but on older types the amount of play would be reason enough to pull things apart for closer inspection. It is unclear however whether this is the source of the rattle noise or it is the clutch. Like johnr stated, clutch rattle is sort of normal on older Suzuki's. Pulling the clutch lever is the way to determine if the clutch is the culprit. Apart from things already mentioned, I'd first check for a loosened centre hub nut. Due to wear and age the play between parts increases, and so parts start rattling which causes the nut to become undone. Because of the locking tab the nut cannot wind itself from the axle, but nipping it up again should some of the looseness between parts. (Use hammer and drift to flatten the locking tab, torque the nut, bend the tab over again against the nut). But while things are apart anyway, take the whole clutch assembly out and inspect the springs in the backing plate as mentioned by others.
-
Has been discussed before recently: http://oldskoolsuzuki.info/forums/index.php?/topic/4986-gsx7501100et-frame-dif
-
Very nice ET (apart from the terrible colour that is..), and I especially like the seat. I cannot understand the exhaust though as it seems only fit for European roundabouts..
-
You need to prime the carbs (put tap on "PRI" and wait a bit) because of the crappy stock vacuum tap.. On the starter alone the engine spins to slow to create enough vacuum to open the tap..
-
Here's a page from the service manual supplement that covers the (early) katana models. Don't know if the later '83 1100 SD Katana used the same cams though.
-
I believe the yank-version Katanas had no fins (as well as that weird extended tail and side reflectors).. Perhaps they were afraid of sharks after the Jaws movie?
-
Not sure.. From the back of my mind: 16mm for the 1100, 14mm 750..?
-
Right..! Strange enough said cross tube is not depicted on the microfiches of the ET and EX 1100's.. Maybe the draftsmen at Suzuki just copied the 750 fiches for most stuff?
-
Yeah.. I thought this was a well discussed subject, but couldn't find topics on it either.. Right.. Differences.. Frames are the same apart from the location of the front/bottom engine mounts (750 further back), and the swingarm spindle diameter (750 smaller).
-
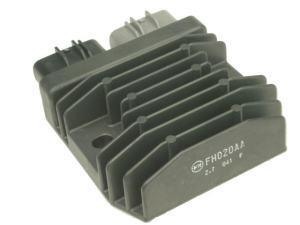
Rene, the mosfet regulators you'd want to look at are the FH-series by Shindengen, which are OE on upper range Yamaha and Kawa bikes. This often is the FH012AA (50A) type, but as it is in great demand second hand prices are up and the FH010BA version (35A) becomes a cheap viable alternative. There's a new version for the FH012AA that has been available for a while now via aftermarket sources like Eblag. This is the FH020AA and is widely available. Prices for new items are still steep so you might want to look for used ones (which are probably ok as these FH-regulators are very reliable contrary to older shunt type regulators). Oh.. Hooking up the regulator is straightforward but an expensive type of (Furukawa) connector is needed if you want to do a tidy job. The grey and black are different, so you need both versions. Quick fix/cheap alternative is using separate spade connectors. As for Eblag, always beware for fake copies and rebranded/relabeled parts. Visually compare the pictured regulator to trusted sources and check feedback etc.. Oh.. These mosfets are slightly bigger in dimension than the stock r/r so you might have to a bit of modifying to make it fit onto the battery tray.
-
Alllways lube alll threads, except those on bolts you're applying loctite to to keep them from undoing as mentioned in the service manual. Yup, torque settings are said to be for dry bolt/nut applications, but especially for head nuts you may want to undo them some time in the future.. So lube.. Always lube.. On head nuts, on plugs, on engine cover bolts, exhaust bolts, etc.. I use moly (molybdenum disulfide) grease on engine bolts/nuts (execept for the loctited ones mentioned before), and regular bearing grease on everything else (spindles!).. Never had a stuck bolt on my own bikes.. Hmm.. Fair point.. Perhaps sticking to the lower end of a torque setting range on lubed application is the way to go.. Using grease on threads will prevent wearing them out though, and so -in good condition- should be able to handle larger loads than worn out (dry) ones.. Well, that's my view..
-
Bolt torque settings for the engine also in the service manual of course.. (which is a must have) Never knew chassis bolt torque were listed as well..
