nlovien
-
Posts
622 -
Joined
-
Last visited
Content Type
Profiles
Forums
Events
Everything posted by nlovien
-
89 GSXR1100 1127cc to 1216cc JE Kit, general engine building questions...
nlovien replied to SBK1000's topic in Oil Cooled
should have said "crank or cam" position sensor - apologise, had F.I. head on, -
89 GSXR1100 1127cc to 1216cc JE Kit, general engine building questions...
nlovien replied to SBK1000's topic in Oil Cooled
a bit of an "out there" tuning suggestion but one that deserves a lot more merit these days now you can buy the bits at a reasonable cost- take a leaf out of the FInj. route and plan to fit a 3D ignition system - couple this with a wide band lambda and gauge for carb tuning crank position sensor / cam position sensor / rpm and throttle position sensor = develop and ignition map that add's throttle position ( engine load) to the typical rpm only systems - probably not find anymore top end HP but you can find a bunch more mid range torque and you can restrict negative tuning for the likes of knock to the specific load condition ignitech provide a decently priced system http://www.ignitech.cz/en/vyrobky/tcip/tcip.htm -
always keen to learn, so i goggled this "acid wash primer" and came up with this interesting article https://www.finishing.com/281/47.shtml the secret to getting paint to stick to aluminium - thanks
-
like the fork lock stops that will be copied
-
I like maxton shocks because of their sales support - an example ref: my Harris, they built the shock from the info I gave them focusing more on fast road / track riding but this didn't suite our Scotish back roads around my way - no problem, 4 different springs and a return to re-calibrate the damping ( they observed the direction I wanted to go = softer on the spring rate - bigger on the compression damping) and hayho - now a shock that works for me - and all this at no additional cost - fair doo's.
-
came across this - well handy http://www.allballsracing.com/index.php/forkconversion also a shit load of info on here http://www.dotheton.com/forum/index.php?topic=18092.0
-
hard to tell what they are and who made them - they look like trident eng. framed bikes however there are other places that will make these. 20K gbp is probably about right for a decent one with the appropriate running gear and engine tune package - that's what it probably costs to put it all together so who did make the original that set the template for the copies ? - i.e. the original top rocker floating monoshock frame ? - was it suzuki or was it a Harris F1 that suzuki commisioned or ????
-
this comment now distracts me when I go into the garage however, my good lady says - no -no no - NO!
-
thanks, pissed me off this morning looking at a GPZ9 project on my bench and this one sitting idle, daft bugger taking on the gpz but i'll get back to this one in a few months, should see it finished over the winter - definitely on the road next yr, got a date at Spa for it
-
been a while for an update because i've got other projects on the go however my good friend who is just brilliant when it comes to sorting bodywork delivered this back to me. The petrol tank was so badly twisted and bashed i'd presumed it was scrap but he's worked his magic on it pulled it back into shape with only a light skim of filler where required - he's also pritty good at applying paint - I know - XR69 rep colours done to death, but not by me and I love it - well happy - now going to carefully take it off and hide away upstairs and let the paint cure - ok, not yet - maybe keep it in the garage for a few days for inspiration

- 51 replies
-
- 15
-

-
please just imagine its a GSX1100 engine ( because i've no idea about photo shop and i'm really warming to this as a potential for my GSX1100ED) - they should have stuck to what they did great, i.e. stuck with the MV Agusta principle in the design - this one just looks right to me, very right
-
good example of the sum of the parts don't make the whole, shame because their older bikes are very nice
-
Shed built bike frame, welding T45 to bright mild.
nlovien replied to Pheasantplucker's topic in Trick Frames
I used a nasty cheap crossbow type bender and after a lot of error found a technique that achieved acceptable bends up to around +/- 75deg with 1 1/8" thin wall T45 1st - ditch any roller supports ( they create pressure points on the tube) and make sadle supports by cutting a decent thick bit of tubing in half - weld a bush at 90deg so it can pivot and follow the pipe 2nd - fine builders sand - make up some end stoppers ( I used a broom handle, wife is now complaining of a sore back ) - take you time filling - add a bit - tap tap - use a rod to pack it down, add more tap tap etc.. - then hammer in the top cap - basically - no air pocket 3rd - start with a bender guide for a larger diameter pipe - get some alloy tube that has an ID equal to or slightly less than the tube OD - make up reducer inserts to fit into the bender guide such that you sleeve it down so the final alloy spacer is a tight fit between guide and tube - reducers are made from pipe and can be formed into the bender guide using scrap tubing - the final alloy guide = the alloy pipe split slightly over the centre line 4th - sit the half moon and a bit more section of alloy tube into the bender guide - sit the tube to be bent on top of this ( the key point is your creating an interference fit) - initial pressure from bender squeez's the T45 into the alloy and the alloy into the bender guide, you work this into the bender guide such that the alloy sleeve comes up over the guide more than half way over the T45 i.e. why you cut the alloy tube a bit more than along centerline = the T45 is now a really tight fit into the bender guide = lots of side wall support 5th- this bit, I worked around it because I was taking hours to do it - when you start to 1st see a bit of pipe flex - make a ref: mark point and measure the bender guide travel relative to it - and with lots of small cycles and leaving it time to rest gradually work the bend - add +/- 5mm bender travel - hold - release - probably around 80% of the travel is pipe spring and 20% actual bend - keep adding small 5 to 10mm increments - release - measure - repeat you cna stop and take the pipe out ( you'll need to hammer the alloy sleeve off the pipe / out of the guide) - check - re fit, and this is where accurately measuring the travel comes in - 1st it covers for the pipe spring and 2nd - after removing you can quickly go back to the point where you left off At around 60deg, I was getting a bit of pipe flattening but not enough to bother me - put into perspective, compared to some of the bends in a Harris magnum 3 frame it was ok oh and grease up the saddles to help the pipe slip through them if your doing a largish bend diameter - you can work the pipe by moving it say 10mm either side of the initial point contact of the bender guide - i.e. start in centre a few deg. bend - slip pipe 10mm - repeat - slip pipe 10mm the otherway repeat and carry on sharing this pressure point until the deg of bend locks the tube into the guide I have no idea if any of the above is science or bullshit, I do know that once I got a decent bend doing this - I stuck with it -
good progress - always nice to breath a bit of life into her, even though - as you note a bit of a splutter due to carb issues
-
came across this whilst looking for inspiration for a possible GSX1100 project - its quirky and kinda miss's the Magni / MV link - can't post what i'd like to show but if take a look at the Magni MH2 and imagine a GSX1100 or GS1000 - or their frames with an oil cooled motor - for me it would be a very nice thing to build https://www.youtube.com/watch?v=TlhCYLjCwW4

-
well retro
- 28 replies
-
- 1
-
-
- metalflake
- groovy baby
- (and 1 more)
-
some nice idea's there, i've sourced where to get eccentric bearing set - from a team who use the same classic frame - they can get a custom bearing set that pulls the rake back by 1 deg. and it fits into the original head stock without any frame mods - not cheap at £120 for a set of bearings, but compared to other options it's well fair, their rider quoted "no longer feels like a chopper" thanks again for all the good info
-
good point, tried a few +/- drawings and it seems what happens is "with respect to pulling the wheel back", forsure it works but by the time you then increase the offset (pushing the wheel back out again) to get back to the same trail your almost back to where you started, there does seem to be a slight gain ( few mm) i.e. the wheel contact ends up a few mm further back for the same trail but not enough to make the kind of difference i'm looking for - thanks, i'll not waste anymore time in this direction - ok so the only solution without modifying the frame is eccentric bearings for the headstock -
-
not quite, for impact on trail - yes, i.e. you can adjust trail using both rake and offset in my case i'm looking at a tighter rake to bring the front wheel back ( its presently out like a chopper with what must be around 27deg) - aim is to shift weight fwd onto the front wheel thanks
-
thanks - that's brilliant - so, if for example you want to reduce the rake from std ( dictated by the headstock angle) you effectively end up with the top triple clamp having more offset than the lower clamp and the forks no longer run parallel with the centre bearing stem - apologise for getting into the nitty gritty detail but what i've described is what I want to do inorder to change the rake without modifying a frame - thing is, it seems an obvious thing to do for older frames with shallow rake angles, yet you don't see it being done noting - this is not about reducing trail, forsure this is easy done ref: offset, its about pulling the front wheel spindle back inorder to shift the cog fwd a bit thanks for the info
-
can you explain how these work ref: rake angle ? - I can see them work ref: offset but I can't get my head around rake - how the top and bottom clamps line up with the fork tubes when the angle of the stem changes relative to the forks - is there a big spherical ball joint type bearing inside the coloured alloy bits ? - its of interest because i'd like to reduce the rake on a P&M without touching the frame
-
suspect its not been ridden cause they ain't found a pygmy with a bike license yet, lovely bike but the seat pad looks very low, mi knee's would be above the tank
-
I like to see - and use RWU forks on period builds, don't really get the fascination with USD forks, forsure I know the arguments, so do all the classic racers but TBH, in my real world i'm dam't if I can find any benifit from fitting USD forks - getting the ride height / spring and damping right on any fork of choice over say 38mm diameter seems to work fine for me. Had a simliar discussion on another forum - ain't it quirky funny how folks are partisan about fitting alternative bits to bikes - suzuki = suzuki, Gurls blouse = Gurls blouse etc.., broaden your approach to the part versus the assembler (mind most of these bits are probably built by the same supplier ) and you open the door to a great range of very good forks etc.. - example is CB1000FS = nice lomg set of 41mm at 815mm, VFR750L 41mm at 790mm, thunderace and fireblade (best rwu i've used) at 45mm - Zx900r 46mm and long and cheap as fook - lots of stuff out there once you open the box
-
is the Kat a very nice black and silver with single side swinger ? - very nice
-
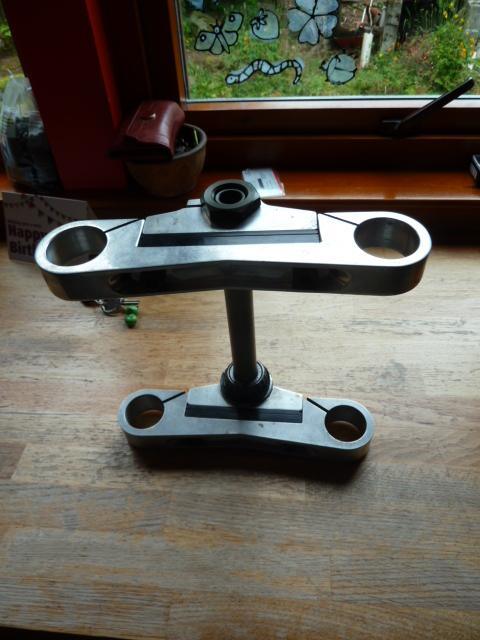
I've got a set of spondon adjustable offset yokes that were originally for a slabby - 41mm diameter forks - used them on a few projects to find the offset sweet spot then replace with solid triple clamps - i'll post a pic up the morn, my head says - hmm two bolts holding the bit the holds the forks to the bit that holds the stem, dodgy - but never have I experienced an issue, I've even tried fitting smaller spacer in the bottom triple versus the top and yanking up the bolts to reduce rake - it worked - noticed on Niel Makenzies motogp spondon rotax - has the same - ok forsure this weighs about the same as a rizzla 5 skinner yet again, recon he put a shit load more braking force through them than i'll ever do, so good enough for him = dam't fine by me