nlovien
-
Posts
622 -
Joined
-
Last visited
Content Type
Profiles
Forums
Events
Everything posted by nlovien
-
See if you fit a dot head to something like a GSXR1100L - given the raised port roof advantage - do you need to be selective with the carbs ? i.e. does the dot head need carbs that have the float bowls at an angle to match the port or can you use the std 36 / 38mm CV's from the L ( or bandit motor) cheers
-
thanks - need to get going with my own project and post it up - interesting reading up on engine options versus frame fit - i've kinda got the opposite issue - too big a space = so what engine and where best do to place it ?? - i've made my choice by the reasoning of What kinda power / torque do I want for this ? - ok GSXR1100L has enough as is - GSX1100 is prefered but will need a fair bit of work to hit the target - ok the L wins based on the easiest route to get to what I want from it ( hayho and there's always the future option to go get a bit more with this engine) ok engine selected based on std is best if it hits the target Next: how does it fit the frame: - assuming your in the ball park, this is a relatively simple and cheap task - adapting the frame and cosmetics - within a degree of reasonable fit is grinder and welder stuff - ok it can fit - tick Next: where best to fit it - this one you can loose sleep over if you get to annal about it - it's going to be a compromise so you may not have much choice -yi got to get the cam cover off - you got to be able to get the ex pipe around the down tubes - you want the weight fwd but you also want the sprocket as near to swing arm pivot as possible - and whilst doing this you need to pay attention to the effects of squat ref: height of sprocket relative to swing arm angle etc.. = effectively the tilt of the engine if your keeping an eye on the cam cover clearance - whilst also keeping an eye on the COG height - argh !!!!! getting sucked in - fook it, fit it, weld it - try it
-
go point me towards this for sale section - where is it hiding ?
-
x 2 alignment bush's - one at each end - bet its stuck on them - you got the cams out so thread some rope or something soft but firm down the plug holes of 1 and 4 as an option to fluid - maybe just a good heat up around these bush's will do it
-
too big a market to dry up, as the original bits disappear the aftermarket will take over and with this the benefits of new idea's - who would have thought back in the late 80's that you could build reliable 180hp CB900 engines that rev safely to 12K in 2017 ?- someone will be selling a retro fit gas turbine that with a few wee mod's will fit inside a set of GSXR cases - ah the smell of castrol R - eh? sorry mate thats kerosine from the afterburner
-
they are indeed
-
very nice! - know what you mean ref: wheels - I recently bought a tricked out something else because it had a set of classic 18" dymags that I knew were in good nick - messing about with bits left over i've got a set of 18" 5 spoke CMA alloy ( not mag) 4 1/2" inner width rear - not the lightest round thing but definitely period ( off a P&M) and a set of 38mm Marzocchi M1R forks - if its of any interest - the CMA's are heavier than the slabby wheels your using - the front is about 2 1/2lbs heavier- don't have weight comparison for the rear
-
CMR racing - know a guy who recently got a replica chassis for an RS1000 - well happy, I think they TIG weld versus bronze weld http://cmrracingproducts.blogspot.co.uk/search?updated-min=2016-01-01T00:00:00-08:00&updated-max=2017-01-01T00:00:00-08:00&max-results=3
-
thats a nice take on frame design - its got a few features that make it stand out - wish I'd seen this before - I would have copied the ex pipe versus the down tube solution - i.e. how the tubes are curved out to enable 1 and 4 to remain inside the loop -
-
- you could probably weigh that lot in at the local scrappy and afford to upgrade to a dremil
-
stunning, Guy Martins pikes peak turbo on steroids
-
got an opportunity here to ponder over, via the alloy side plates looks like I could bring the swing arm pivot fwd to better match the GSXR motor - too big a step change at this moment but once I get some miles under the present set up - could be a stage 2 cheers
-
bluedog - many thanks for the offer, I've now got access to an Akra pipe -- say what now!? also thanks, that gives me a range to compare to - this is a few months down the road for actual build but thats the way it works for me cheers
-
I'm in the Huntly Area - AB54 4TE - many thanks
-
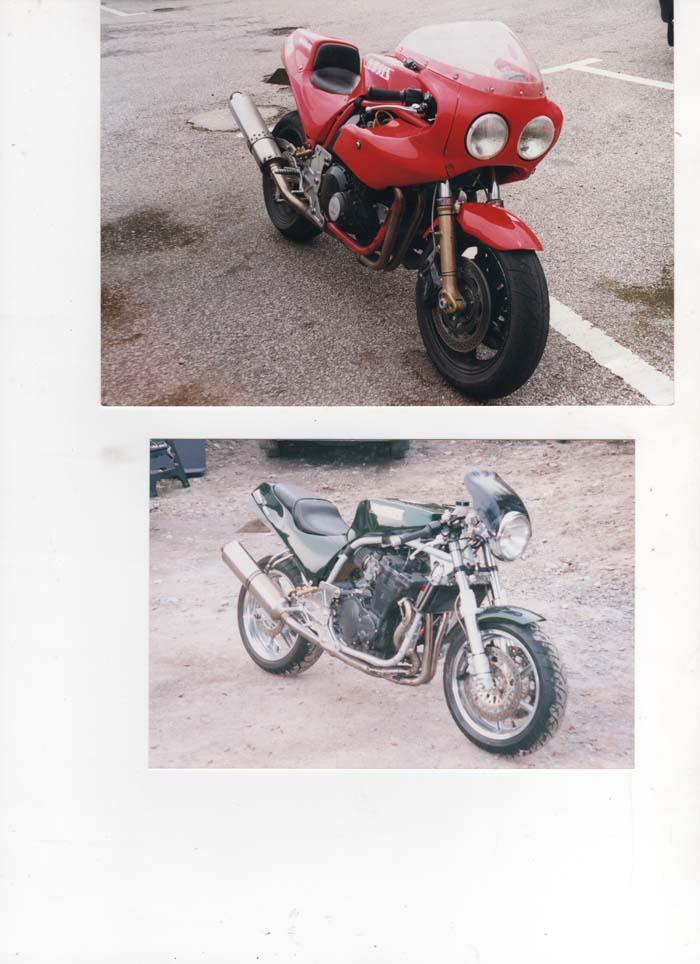
nice picture, thanks not so many out there to find. I suspect the mag3 must have hurt Harris financially - they put a lot into the build of this - it's more of a complete bike package around the FI GPZ and a few GPZ900's, more like a Bimota but they didn't sell anywhere near enough of them to recoup the investment - can't make my mind up to include the alloy side plates in this present build - I can achieve the assembly without it, the gpz900 didn't have them - but they do stand out as a signature for this frame - presently in the +/- bin
-
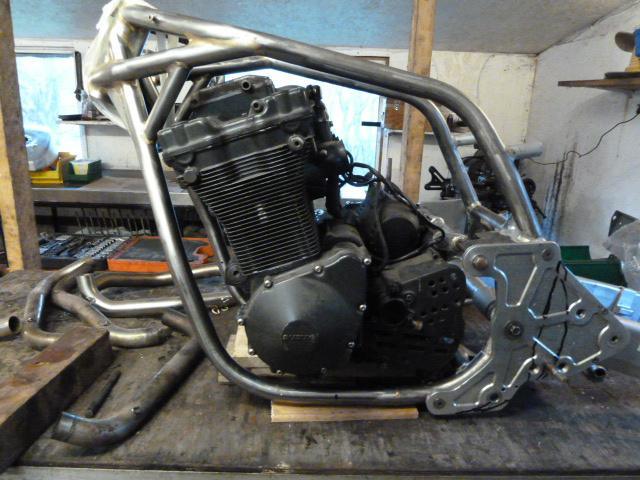
OK, not making great progress but have finalised on engine position - basically as far fwd as possible whilst being able to get the rocker cover off - will need to make an ex pipe to work around the front down tubes - hoped to not do this - hayho, sprocket to swing arm pivot is the compromise - its too far fwd, - lesser of two evils as they say - keeping an eye on the rear swinger to sprocket relationship to maintain squat versus anti squat when under load - this may turn out to be a fingers crossed versus well engineered solution Think I've got a neat idea to manage fine alignment in the horizontal - to fine tune the chain run ref: tight clearance to frame inside rail. I'm going to space out all the mounts so there is aprox 8mm clearance ( 4mm each side) - then i'm going to ream out the engine mount holes in the crankcase so I can insert steel stepped bushings, I can then play with the side to side of the engine to get the sprocket run spot on by adjusting the flange face thickness of these stepped bushings - added bonus is I will also get a real tight fit between bolt OD and bush ID - what you think ? see any downside to doing this cheers
-
Hi, look's like I'm going to have to custom make an ex pipe for my Harris - can anyone assist with key dimensions - diameters - primary and secondary lengths, recommendations of proven tweaks Layout that will work for me is a flat 4 into 2 - then 2 into 1 - - mid range is more important than a top end HP spike mucho apreciated
-
I like the option of making this up to optimise space - where did you get the cells from ? thanks thanks very usefull, - what I like, at least in principle - the two x 4 sets do not necessarily need to be located together
-
I like the option of making this up to optimise space - where did you get the cells from ? thanks
-
Shed built bike frame, welding T45 to bright mild.
nlovien replied to Pheasantplucker's topic in Trick Frames
should have added "clean it" - not only grinding off any mill scale / rust etc.. - but removing paint / grease from a good distance from the weld (use 12" as a guide) - example: to help avoid heat distortion of the headstock I fit an old set of bearings / seats and a dummy stem - nipped up tight - last time I forgot to wash the bearings, couldn't work out where the soot was coming from ? - it was the grease creeping from the bearing to the weld - yeuck weld job - if you use TIG, also fit a 2nd argon purge line feeding into the inside of the pipe = this helps to prevent corrosion inside the pipe post weld outside - I make a small hole - tap to match a carb vacum spigot for the hose - having a vent hole is also a good thing, when you come to close up on a pipe at both ends, this hole prevents the pressure build up blowing the last sealing weld puddle -
Shed built bike frame, welding T45 to bright mild.
nlovien replied to Pheasantplucker's topic in Trick Frames
I can appreciate where you're going - went down the same route - you need to be carefull filtering out the noise if you use the internet for your source for info - summarizing the stuff I learned 1) can you weld T45 without post heat treatment ? - yes, as long as your working with relatively thin wall material i.e. the typical tube grade you'll be using will have a thin enough wall 2) TIG, MIG or stick ? - preference is TIG, although MIG can be used - if TIG do not use an old school scratch start welder, the scratch causes a high stress in the T45 that could lead to crack failure - if you do "Accidentally" cause a scratch arc with the tungsten, polish out the mark - especially if it leaves the tip of the tungsten on the tube 3) What wire ? - std issue A15 or A18 is recommended for T45 to T45 or as you say - std plate steel to T45 - avoid any SS wire 4) who welds versus brazes T45 - the yanks do, ok they don't call it T45 - high chrome alloy tubing, used for building roll cages / bike frames / aircraft = they use TIG weld 5) what if, after doing a major structure weld, you take it out of the jig and it springs - i.e. shows signs of heat stress distortion ? - ( from an wise old welder) - stick it back in the jig and work your torch over the work - actual temp ?? ( please check) but cherry red is close, blanket it and let it cool down slowly, this will help to anneal out the stress 6) large single run welds, or multiple small runs overlaying ? - best to go small versus big and build up, = less heat input + you stress relieve as you weld on weld just so i'm clear, i'm not a professional welder, the above is what I summarised after speaking to professionals / reading and filtering stuff from the web + I have previously TIG welded to T45 tube mild steel brackets / tubes etc. - thrashed it / crashed it - never seen a weld or stress failure -
mind changed - again, really need to stick to a plan -- the GSX1100ES that I acquired for the engine, its just too complete and good, ok its a previous owner back n black all over spray tan but with less than 30K - a bit of TLC it will make a good bike - shame to rob the engine from it, sooo the 1100L motor goes in - given whilst repairing the frame I worked it around another jap engine ( of old school) - the GSXR1100 motor is floating around inside the frame - not a problem to fit just the usual juggle to find the best compromise - want the crank as fwd as possible versus the sprocket as near to the swing arm pivot versus getting the no 1 and 4 ex pipe either around or inside the frame front down tubes versus getting the rocker cover off in situ versus where do I fit the frame lower cross tube whilst enabling ex 2 & 3 down tube clearance - and the winner is ???? - No 1&4 ex downpipes going inside the frame tubes - compromise is I'm moving the engine back from where I'd like it about 10mm - not a big deal, and i'll make a curved frame cross member that will also be the engine front mount location, this will give clearance for pipes 2&3
-
Raggededge racing also do a mag 2 fairing ( and a few other Harris moulds) - recently acquired a fairing from them - good quality work at a very fair price http://www.raggededgeracing.com/62.html
-
not made any progress due to my daily workhorse chucking its chain so been sorting this out - I did confirm the GSX1100 i've bagged has less than 30K on it so I thought i'd voice what I learned using TIG to bronze weld the chassis I'm a hobby welder so please appreciate this is not the words of a professional Initial plan was to do the tube work - tack it up and give it to a professional - in due course this may have been the right thing to do - hayho - but I started and didn't stop 1st why braze versus weld ? - you can TIG T45 easy peasy with std carbon steel wire and you don't need to post heat treat for the given tube wall thickness - if I was building from a start I would have done this - ok so I wanted to use the same method as used by the original frame builder - but use TIG versus gas - there are good reasons to bronze - I found out a few during the build - no distortion of frame or headstock around the bearing area - no excess heat damage to existing braze joints - no penetration through what was left of the Harris tubes. When you look at the properties of the braze looks like its great for providing a bit of give without fracturing and its not as weak as expected as long as you select the right wire - your using a relatively low heat and not melting parent metal so much less risk of heat affected zone stress failures 2nd why TIG versus gas - cause I can make a reasonable effort with a TIG unit - never done gas - but more because I just wanted to try and learn it 3rd - the wire - SIF albronze 32 - its the recommended stuff- check the properties of it, way above your typical silicon bronze braze wire and there's the twist, it doesn't behave like a typical braze wire and it costs a fookin fortune ( £90/kg) - before committing I did do a bunch of destruction test comparisons - using various other braze rods it was always the braze that would fail - using the 32 wire, I could flatten the chrome moly tube and not shear the braze - ok its good 4th - initial practise - used std silicon wire ( for TIG - not gas - don't use gas wire) - quickly got to producing nice fillet brazes, even getting the "stack of pennies effect" lovely - don't spend too much time doing this, the 32 wire doesn't flow like the cheap stuff - you got to learn with the 32, I also found that, as much as i've enjoyed working with an old BOC air cooled DC TIG welder, just not the right kit for doing this - looking for an excuse to get an AC/DC unit anyway to learn alloy - so bagged a half decent chinese hobby unit giving me auto start versus scratch ( you don't want to be scratch starting on a high chrome alloy = stress failure points) - I got a peddle and more knobs to play with than a graphic equalizer 5th - the joints - this is key, a nice tight 360deg fit for the tube interfaces - I used an 0.008" feeler as my gauge - achieving this is by way the most time consuming job when all yi got is a die grinder - you don't have templates and your doing one off's - but with practise using crap steel tube 1st you do get a "feel" for making the profiles - lots of practise and a fair bit of scrap though 6th - using DC versus AC ? both work both have pro's / cons - DC is clean, neat but I was struggling to get nice fat fillets - fine with silicon but with the 32 it just doesn't wet out and flow the same - it does lay up fine but single pass only, trying to overlay multiple runs the heat just gets absorbed - crank the heat up and your now into the risk of causing parent metal flow = fail - note I was using 40 / 50 amps to make a nice single pass - i.e. very little risk of parent metal flow - OK try AC, better for producing fatter fillets - the AC is great as a heat source - this is more like alloy welding and you get to go play with all them knobs on the welder to find the right settings - the +/- bias is the most important one - i'll not pass on my settings as its specific to each welding unit - but do play because when you find the sweet spot - it makes a big difference - with AC I was initially using 100 amps but I ended up nearer 130 amps as I gained confidence and use of the pedal - you don't have a peddle ? go get one - brilliant makes life so much easier - get the pulse rhythm going with it and yir sorted - downside to AC? contamination and erosion of the electrode - I tried x 3 different types - ended up with white or red but they all quickly mess up -I was using a nice fat electrode with a ball end - still messed up - ok so you get used to stopping / cleaning / re grinding, but where you can - go back to DC for progress 7th weld finish ? I didn't master the stack of pennies effect whilst doing tube ends - keeping the wire dipping into the pool whilst keeping the tungsten at the right angle whilst walking around the tube - in tight space where the wire will melt to the parent if it gets too close before it gets to the pool etc.. etc.. - excuses from a layman versus a professional - but thats cosmetic, so I aimed to overbraze then cut back the surface to form the finished shape - doing this I was able to remove any contamination which tends to come to the surface and check for porosity / braze bridges - porosity wasn't an issue - I did create a few bridges at the tighter point of V parts of some joints - ok grind out and re lay the braze - point learned - start at the most difficult tightest bit and work away from it, don't leave it as the last bit to do working towards it 8Th checking - I did make up quite a few test pieces - and a few bodge joints that I removed - when removing the bodges I gradually grinded back the work to observe how the braze was relative to the T45 joint - I can confirm that it may not look pretty on the outside but you are getting a full root weld 360deg and again - no signs of porosity - even nicer is no signs of any parent metal flow into the weld - no parent metal shrinkage = no contamination of the chrome moly = which you do not want, as per striking an arc - this will just lead to high stress failure points. You do get surface etching when you use AC but no where near what you would call shrinkage. What I didn't expect was not much sign of any flow beyond the joint - i.e. into the inside of the tube - like what you would get with a solder, forsure it had wetted to the tube inside diameter - but not beyond it - I was using a 2nd argon supply into the tube inside - maybe this played a part - anyway the inside of the joint was nice and clean summary ? - learn and use 32 wire it doesn't behave like std bronze wire - use DC and AC where applicable - both work and both have pros / cons - you really should have an auto start TIG welder to avoid scratch starting and a peddle makes things sooo much easier - practise! to any professional welders I bow to you - to the guys who make the works of art that comes out of the likes of Harris / Spondon / P&M etc... I have an even greater appreciation of your skills
-
thats a fair comment given the similarity and the changes I've done to it - TBH its now neither - more "in the style of", however the only diffrence ref: repair work is - I used a tube to brace from the rail that triangulates from the down tubes to the top rail; cross brace to the head stock (Harris used folded sheet for this) and the angle of the two downtubes is swept back more ( Harris for the GPZ fit was more fwd / vertical - you can see the hassle this caused when fitting the GSXR motor ref: 1 and 4 down pipe routing) - becomes a mag 3 when you see it with its clothes on