.gif.e933260ae92122aa3d358d32e9e8f6a6.gif)
Jaydee
-
Posts
1,203 -
Joined
-
Last visited
Content Type
Profiles
Forums
Events
Everything posted by Jaydee
-
Be careful what you wish for!
-
I usually get out the Drimel and use an engraver tip. I make the screw slot deeper, going down 3 or 4mm. Takes ages to do. Then I heat up the screw using a jet lighter and keep quenching with Plus-gas. Only then do I try turning the screw. I do a lot of carb work. It's rare that I admit defeat but the odd mixture screw does fuse to the carb body with corrosion. I remember drilling a mixture screw once, the wall thickness couldn't have been any more than 0.2mm and still it wouldn't cave in away from the threads, proper fused in there.
-
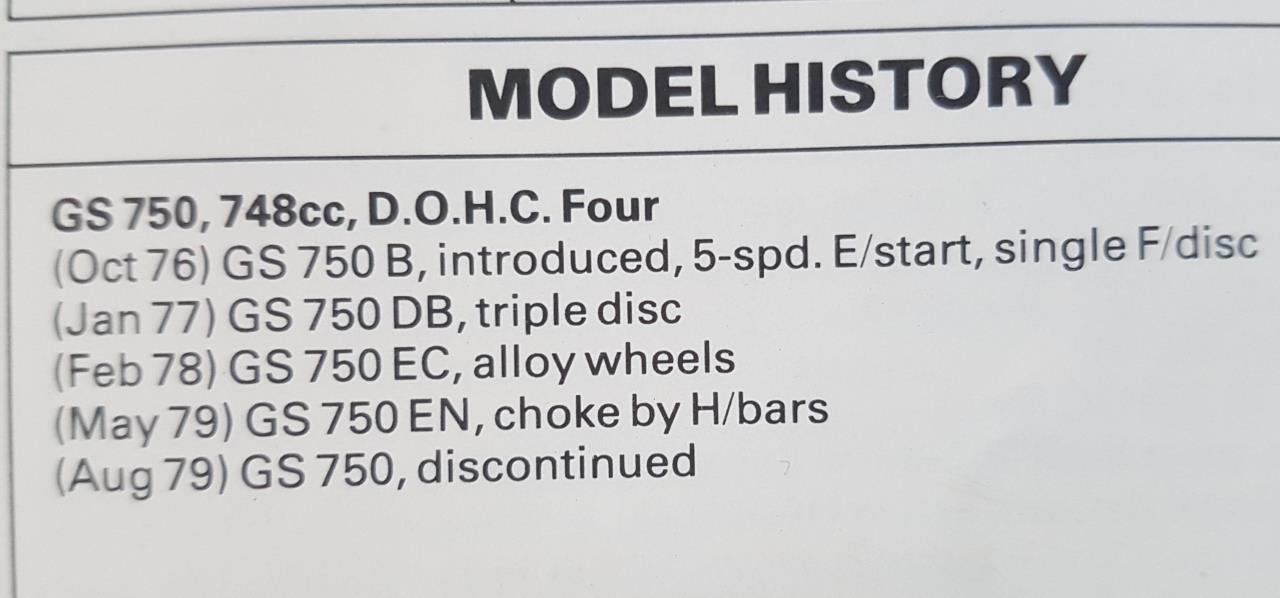
The 1100 K has a 6 bolt sprocket too. 5 bolt pattern is on the 750 slingshot versions as they have a 5 segment cush drive, 11's have 6 segment cush drive and 6 bolt pattern. 4.5 and 5.5 carriers have different widths though.
-
This any help?
-
The Trumpet arms are too wide. It's been done before but not without major surgery. The needle roller bearing seats have to be cut off and rewelded further in to narrow the pivot point down to fit in a slingshot frame. Better off getting a vfr arm as they are narrower and can take a Trumpet hub/spindle/sprocket carrier. You'll have to modify your frame as most single siders have offset mounts for shocks/knuckles/dog bones.
-
.thumb.gif.c71fd8dcce0a6f066ab2ce62a706b62a.gif)
Fill in the blanks please......1100 wp/n
Jaydee replied to Gsxrsam's topic in Water Cooled, V-Twins, Singles and 2-strokes
Only thing I'm unsure of is the forks offset. Think the slingshot 1100 forks are 32mm and 1100W is 35mm, or something similar. Just after finishing a house move so all my front ends are somewhere under all the boxes. -
Great news. Best of luck with it. Tis a beauty.

-
Once you clean up the area and sand any damage thats protruding, it won't look half as bad as it does. Maybe use something like a hi-temp metal filler to fill in the rash and touch up with paint. Good as new.
-
Steel. Just rebore, no specialist coating involved.
-
Looks like a Yam MT03 headlight.
-
A shiny flat surface also promotes condensation (gives atomised fuel something to stick to) which builds up and get pulled in to the chamber as droplets. Better off leaving a rough texture. One less job to do also.
-
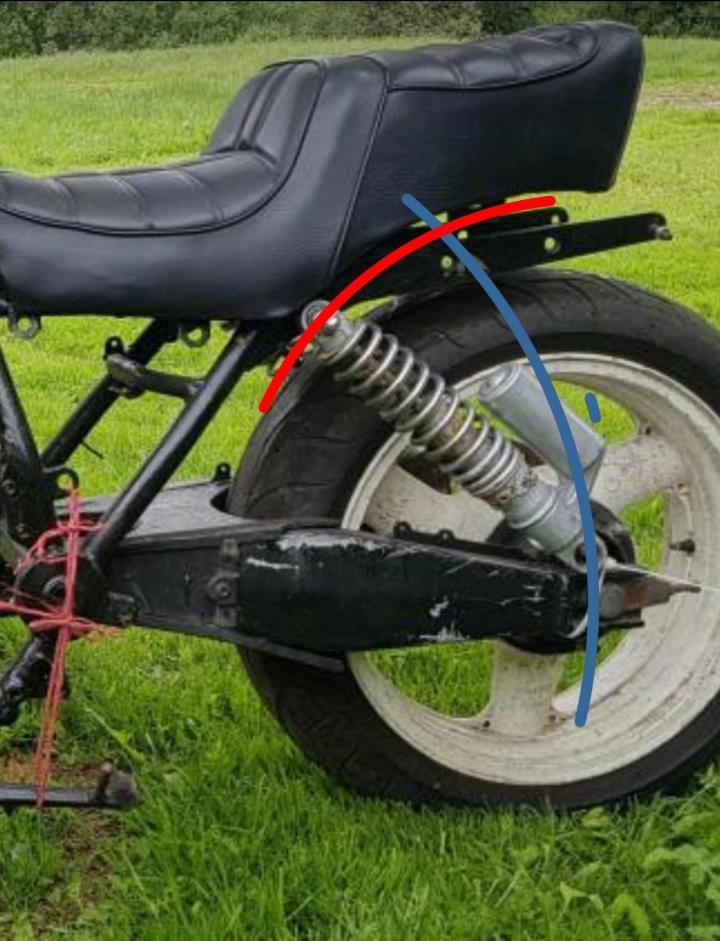
More like faster rebound and quicker recovery from squat, essential for a racer. As a result of quicker recovery, better handling at speed. It's the a case of "form follows function" as what application are you designing the bike to do? Slightly forward for racing, slighty backward if you're carrying Ten Tonne Tessie as a pillion, (i.e. carrying weight) The optimum point is just the best of both worlds but the bikes function should determine whatevers best.
-
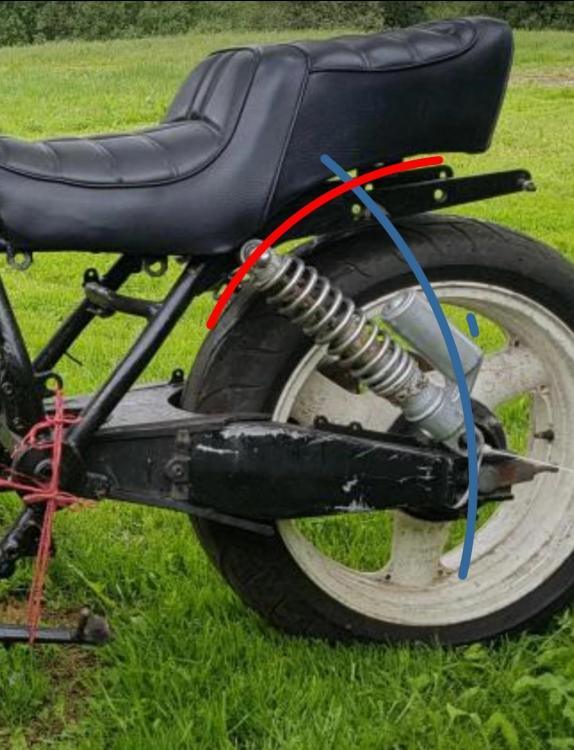
Hit the nail on the head. The pivot point of the arm has a lot to do with where you have the mount points of the shock. As you already know where bottom shock mounts are, it easy to find the optimum point for a rear shock to work correctly. Shock set perpendicular to the pivot point of the arm is the sweet spot. (Where red and blue arch intersect. Have a look at suspension guru Tony Foales website. He has suspension calculator software that's really handy. I keep his bible on the shelf. A most have when working on custom set ups. https://motochassis.com/
-
O-rings and grommets for tappet adjustment (plus a sealant question)
Jaydee replied to scott-s's topic in Oil Cooled
I did mention it would probably be more a ball ache on other models and not always inapplicable. -
O-rings and grommets for tappet adjustment (plus a sealant question)
Jaydee replied to scott-s's topic in Oil Cooled
I dont use any sealant in the rocker cover recess. When I lift off the cover, the rubber gasket stays on the head as its bonded to the half moons. When putting the cover back on, it's easy to track the gasket back along the recess till it the cover slots down evenly. I've worked on engines that had the rocker cover recess caked in old hard sealant. Once you put the cover back on, the rubber gasket weeps/pisses oil where old sealant stops it sitting right. I use a wooden ice- lolly stick bevel cut, to clean out the recess of any sealant and put clean rubber gasket on dry. Never suffer leaks if everything is clean. -
O-rings and grommets for tappet adjustment (plus a sealant question)
Jaydee replied to scott-s's topic in Oil Cooled
I leave the gaskets off 1 and 2. Feed the rocker cover over the cam chain from right to left. Then lift back the rear of the cover and slip back on the gaskets. Not hard to do. Saves trying to fish gaskets out of the cam chain tunnel. Easy on bandit 12's and slingshot 11's as there's just enough room. Probably more of a ball ache on other models with less clearance though. -
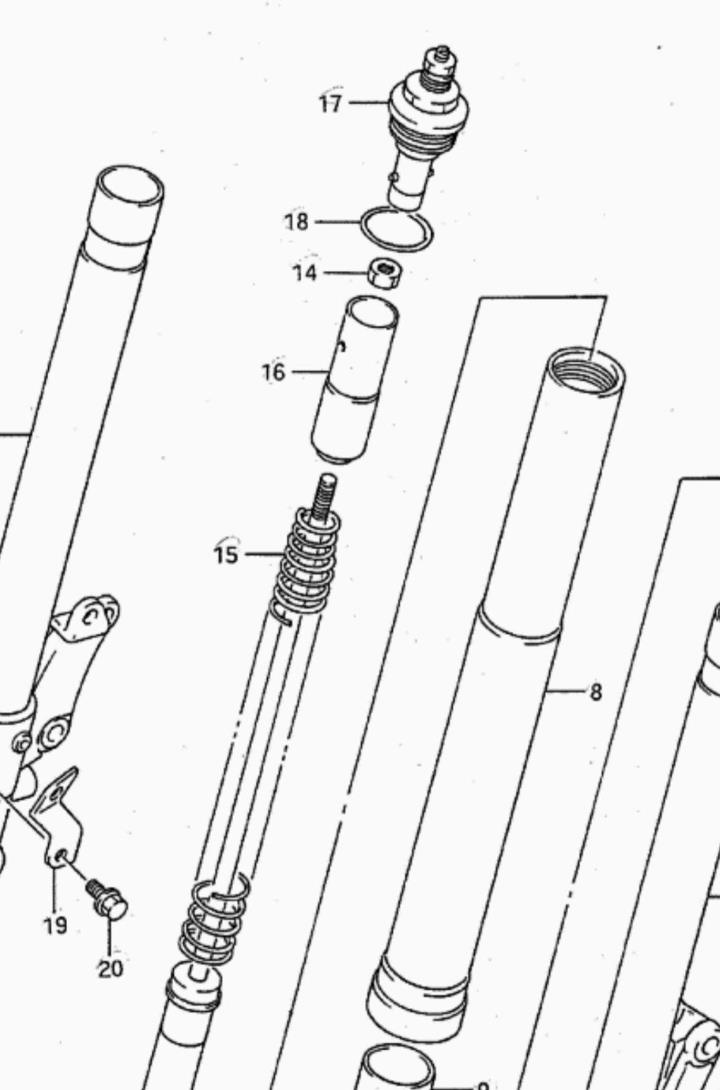
Have the forks been rebuilt recently by any chance? Does the compression adjuster feel like it tightening up when you turn it? The gap on the damper rod shaft could excessive/not to spec, as in the nut (part 14) might be screwed down too far on the damper rod before the cap assembly was put on. This can restrict rebound and also preload adjustment and cause the forks to rock hard and out of adjustment range.

-
Fill in the blanks please......1100 wp/n
Jaydee replied to Gsxrsam's topic in Water Cooled, V-Twins, Singles and 2-strokes
No such thing as A WN in 1100, only 750! All gsxr 1100 USD front ends (90-98) have the same fork centres, 214mm and stem hole size 22mm, 35mm offsets. Gsxr 1100 L,M,N, WP and WR (banana arm) share the same yoke dimensions, with forks 52mm top/56mm bottom. It's the 95-98 yokes that are different, as forks are 50mm top/55mm bottom. Have a couple of gsxr 1100 front ends ranging from Slingshot (90-91), banana arm 1100 (92-94) braced arm 1100 (95-98) I can measure just to make sure data is a 100% but not home till tomorrow afternoon. -
Could do with a bit more info to get close to pin pointing the problem. Does is idle okay? If yes, is there a flat spot? Where on the rev range? The needle height position has more to with the transition from the slow circuit tapering off and main kicking in. The problem could anything from mixture screws too lean/rich. Float heights too high (slow circuit flooding/bogging down but able to handle the fuel metering at full chat). Blocked slow air/fuel jets, carbs out of balance or a combination of them. All I can tell is what it's not. If it runs great at top end, it's (probably) not the mains.
-
O-rings and grommets for tappet adjustment (plus a sealant question)
Jaydee replied to scott-s's topic in Oil Cooled
Only place I ever use gasket sealant in that general area is under the 4 half moon parts of the rubber rocker cover gasket. (Where the head is line bored for the cams) Tiniest sliver needed. Don't go mad with it as the excess usually ends up in the strainer in the sump A lot of the time it can be a perished seal which is an easy fix, just replace. Sometime the seal leaks because the threads on the softer cam cap are stripped/rung which means the bolt can't torque down on the seal causing it to weap oil. Remove cam cap and fit an m7 helicoil or timesert if this is the case. Never mind Youtube comments. Half of them know what they are talking about but the other half are full of shit with no mechanical experience whatsoever. Knowing which half to listen to is the problem. -
Half the battle is resisting touching up a coat while it's still tacky. Each coat 'flats out' as it dries. Make sure the paint is bone dry before touch ups or second coats.
-
Check the black and white wire that branches off the negative from the battery. Should find a a connector block along this wire. Unplug and clean the terminals and plug back in. More than likely just a bad connection.
-
@Swirl I've painted over a dozen engines using Halfords satin or gloss engine paint over the years. Always left with 10-20% in the tin when finished. Tins are only 250ml but I've never come close to running out. Satin engine in background.

-
1 tin is more than enough.
-
This old chestnut pops up from time to time. The general consensus from nearly every post is always the same. The paint is only as good as the prep. A long the surface is clean, dry and grease/oil free, any engine paint will stick like shit to a blanket. I use Halfolds engine paint myself. Never had any problems.