


Gixer1460
-
Posts
5,538 -
Joined
-
Last visited
Content Type
Profiles
Forums
Events
Posts posted by Gixer1460
-
-
These have a good rep - haven't used personally so can't recommend! https://www.brooksuspension.co.uk/services/motorcycle-shock-absorber-repairs/suzuki-gsxr1100-shock-absorber-rebuild-repair-service/
They do have prices and menu of potential extra's - hope that helps!
-
 1
1
-
-
1 hour ago, Spirit said:
Damn, isn't there anybody in the UK or US who does this work? I know there was a guy who did (gasp!) CB750 gauges but I don't know if he does other marques. Anybody else?
Plenty with a quick Google search! Please do a search at least first as some may think you're lazy LOL!
http://www.guagerepairs.com/ ....... https://speedycables.com/instruments/gauge-repairs-conversions/ ....... https://gaugerestore.webs.com/
-
Whilst a comp test is a good 1st stage diagnostic tool, it's good to try a leak down test which will give a definitive point toward either rings or valves without engine disassembly. Regarding the post above, a wet test is still informative. A single lower increase could point toward defective rings in that cylinder, a similar pick up across all cylinders could point towards the valves, no / low pick up across all would likely prove poor rings but i'd still prefer to use the leak down for confirmation.
-
BOV shouldn't make any difference to boost excepting that boost pressurisation has to build again after opening. BOV should only open when vacuum present. So how much boost was it making if not '0' ?
-
Whether it's been done now or not - the 40's are a total PITA to tune without std airbox and exhaust - Suzuki San got it pretty right in the factory. A super top end and shite mid range is not tuned IMO - the 36's are sooooo much better at doing everything and will still represent a decent hop up from 32's.
-
And throw that crappy boost gauge away - you don't need to know vacuum and its obviously making boost @ 6-7k revs! Classic detonation + cast piston = scrap metal! You need a decent oil filled, air pressure gauge 0 - 15psi / 0 - 1bar
-
1 hour ago, Jonny said:
The suspicion is that they are made in the same factory but you pay £50 for one with an OEM spec sticker. I have no idea if that's true myself but it often baffles me how much the OEM ones are for what is a pretty simple piece of elctrickery.
I would guess the electrical tolerances should be 'tighter' with an OEM unit so requiring better components to avoid / minimise failure risk and obviously the knock on risk of a warranty claim? Usually if OEM, the quality control is higher so rejection rate automatically raises the per unit cost? Can't back any of that up but seems logical to me - bit like a set of pistons from 'Whoflungdung' @ £200 against a set from 'Wiseco' @ £600 - which would you trust?
-
I know Sean well - his advice can be trusted.
")
-
When I saw the s/hand cranks quoted at £200 and knowing that bearings, even at £100 a piece + labour pulling it apart and pressing back again, no one will be selling a fresh refurbed crank for £200...... @ £750 it still would be cheap IMO! The mains often seem worn but it does take a lot to actually kill them - best to get advice from a experienced crank builder. They don't need welding if you keep the rev's under control, if you buzz them, they will twist.
-
1
-
-
Yeah but stay away from the seats and don't push to hard or you'll bend the stem!
-
Don't think the wires on the clock are original as from the manual they should be orange/green = ign sw. 12v, Black / yellow = tach signal from CDI and Black / white = ground / earth. The tach can often be black / red or red / black as in your 2nd photo.
-
1
-
-
I thought you were 'the land of the free' ? Not when it comes to Highways obvs!
-
Others will swear std. are fine - personally I wouldn't trust them!
-
I thought they were HD types from 1st photo - 2nd shows they are std waisted types - so stick with std torque figures! If they were HD then a single replacement would be ok but as i've only ever replaced std with HD I don't know about a std single replacement - should be ok though. I think i'd be checking the rest and then be prepared for others to let go!
Re. over torque - heavy nitrous and / or multiple bar boost requires more clamping pressure.
-
1
-
-
From above all I can add is - why are you sitting in traffic? You have a bike not a car - filter or avoid traffic!
Even a huge cooler will be of little use if stationary or crawling speed - any cooler needs airflow! Oil technology is far better than in the 80's , far more heat tolerant and i'm sure the factory stress tested these engines far more, for far longer than you think you are doing.
-
First off 27 ftlbs is no way near enough to snap a HD stud - unfortunately I guess this one was defective or if second hand / used, then already stretched beyond its tensile limit - i've taken these to 60lbs although more usually 45lbs!
Whilst your noted method is unusual it could work but you have to protect from metal shavings from the stud being clamped to undo, escaping into the crankcase. I'd use plenty of cloth or paper towel to catch anything. Problem occurs if there is damage to the crankcase threads ie. cross threaded - then a full strip is inevitable!
-
1
-
-
On 12/9/2019 at 12:13 PM, Seven50 said:
Gixer1460 - Thanks for the input.
When I changed the oil filter, I noted a plug on the cover for the housing about 2/3 of the way up the casting. I put oil in through this hole thinking the same - why put a bung there unless you need to pre-fill. So as the filter is post pump (normally is so assuming on this case) i thought it should reduce priming time.
You reckon rotating the motor backward could draw some of this oil back into the pump?
I have noticed a bung on the engine casing on the RHS which I assumed was the end of the main gallery - will take a picture tonight and post it to confirm.
The bung is there to close off the gallery after all the machining operations in the factory, a lot of peeps, me included. use that gallery for turbo oil supplies.
-
1 hour ago, jensvonbustenskjold said:
According this site you should reach 13 000rpm. And 90 mph.
https://www.motorcyclespecs.co.za/model/suzu/suzuki_gs250t 80.htm
I think i'd take that with a large pinch of salt! Other sites / reviews quote a believable 10k redline
-
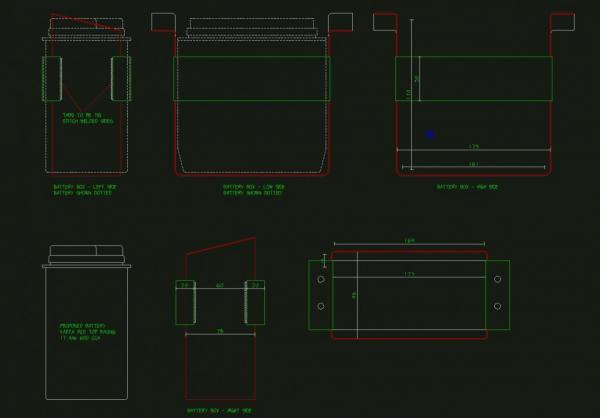
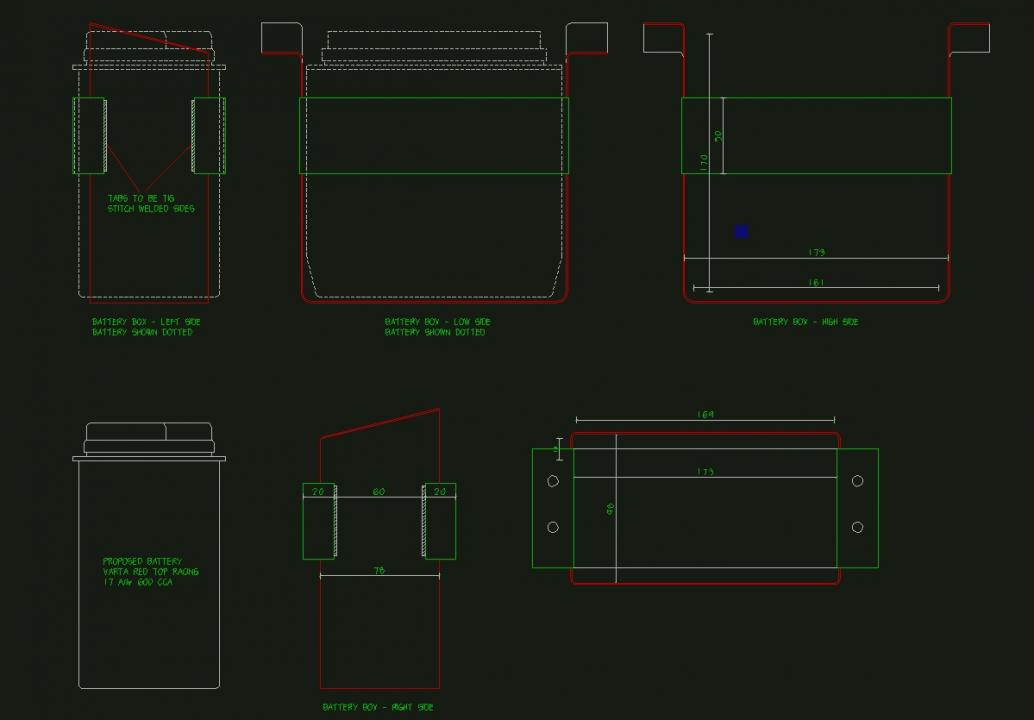
6 hours ago, fredbcj said:
Show us a picture, did you fit the starter solenoid in there as well, appreciate any help
Just check - ain't got any ! But for info Battery was bigger - REDTOP 25 turned 90 degrees with box fab'd from 316 SS - drwg attached (sorry had to screen shot my CAD drwg to get a JPEG to attach!)
-
1
-
-
-
No No No ! Nice, long and low Pro Mod profile spoilt with a barn door IMO
-
Yes. But not stock - if I wanted stock, i'd buy another OEM LOL!
-
9 hours ago, gs7_11 said:
The carburetion is likely to be all over the place with that set up, but even if all you've done is up the main jet, that should be good enough for full throttle, but being CV carbs you might not get out of a mid range flat spot if it's too bad.
Changing the gearing to suit your new, crippled, power output isn't the way ahead!
Agreed - cv's won't tend to pull through the mid-range if the jetting ain't right. It's unlikely a jet kit will be available, so a Dyno session may be the solution or you'll be forever fiddling with them!
-
If you connect it all up as std., run it and check the timing with a strobe on #1 lead. Then swap the dyna wires blue & white for each other then swap plug leads 1/4 and 2/3, run again and the strobe 0n #3 will use the 1/4 marks checked first time but will apply to the 2/3 trigger which can now be adjusted to get the line matched.
I've never tried this and take no responsibility etc - I just eyeballed settings on mine and never pushed the timing limits to be worried about +/- 2 degrees or so!
Harris F1 GSXR Tis a beauty
in Oil Cooled
Posted
Just a thought regarding the 1st one - yes 'orrible lights but if they were quick detach stylee then they'd make sense - daylight racebike don't need lights and don't need to carry extra weight around and secondly night time running is generally at a slower pace so the added draggy lights wouldn't be such a penalty? - just my thoughts - may be way off!