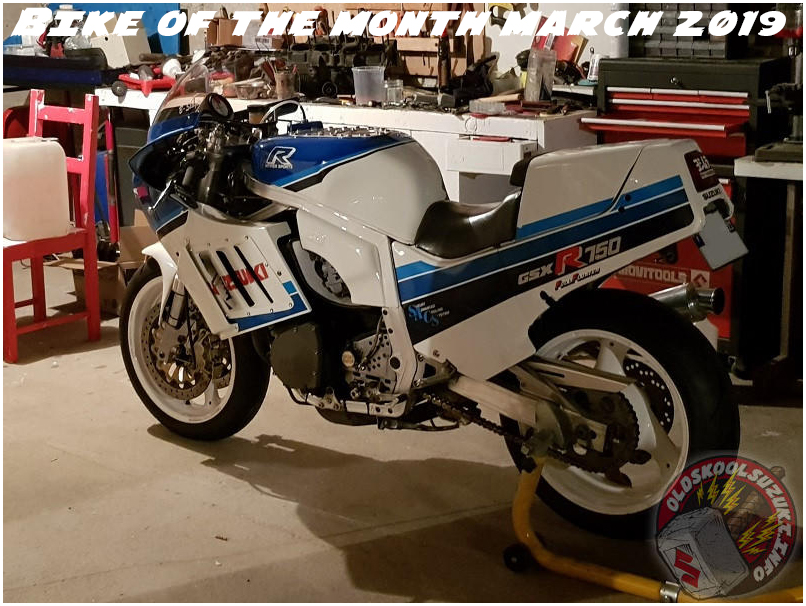
Bike of the Month March 2019 – Suzuki GSXR 750 H

Slabbies, I love them. The GSXR 750 was such a radical new model back in the day when they were first launched, they have become very desirable today and are ripe for both subtle and serious modifications.

GSXR 750

So when I first saw pictures of b-slayer’s GSXR 750 H in it’s very sorry state, I thought the same as you probably did… ‘this has got potential’. Little could we have imagined how trick it would end up being… a real ‘zero to hero’ build.

Suzuki GSXR 750 H

Having started his project thread, b-slayer shared some photos of the horrendous state of the bike when he first got it and then the in-between stages of his build. Some of the bodges, wow!

Suzuki GSXR 750 H
Suzuki GSXR 750 H
Suzuki GSXR 750 H

There are several more, often scary ones on the project thread.

Progress was made and the bike was back on the road in a few different guises before it’s final new trick state.

Suzuki GSXR 750 H
Suzuki GSXR 750 H
Suzuki GSXR 750 H
Suzuki GSXR 750 H

Some nice details along the way too, much more than righting the previous owner bodges.

Suzuki GSXR 750 H
Suzuki GSXR 750 H

Then, time for the finishing touches.

Suzuki GSXR 750 H

Finally, just wow! Hard to believe that this is the same GSXR 750.

Suzuki GSXR 750 H

What a fantastic end result, looking very clean and period yet with some very appropriate improvements.

So, b-slayer congratulations! Your GSXR 750 is this months BOTM.

Read the project thread here.

Discuss this article here.

Bike of the Month – May 2018

This month’s bike of the month is a tale of both resurrection and evolution.  Plucked from an insurance sale, this slightly fire damaged, pretty standard machine was rescued by nightrider. It was quite a rare find – especially the other side of the Atlantic. The decision is what we at OSS would call ‘a no brainer’.

We’ve been watching the story of this machine since the oldskoolsuzuki.info site itself was resurrected and as is often the case with projects progress sometimes stalls. Over the last 3 years we’ve seen a pragmatic mix of make do (when the OEM spares are hard to get) and mend.

With some advice and moral support from folk who have done the same thing as you and the balls to give it a go (or know when to sub it out) most obstacles can be over come. The proof is in the riding but this ES is easy on the eye in that striking blue squareness it wears so well.

So the GS 1100 ES has now returned to it’s rightful duty as a smile inducing muncher of miles. And I have no doubt the story and evolution will continue.


It’s a great bike. Who wouldn’t want it in their fleet?

Read all about the build  project here

Or throw your green eyed congratulations in nightrider’s direction over here

Congratulations to our Winner!


How To – Plastic Welding

Long term member from across the water, nightrider had a touch at a salvage auction with a Suzuki GS1100ES  bearing some cosmetic damage. Nothing that can’t be fixed, right? Right!

Here, he takes us through his tried and tested approach to plastic repairs.

I have been plastic welding for almost three decades now. I started in an old skool moto shop back in the 90’s. The old timers back then hated sportbikes so it was up to the young buck (me) to figure out how to fix those annoying fairings with that smelly Mac tools Plasti-welder. Through trial and error I weeded out what worked best for thin motorcycle plastics. Later I went on to repair Kayaks where the repairs were a bit more critical.

That being said, plastic welding is a fairly easy process.

Most mistakes I see is from people just smearing the filler rod material on the crack like glue. It’s best to think of it as welding. You have to get the filler material to penetrate and mix with the plastic being repaired. If you think of it more like really slow oxy acetylene welding you will have more luck.

First off, you are going to have to spend some money.

Yes, you could modify a soldering iron. Perhaps braze a foot on it?  But if you purchase a Plasti-welder you will find it handy for fixing all sorts of things (like any other welder). I’ve had the same Polyvance Mini-Weld Model 6 for over 10 years. There is a Model 7 now. They can be found on Fleabay or Amazon.

Don’t bother with the flat welding material. You will need the ABS R3 filler rod.

Once you have your Mini-Welder and R3 rods you’re ready to go.  Generally speaking you will only need to weld on one side. If your bodywork still has good paint you will want to weld on the inside (I typically always weld on the hidden side of the bodywork).

First off I place a piece of foil tape on the outside as a heat sink (this helps to keep the crack from puckering with the heat).

Next you will want to crank up the heat on your welder.

With ABS material I tend to just crank it all the way up to 11 but you might want to stick to the R3 setting if you’re dealing with y2000+ bike fairings as modern fairings tend to be pretty thin.

Once it’s heated up you will want to “stitch” the crack. This both tacks your weld and makes it easier to mix the filler rod with the fairing plastic in the next step.

Put your finger under the area you are welding and drive the toe of the welding iron into the plastic. You’re going to want to drive about 3/4 the way through the material you are welding at a fairly steep angle.

With your finger on the other side you can feel how hot the plastic is getting. Too hot for you, too hot for the plastic.

After you have done that you are ready to start filling.

Stick the rod through the cylinder on the welder.

With a wiggling motion, draw the welder across the stitch line while pushing the melting rod material into the little pockets in your stitches. Try to blend the two materials together (wiggling motion).

After that go back over your weld using the foot of the welder and melt down the excess and blend it into the surface. (This ensures that the outer edges of the weld are bonded and it makes it look a lot better). Take care to not get it too hot or you will ruin the paint job on the other side.

Peel off tape and Bobs your uncle.

With any luck you will barely even see the crack!

… and your shed will reek and Missus will be fuming and the neighbors will bitch and…


Huge thanks to nightrider! It’s all about the .info 

Read nightrider’s build thread on the forum here

Have you got any tried and tested techniques you can share? (Keep it clean, please!) >>>> here

We Love Projects

Projects, we fucking love them here on OSS! We can’t get enough of them… sharing build progress, inspiring others, building great OSS bikes, solving problems, unique solutions, riding the finished article etc is what OSS is all about. Or are they ever really finished? Just like when you were at skool, the end result will only get you so many marks… we like to see your working out too!

Fact is, the Projects section of the OSS forum is by far the most posted in section of them all and for good reason too. At the time of writing there are over 15,000 posts! Air cooled, oil cooled, water cooled, trick framed, forced induction and various combinations of those mixed up. Serious OSS porn-in-progress is just a click away and often the inspiration for your next build or even just the solution for that head-scratching problem for your current build you’ve had for a while can be found in there.

We keep a close eye on this section and as well as inspiring all of us and providing great interest it’s also where we primarily look for potential BOTMs (Bikes Of The Month) too. So, we urge you to do the decent thing and have a browse through the project section if you haven’t done so recently and if you are building something, no matter how humble or how trick… as long as it’s OSS we’d love to see your project thread up there. Who knows, it could be BOTM one day soon…

You can find the Projects section here.