Part V – The Visit comes to an End – Sayonara, Hamamatsu

There was no EFE. I lapped the room again just to make sure it wasn’t hiding in a corner that I’d missed. Nope. Clearly, this was in my opinion a HUGE gap in the gathered collection. How could they not have an EFE out on show?! But so it was. ‘Suck it up, sunshine’. I am totally writing a letter.

Some interesting marketing displays
The Hayabusa – Suzuki’s Power House
70’s Suzuki Fun rides

I returned to do the circuit of exhibitions the other way around, just to get those different angles. Sometimes you get very interesting angles.

The Katana looks good from all angles.

I walked the floor, gathering extra snaps of my favourites. I was still feeling pretty euphoric just to be there. From that position, everything else is a bonus.

The GS750 was a milestone marker in Suzuki development

It came time to go. I’d been walking the top floor for an hour and a half and some other visitors were starting to arrive. Time to Exit through the Gift Shop.

Except …. well, it wasn’t really a gift shop. That would be stretching it. I had taken my credit card and as much Yen as I could stuff in my wallet and I was going to buy Stuff.

The shopping opportunity was modest. It consisted of 3 vending machines with a small range of 30 or so souvenir items from a Suzuki key ring to a katana model kit. I cleared the front desk out of change swapping my notes and brought back enough small packages to generate some smiles as well as adding to my collection.

The Suzuki Plaza Gift Shop

And there it was. With the day drawing on, I had the same long journey to do in reverse and from the cloud I was floating on, I preferred to get back to the hotel before dark. The parting shot from the overhead rail platform was almost surreal except I had a phone full of memory snap shots and bag full of goodies. I did it. I went to Hamamatsu. Get. In.

Thanks for listening, folks.

Discuss your trip to Hamamatsu here >>> https://oldskoolsuzuki.info/forums/topic/12455-that-time-i-went-to-hamamatsu/

Hamamatsu Heights – Part IV

Another spotless flight of steps led to 3rd and final floor of Suzuki motorcycle history. I wasn’t sure what to expect from this place, Suzuki Plaza. Everyone has their own idea of what Suzuki is, what they do and what that means to them. I wondered if the old boy who worked the front desk with limited English but a welcoming smile even knew that there were groups of like-minded folks gathered within oldskoolsuzuki.info still trying to better what Suzuki had intended (in our own special ways).

I had high hopes, of course that I would see all my favourites here. I wanted to see the clean, original version of stuff I have stashed around the workshop in various motorcycle shaped lumps. And here they were –

GSXR1100H Hamamatsu – Red and Black – Ding Dong
One of my favourite views …
We love the .info

I’m partial to a red and black slabby, I’ve had a couple although my current preference is blue, white and turboed.

Talking of which … how clean?!

Not the highest regarded of Suzuki’s machines, it’s a rare thing to see

There were some great .info displays and I got to dust off my anorak and top up my pub quiz knowledge.

The latest in early 80s motorcycle technology

It tickled me to see this lovely little RG. My first taste of something a little ‘sharper’ at 18 years old. I somehow over-baked a tight right and ended up in the long grass – could have been worse.

Now, I am being picky here about what I’m sharing. There was some other stuff up there from the ‘utility’ market – funny little motorised carts which had done great business for Suzuki. There was also some stuff about the introduction of water cooled engines in motorbikes but you’ll have to read about that elsewhere – it’s not for me.

I lapped the room. I had been here for 2 hours so grabbed a can from the vending machine and sat. Sat and looked. And looked. For me there were some obvious omissions but I was going to walk the room one more time.

Tune in for the final part coming soon!

Discuss Suzuki Plaza at Hamamatsu here. What’s your story? >>>> https://oldskoolsuzuki.info/forums/topic/12455-that-time-i-went-to-hamamatsu/

Hamamatsu III – The History Stuff

Being a good student, I already had some of the history of Hamamatsu down to an ‘elevator pitch’ but let’s see what I missed. The bikes were not going anywhere but I was still teasing myself with thoughts of what the top floor had in store for me. First I had to make my way through the manufacturing exhibition.

As you’d hope, there was some interactive stuff. Pulling levers to rotate a car door on a fully automated robot production line was a good one -great sounds. I knew from a little inside tip that there was another machine which would deliver me a Suzuki egg! (It had a car in it … booooo) You were walked through the casting process and got to see some models too.

Can ya tell what it is yet?

I’ve got a bit of a thing about casting since making my own ally ashtray in Big Pete’s GoP many moons back …

There was some stuff around the factory itself and the sheer scale of the site can be seen from the aerial photos taken through the years. (come on! get to the bikes already!)

Hamamatsu from the Air
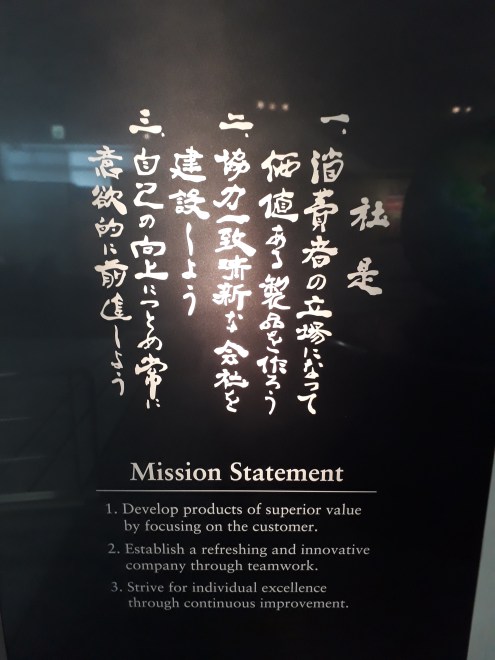
Suzuki – Mission Statement

I moved up to the next floor and came pretty much face to face with The Man Who Started It All. Not the most recognisable face, sure but here he was. The man who had used his engineering skills and business acumen to redirect Suzuki from a failing loom making business, to an upstart car manufacturer closed down by the war as ‘non essential manufacturing’ , reinvented AGAIN as a motorcyle and small utility manufacturer, and onto the business that continues to thrive today. It was pretty emotional. Plus, I hadn’t really spoken to anyone all day and this guy was willing to listen a while.

The man of ingenuity – Michio Suzuki

And finally – here they spread in front of me, I CAN SEE THE BIKES! Be cool. Breathe.

Suzuki: In the beginning …

I’m still on early history trip now and am duly reminded that from day 1 the business purpose was to serve its customers. Right now there was a gap in the market for cheap and easy to maintain transport that everyone could use. Suzuki’s engineers calculated that 36cc gave sufficient output having been combined with a pedal drive and the Power Free E2 was born in the early 50s.

The handsome Diamond Free model

Development continued at pace in Hamamatsu. It was 1954 and the team were set up at the prestigious Mount Fuji hill climb – it was show time. Their win there in the 90cc class put them firmly on the manufacturer’s map. They were contenders.

As well as speed and power trials, Suzuki also wanted to demonstrate the reliability and tenacity of their new machines. A pair of brothers spent 2 years riding this ‘Diamond Free’ 58cc model 47000km between Bangkok and Paris. The road network was barely developed at that point and you can only imagine the challenges along the way, but the machine survives to this day, on show here in Hamamatsu.

By the early 60s. Suzuki were ready to take on the world renowned challenge, the ultimate test of rider and machine – the Isle of Man TT Race. The team ran machines from 1960 but it wasn’t until Mitsuo Itoh took the ride in the 50cc class on the RM63 that Suzuki got to lift their first TT trophy.

The TT winning Suzuki RM 63
The RM63 – small but powerful!
Suzuki for the Win! Eat My Dust.

Keep posted as I head further into the 60s, 70s and dip a toe into what Suzuki had in store for the 80s

Hamamatsu – Part II

Had I set my expectation too high? What if I was disappointed? Travelling solo brings out split personalities – the one voice in my head saying ‘You have 1 day in Japan .. do you really want to spend most of it on a train?’ The rational voice replying … ‘Let’s go!’ And so … I’m here now. In Hamamatsu.

Walking past the factory, I gripped the metal fence bars and stared at the unassuming swathe of factory buildings. There was no hint here as to the impact this site has had on my 2 wheel world. No piles of rejected EFE heads, slabby top fairings waiting for paint or katana front fairing braces- ah well. I paused to gaze for a few minutes, waving my nose in the air and trying to soak up ‘something’. I imagined Hanma Shin in his workshop in there somewhere hack sawing H*ndas into bite size chunks and chuckled to myself, remembering the stickers I had packed in my bag that morning. Following the arrows, I tracked through the underpass which crossed the road and up to the steps of Suzuki Plaza.

The Factory
More Factory

I knew from my research that Suzuki Plaza was a small museum and exhibition centre near the factory and I’d gone online the night before from my hotel and booked a ticket. The accuracy of the train timetable had me land on the steps of Suzuki Plaza 5 minutes before my slot. Perfect. And there was noone else about. Even better, with not a soul around – I had the place to myself.

Front Window. Meh.

I was in. The foyer wasn’t all that. There, I said it. It’s that feeling I get when I’m reminded that as well as EFEs and GSXRs and GSs, that Suzuki also make the Swift and the Jimny. It took a collection of rare race machines to bring balance to the situation.

Graziano Rossi’s RGB500 had 2 podium finishes in the 1980 series

I checked in and took the opportunity to get a snap on the Katana displayed in Prime Position. Well, you would – wouldn’t you?

The rest of the exhibits and the museum were to be found via the stairs. Pop out for a quick ciggie because. Pinch myself. Giggle some more. Take a selfie. OK, back in. Let’s see what this is all about!

Hamamatsu – The Holy Grail

Suzuki Fever hit in my teenage years. It was the mid 90s, GSXRs ruled the streets and the mighty EFE was still winning at the tracks. Gary Rothwell was my hero and Streefighters Magazine fuelled my fever. Who knew over 20 years later, my passion would lead me to Hamamatsu, the home of Suzuki Motorcycles.

The path through life has many cross roads. Back in 1995, it was going to be either a GS550 or a GPZ550 uni trak. I’d spent my first full year on the road on a forgiving and relatively new Kwak but I now had a full bike licence in my wallet and I wanted more power. The GPZ was rougher in the flesh than the photos suggested so it was the Suzuki that was to become my daily ride and the first of many Suzukis.

20 or so years later, I had sampled most of Suzuki’s big capacity engine offerings from the 80s and 90s. I even had a few of them in the shed. That turn at the cross roads had developed into an almost obsessive passion for the machines built across the other side of this globe in a town called Hamamatsu. When a work trip to Japan left me with 1 free day, there was only one thing on my mind – how do I get to Hamamatsu?

I was staying in Yokohama Bay. The sun broke over the harbour and into my hotel room. Today was the day. Japanese trains are rightly known for both their speed and timeliness. I just had to work out which ones to get. The underground from Minatomirai took me to Shin-Yokohama and then to Tokyo Central station where I could grab the Shinkansen. It wasn’t the super fast train which suited me fine and gave me the chance to take in the paddy fields streaming past the window and a view of Mount Fuji as we sped along the coastline.

I tracked the time, watching the stops go by until finally the scrolling message in the cabin said ‘Hamamatsu’.

Heart pounding, I grabbed my bag and stepped off the train. In the distance I could see the Suzuki S drawing me in.

I tripped down the steps like a kid at school kicking out time and followed the sign as it got bigger and bigger through the grid-work town until I could see it. The factory was right there.

Part II coming soon ….

Discuss this article here >>> https://oldskoolsuzuki.info/forums/topic/12455-that-time-i-went-to-hamamatsu/

Bike of the Month – May 2018

This month’s bike of the month is a tale of both resurrection and evolution.  Plucked from an insurance sale, this slightly fire damaged, pretty standard machine was rescued by nightrider. It was quite a rare find – especially the other side of the Atlantic. The decision is what we at OSS would call ‘a no brainer’.

We’ve been watching the story of this machine since the oldskoolsuzuki.info site itself was resurrected and as is often the case with projects progress sometimes stalls. Over the last 3 years we’ve seen a pragmatic mix of make do (when the OEM spares are hard to get) and mend.

With some advice and moral support from folk who have done the same thing as you and the balls to give it a go (or know when to sub it out) most obstacles can be over come. The proof is in the riding but this ES is easy on the eye in that striking blue squareness it wears so well.

So the GS 1100 ES has now returned to it’s rightful duty as a smile inducing muncher of miles. And I have no doubt the story and evolution will continue.


It’s a great bike. Who wouldn’t want it in their fleet?

Read all about the build  project here

Or throw your green eyed congratulations in nightrider’s direction over here

Congratulations to our Winner!


How To – Plastic Welding

Long term member from across the water, nightrider had a touch at a salvage auction with a Suzuki GS1100ES  bearing some cosmetic damage. Nothing that can’t be fixed, right? Right!

Here, he takes us through his tried and tested approach to plastic repairs.

I have been plastic welding for almost three decades now. I started in an old skool moto shop back in the 90’s. The old timers back then hated sportbikes so it was up to the young buck (me) to figure out how to fix those annoying fairings with that smelly Mac tools Plasti-welder. Through trial and error I weeded out what worked best for thin motorcycle plastics. Later I went on to repair Kayaks where the repairs were a bit more critical.

That being said, plastic welding is a fairly easy process.

Most mistakes I see is from people just smearing the filler rod material on the crack like glue. It’s best to think of it as welding. You have to get the filler material to penetrate and mix with the plastic being repaired. If you think of it more like really slow oxy acetylene welding you will have more luck.

First off, you are going to have to spend some money.

Yes, you could modify a soldering iron. Perhaps braze a foot on it?  But if you purchase a Plasti-welder you will find it handy for fixing all sorts of things (like any other welder). I’ve had the same Polyvance Mini-Weld Model 6 for over 10 years. There is a Model 7 now. They can be found on Fleabay or Amazon.

Don’t bother with the flat welding material. You will need the ABS R3 filler rod.

Once you have your Mini-Welder and R3 rods you’re ready to go.  Generally speaking you will only need to weld on one side. If your bodywork still has good paint you will want to weld on the inside (I typically always weld on the hidden side of the bodywork).

First off I place a piece of foil tape on the outside as a heat sink (this helps to keep the crack from puckering with the heat).

Next you will want to crank up the heat on your welder.

With ABS material I tend to just crank it all the way up to 11 but you might want to stick to the R3 setting if you’re dealing with y2000+ bike fairings as modern fairings tend to be pretty thin.

Once it’s heated up you will want to “stitch” the crack. This both tacks your weld and makes it easier to mix the filler rod with the fairing plastic in the next step.

Put your finger under the area you are welding and drive the toe of the welding iron into the plastic. You’re going to want to drive about 3/4 the way through the material you are welding at a fairly steep angle.

With your finger on the other side you can feel how hot the plastic is getting. Too hot for you, too hot for the plastic.

After you have done that you are ready to start filling.

Stick the rod through the cylinder on the welder.

With a wiggling motion, draw the welder across the stitch line while pushing the melting rod material into the little pockets in your stitches. Try to blend the two materials together (wiggling motion).

After that go back over your weld using the foot of the welder and melt down the excess and blend it into the surface. (This ensures that the outer edges of the weld are bonded and it makes it look a lot better). Take care to not get it too hot or you will ruin the paint job on the other side.

Peel off tape and Bobs your uncle.

With any luck you will barely even see the crack!

… and your shed will reek and Missus will be fuming and the neighbors will bitch and…


Huge thanks to nightrider! It’s all about the .info 

Read nightrider’s build thread on the forum here

Have you got any tried and tested techniques you can share? (Keep it clean, please!) >>>> here