Bike of the Month December 2017


Lists, we all have them; shopping lists, to-do lists, bucket lists. Stuff you “need” to do/buy/build before a certain time.
When you then, in your waking life, don’t get the chance to tick off some of your most desired points on your list, if you’re really lucky, it sometimes happens that some of your friends will do it for you, in your honour and in your memory.

Craig Smith is such a friend. We know Craig as one of our like minded Down Under members who has made VERY good use of what Pops Yoshimura and Wes Cooley started in the old AMA championship, by using his GS as it should be. He has also always made an effort to let us in on all the fun.

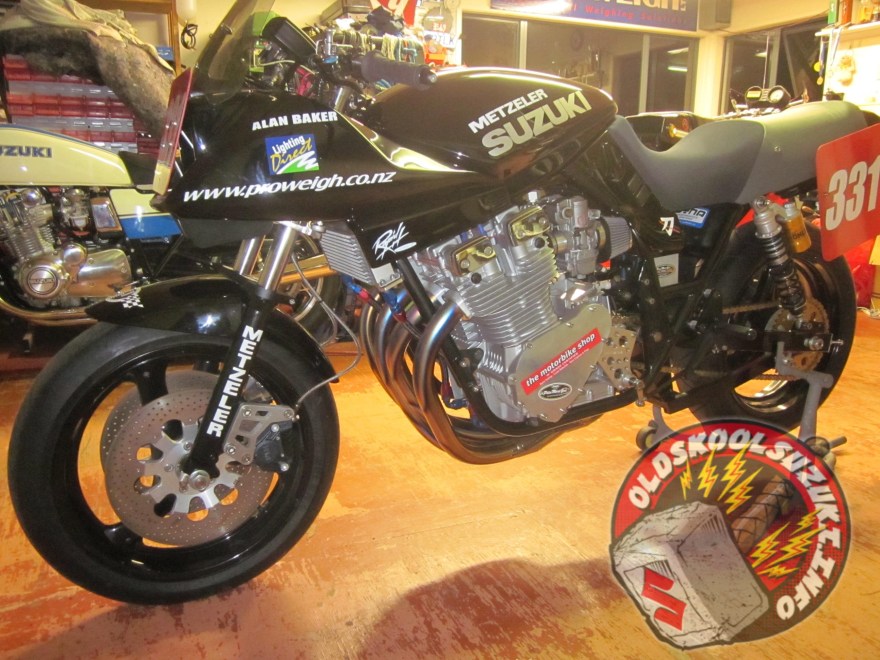
This Katana project was started off with previously accumulated parts and a general idea of what the finished product should look like. Craig and a few friends went on to finish the bike that their late friend, Alan Baker, had dreamed off and had actually started building. This project has had many things in common with the OSS Knarf build. Both were documented on the old site.

Only when we got OSS  back up and running did we properly learn how the project turned out and how the story had concluded. (imho) this Katana on its own, even when you don’t know the story behind it,  is one of the best Kats out there. Revealed to friends and the world in May 2016, it’s more than what anyone could wish for as a lasting monument and a promise that they hadn’t been forgotten.

I realise this project has been finished for quite a while and Smithy hasn’t been on OSS much after it but that’s beside the point. I had this bike on my BOTM list for a long time and here it is; congratulations Craig, Alan’s Katana is Bike of the Month December 2017.

Read more here

Sisters are doing it for themselves…

In our first year since creating the oldskoolsuki’s Winged Hammer race team we’ve issued the hallowed and exclusive Winged Hammer livery to a full range of competitive racers including world record holders, Isle of Man Racers, straight-liners and drag racers. They all have one thing in common; Their weapon of choice is an old-kool-suzuki. Here’s a story from from one of the team. Go Winged Hammers!

Words of Anna; Winged Hammer, Drag Racer;

This all started in July 2015 with a day out at North Weald, where I took my old Z900 up a drag-strip for the first time ever, having owned it since 1980.

The 2016 season saw me switch to our old Suzuki Slingshot, which had been hibernating in the spare garage. Second time out on it at the Pod I was slowing down from 117mph when I locked the front end and ended up bouncing down the slow down area, writing off my helmet, brand new leathers and gloves but, happily, not the Slingshot which slid down the track on one side.  This was when I learned how wonderful the  emergency response crew and medics at Santa Pod are © And got acquainted with Bedford Hospital A&E.

Some TLC and parts replacement on the bike meant I was back at North Weald the next week just to prove to myself I could still ride it and to make sure it still ran true.  Just aimed to get up the 1/4 mile and back safely so times and top speeds were well down.

The front brake lever, bar end, exhaust and points cover took most of the damage.  Luckily we had a Vance & Hines exhaust in the shed (thanks to Kyle’s hoarding tendencies).

One of the reasons for the crash was that I couldn’t get my right foot onto the peg and use the back brake so one of the main post-crash mods was setting the footpegs back making it much easier to get my feet on them.

The first few times I rode at Santa Pod post-crash, I concentrated on just getting across the line and back to the pairing lanes safely and the rest of the 2016 season was really about getting my confidence and some consistency back.

Between the 2016 and 2017 seasons we repainted the body work, lowered the bike even more, fitted a Nitron shock, a Dyna 2000 system, 38 mm Flatslide carbs and treated it to a dyno session thanks to the wonderful chaps at Warpspeed in deepest Norfolk.  Eblag provided a second hand set of BKS leathers and  I signed up for the RWYB Challenge at Santa Pod, so in Feb 2017 I shivered and ran up the foggy track as fast as I dared. Which wasn’t very fast.

In March 2017 I did the dial-in day at Santa Pod, as the only motorcycle so want to give huge shout out and  thanks to Dave Grundy who came along to give me someone to ride against.  The bike started to misfire so didn’t do great times and headed back to Warpspeed for some trouble-shooting.  The culprit was the Dyna leads and the coil shorting out.  While we were up there we got  Stuart Crane to fit a lock-up clutch and 2-step,  so I had to get my head round yet another a new set up.   I got used to the lock-up before I attempted to use the 2-step and started with a gentle 3500rpm launch working up to its current setting of 4000rpm.  I’m still getting used to winding open the throttle,  dumping the clutch and having the front end come up (at least I think it does – no photographic evidence yet).

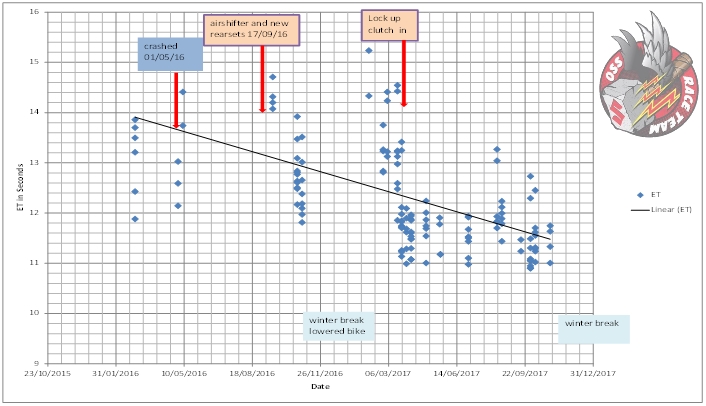
2017 is when I started to learn how to really ride the Slingshot and began to get near its capacity with a standard engine, gearing and swingarm set up.  In July I got my first 10sec run and in September I managed 3 PB runs in one day, finishing with a 10.8!  I like to think I have improved this season, my times bear this out as I have gone from 13 & 14 sec runs at the beginning of the season in Feb 2017 to consistent low 11s in autumn 2017.  Another recent personal achievement is being able to pull out good runs towards the end of the day, whereas I used to get tired and my times went down towards the end of the day and I started to make “D’Oh” mistakes – taking off in neutral anyone?

Last meet of 2017 (29 Oct) and I got the chance to ride our new Slingshot “Chip Shop Express”, which used to be the Warpspeed chip-shop-run bike.  Never ridden a turbo bike hard before but it felt really good and another credit to Stuart Crane’s bike-building skill.

As a paid-up science nerd, I graph my times after each session and the graph is my times on the Slingshot over 2 seasons.  The regression line tells me that I really am getting faster and more consistent (even when it doesn’t feel like it).

Next year we are hoping to run 2 Slingshots, one nitrous and the other turbo – Mr & Mrs will be going head to head!

Big shout-out to the RWYB and Drag Racing family that we are becoming part of; my fellow riders who made me welcome in the RWYB Challenge at Santa Pod; Straightliners and our Pendine Land Speed friends.  XXXXX

Especial  thanks to Chris Tombleson and Gary Hurd at Grumpy’s 1260 Performance for encouragement and advice of my early efforts on my old Kawasaki Z900 and the pink handlebar grips that will become my signature.  Gary – you said “do burn outs” – I’m getting there.

To Stuart Crane (a Top Fuel racer giving little newbie me help and advice ), Martin Hewitt (Electrical Genius) and John Wood (Dyno Wiz) and all at Warpspeed for their amazing bike building and tuning and for inviting us to be part of the experience.

So here’s to a great 2018 season from Kyle Rushby – Chief Pit Bitch and me “the Rider”.  The ‘Rents will be going Racing…..

Read more about Anna’s racing here

http://www.warpspeedracing.co.uk/
http://grumpy1260suzukispares.co.uk/
https://www.fiberman.net/

An Old School event on some Belgian ring road

With me being from The Continent, I live a bit of a different life than most of our members, as about 90% of you, are from the UK. In the UK there’s a racetrack, an abandoned airfield or a drag strip usually not more than an hour away from wherever you are, at legal speeds even.

For us, it’s quite the opposite; from my house, the closest proper racetrack is 2 and half hours away. The fact that the track in question is the legendary Spa Francorchamps circuit does quite make up for it though. Zolder is closer, but that’s not really to my liking and Assen is another hour further the other way.

Yup, Spa is my home track, so to speak and every year since 2012 I’ve been making the trek to the Biker’s Classics held there yearly the first weekend of July. It’s a festival of everything Not New on 2 wheels; super-rare superbikes of days gone by, proper GP stuff from the 60’s and 70’s, etc.

Most of these bikes are not static, not by a long way. Championship races are held, track sessions for those that want to use his/her outdated bike for what it was actually meant and there’s the obligatory parade laps which usually end up in a few ex-World champions redoing some of their old battles, just for the hell of it.

Since we’ve been coming, we’ve also been shouting; “We need to have a go” Last year, I did and this year, we were out in force. As members of OSS, our little Dutch based“race team” (with lack of a better word) called #Team Banana; 3 bikes on track, 3 bikes as support vehicles, easily the biggest plot in the paddock and full catering and management; we clearly don’t do things by half.

Anyway, this is all beside the point; the 2017 Classics will mostly and sadly be remembered for appalling weather, which has quite the effect on the whole gathering. I myself have been out on track in pretty much every session available as most chose to keep their irreplaceable bikes in their respective pit boxes and tents, as to not write them off, which is very understandable. My bike was cheap (and not very fast) and I had full-wet tyres with me, as did Leblowski, so we were safe, doing many sessions with 5 or 6 bikes on track, instead of 50.


For the public and our supporting crew, it was quite different. It was cold, wet and miserable and that doesn’t make for a good day’s watching rare bikes, either static or racing which was sad as there is so much to be seen, it boggles the mind.

Next to our own little paddock with 2 Slingshots and 2 Slabbies, there were so many bikes from our school of thought, built solely for this yearly event; if there was nothing else to be seen, we’d all still have a field day. GSXR750RK with a bigbore 1100 motor with superbike running gear? Naturally. An as-new 1100ET? Sure thing. GSX1000S Katana on track? Totally normal. This bike was also blagged from the owner for the event, with the rider having pretty much his first ride on the bike and on a racetrack; very brave. These are just a few bikes run by like minded gentlemen doing the track sessions; no racing, just fast as you like down the racetrack. No ego’s, nothing to be won, just roundy-roundy riding for fun.

Then, in the proper pit lane and it’s adjoining paddocks is where the real bikes are. If you don’t know about the CSBK championship, I suggest you get yourself informed because the bikes used are awe inspiring, as is the riding. Some Dutch guys even do quite a good job on a bunch of Slabbies. Then there’s the French/Belgian Pro-classic series of which the grid is downright comical; from weedy early 90’s 600’s though to Y2K and later litre bikes, it all makes for interesting racing, the level is pretty high.

And then the Show piece of the event; the 4 hour Classic Endurance race. Some of you that were attending the earlier gathering at Donington may have had a feel of what this all is about, but at Spa, it all goes up a notch. For starters; the flag drops at 8pm and they ride into the night finishing at midnight. Thus, in the dark, on a blinding fast racetrack with utterly awful lights on most bikes. How some of these guys keep up the speeds that they do, I will never know. It doesn’t help that I’m night blind, so I best not ever enter myself.

The grid for this race is getting bigger and better every year. Some teams have budgets so high, it’s not really an amateur effort any more, with new bikes being built every year; Bakker/Harris/Moto Martin, it’s normal (almost), as are 170+ Bhp air-cooled motors.


Like Donington, at Spa, Suzuki themselves also entered, showing the factory interest for this type of motor sport, again with the blue Katana we’ve all seen been built at the NEC, this time the riders would be Pete Boast and non other than Guy Martin, with another (privately entered but twinned) Katana entered for good measure, finishing a respectable 7th and 22nd respectively. Our very own Sweatshop Phase One, of Mark Foggy fame ended up 3rd on the podium only seconds behind the Team Taurus GSX1100 and 1 lap behind a bike of a brand we shall not speak of. All of this after nearly 4 hours racing in the dark and wet out of a field of 47 starters; not half bad.

As a spectator, to witness this all, is a bit special. It’s not an everyday thing seeing and hearing these bikes of old tear through the night and the whole paddock itself is so open, you get the feeling you’re doing something naughty going your way around, only to be welcomed to have a look around everything and from very up close, just as long as you don’t get in the way. In this day of barriers and tight security, it is truly a breath of fresh air.

In the end, for me, it was another very good meeting; I was very reluctant at first to enter again next year due to the cost and the fact that communicating with the organisers is a nightmare; it all goes away the first time you plunge down from La Source into Raidillon with the throttle WFO for 75% of the time, all the way round. It’s quite something and I can’t wait to go again. The rain may have slowed the whole show down a bit, but if that didn’t bother you, there was so much to see, do and learn, there’s few thing like it.

I urge everyone with a remote interest in these bikes and racing (which, if you made it this far, should be the case) to make the pilgrimage to this event and see it all for yourself. I cannot make any promises about the weather, but I will promise that there will be plenty things to see/hear/smell to make it worth the trip from wherever you are. And, if that doesn’t convince you; we have stroopwafels.

/EFE

Photocredit;

-Jelly
-Marco vd Velde
-Darren Whyte
-Nolan Freebury
-Chris Whitey
-Team Classic Suzuki
-Bikers Classics
-European Classic Series

Bike of the Month July 2017


Some of you may know of my fascination with Eighties Movies; I absolutely love them. To be honest, I’m not totally sure why myself; could be the cars, the music, the girls, anything. One thing that returns in pretty much all these films is that perseverance and doing the right thing, will alway get you on top. In the 90ish minutes most of these films take, our lead character will fight his or her way though all matter of obstacles, an epic montage for good measure, with the end of the movie wrapping up with the championship/the girl/the car/ saving the planet (remember Wargames?)


This Slabbie that Leblowski has built, reminds me of those movies. The buildthread reads as a moviescript with some things hard to be believed, yet they all really happened.


Starting on the backfoot with a heavy operation and a bike most normal people would’ve called a scrapper, Leblowski took it upon himself to get the bike built to enter in the Bikers Classics Festival at Spa Francorchamps which he had attended as a spectator many times before.


Cutting it as close as you like with having the bike first run on the Dyno only days before the event and arriving at Spa with the paint only literally just dry from application, the bike proved to be absolutely perfect. Finished to a standard most of us can only dream of and the frame so heavily modified, it may be the most extreme Slabbie in existence. You’d have to look for it though, because you really can’t tell if you just casually walk past.


Now Spa is out of the way, this bike will be used for more track outings as part of the #TeamBanana “racingteam”.

I take my hat off for Leblowski, doing this project and taking it as far as he did, I know very few people so determined to make their vision a reality.

Leblowski, your Slabbie is this months BOTM
Read the whole script here

How-to fitting 3.5 GSXR front wheel into EF front end

Capitan Chaos site moderator, motorcycle mechanic and EFE addict shares some useful info on upgrading the front wheel on your EFE.

Here’s how:

– remove the bearings from the EFE front wheel, and take the tube which is in between them. Do the same with the GSX-R one.
– you will find out the EFE one is 16mm longer than the GSX-R one. It needs shortening 16mm.
– buy some bearings which fit in the GSX-R wheel and on the EFE spindle. I don’t remember exactly the sizes, but you need bearings with the ID of the EFE ones, and the OD and width of the GSX-R ones. They were off the shelf in the local bearings shop.
– the tubes in the bottoms of the EFE forks are now too short. Make some new ones which are 8mm (each) longer.
– the EFE speedo drive will fit after a little bit of material has been removed. Offer it up on the GSX-R wheel and you’ll see exactly where.

And now, with that nice 3-spoke wheel, it would be a shame not to upgrade the brakes as well.
The Slingshot Nissin 4-pots, and the later GSX-R models’ Tokico 4- and 6-pots all fit on the EFE forks, 90mm spacing between the bolts. But the Slingshot discs are too large.
Now Suzuki had thought about this and launched the GSX600F in the late eighties, this bike has brake discs that fit perfectly on the GSX-R wheel and are small enough to accept the more modern calipers when mounted in the EFE forks. All it needs is some small rings to space out the calipers a bit towards eachother.
Use the EFE caliper mounting bolts, they are longer than the GSX-R ones.

Captain Chaos

Discuss here

A word from the wise

pp_logo The site RobbyNitroz.nl was started in 1999 by a small group of friends (Robby Nitroz and Mr. 7/11) intending to log the building and modifying of their bikes. RN(S) was the result of Robby’s Streetfighterpage and the Suzuki 7/11 Boulevard joining together.

As time progressed, Robby changed sides and got himself a H*nda fireblade. In 2001 Mr. 7/11 added a forum to the site, which is when things really started to take off. Then Bral joined the RN(S) team in May 2001 but Unfortunately, Bral couldn’t dedicate enough time and left the team leaving Mr. 7/11 running229144_5871722894_2873_n things on his own.

In 2003, after a very open forum discussion with the then-current site members, Mr. 7/11 changed the site name to OldSkoolSUZUKI.info. Eventually in 2003 I stepped-in to assist Mr. 7/11 running the forum.

Over the next year I changed my username from PerversePolisher to PP and got promoted to be a full moderator, running everything behind the scenes with Mr. 7/11.

In 2007, due to personal events and a lot of changes in his life, Mr. 7/11 made the tough decision to step back from running the site he’d built up and leave it totally in the hands of PP

1923646_8911572894_4629_nDevelopments over the years have included a section for “Twins” in support of Wingnut’s Mini Twin racer, and a section for 2-Stroke Suzuki’s (by popular demand).

At the tail-end of 2008, my life went through some fairly major changes and led into an ongoing run of misfortune; the most major or which being the total failure of the server that OSS had been running on in 2011.

Several attempts to rebuild the server, using external services to re-create the site and lack of time and funds led to me having to put the site on hold. Several of the original site members couldn’t let it lie down and began a Facebook page to ensure that the social side of OSS could continue.

Where the site now goes is up to them….

PP

Discuss here

Tagged

How to repair cracked engine covers

How to repair cracked engine covers.

First you remove the cover from the bike ofcourse, and then you degrease it very thoroughly.

As with all cracks in every material you need to drill small holes at the end of the cracks. Do not drill exactly at the point where the visible crack stops because underneath the surface the crack already had gone further. So plot an imaginative line in the extent of the crack and drill the hole along that line a few millimeters from the end of the visible crack.

I used a Dremel tool, but you can use a normal drill with a grinding stone (though due to it’s weight it’s harder to control) to dig a trench along the crack.
Dig as deep until you’re almost coming trough on the other side. This will make it very easy to fill it with epoxy.

Clean the other (in)side using emery paper or a Dremel tool to make sure the epoxy will attach itself well.

Then you clean and degrease the cover very thoroughly and warm it up by laying it on a heat source like a radiator or geyser.

While the case is heating up we prepare the metal epoxy. I use “Bison” metal epoxy but I guess any well known brand metal epoxy will do just fine. Just follow the instructions that came with it carefully and be sure to mix it very thoroughly. As with all two-component substances mixing it thoroughly is most important, so don’t rush it!

When the epoxy is ready apply it to the cover. Make sure you push the cracks full of epoxy so no air bubbles are left in them. If you dug them out deep enough epoxy will come out on the others side.
Your cover will have a very large flat spot so be sure to apply enough material, better too much than too little.
Apply some epoxy to the inside too but it hasn’t have to be much, just enough to make it smooth.

Then you leave it to dry on a heat source, at least for 12h untill the epoxy has become very hard. It hasn’t got the same mechanical properties as aluminium though, more like a hard plastic.

Now you can file/sand it into shape and spray paint the cover (you didn’t intend to polish it, now would ya? 😉

Well, there you are… a good as new engine cover, ready to last untill the next crash!

1. Drill holes at the end of the cracks and dig the cracks out

2. Clean the inside of the cracks

3. Warm up the cover

4. Prepare the epoxy

5. Apply epoxy liberally

6. Epoxy on the inside

7. Let it dry for at least 12 hours.

Welcome to v2.0

“Hello, my name is Rene and I am new” It was the first line of my first 39981post to a forum which would turn out to change and enrich my life, and which would be the source of about half of the friendships I actually have in the real world at this very moment.

I didn’t know it at that time, but I was already very aware of the pedigree and what OSS stood for in the digital motorcycle world that was forming in the (fairly) early days of the internet.

I treaded lightly and took all the information that was there, to heart. Tons of people that really knew their stuff, dared to go beyond the beaten path and no-one was affraid to try something new. OSS was a place away from the internet; no distractions, no things outside of what OSS meant.

It was that way from the off and everyone knew it, understood it and was very much used to it. It was “our” way, and if you didn’t understand this, you had no business on OSS.

mr711Through the years a lot has happened with all things OSS; PP took over from Mr7/11, troops were brought in from overseas to strengthen the international relationship and many hardline moderators helped to keep the ball rolling until the website was being so flooded in spam that it was not realistically possible to keep going without major work to the system. The forum was closed and not long after, the entire website was taken offline.

Banoffee had already taken it upon him to start a Facebookpage, at the time meant to bridge the downtime of the forum, so that we could all stay in contact, but it swiftly surpassed the actual website in membership, and the longer it stayed offline, the more it was looking as if the FB-page was the actual base from which all was ran. This all to an outsider, off course, because those that were there for the journey, knew there was more to it.

Some of the members that had been part of the former website felt out of place on Facebook and Ash was the one that opened up the Proboards-forum. A welcome addition to the FB page that was already in place and plenty members of old have found their way to Ash’s pages and a lot of info has already been posted to be used across the globe.

This bring us to the Now. Firstly, I’ll have to make clear as to who has the current ownership of Oldskoolsuzuki.info ; Me. It has been signed over to me by Mr7/11, with my promise to guard and stay true to what he and PP, along with the founding members have created. I’ve surrounded myself with a few key people of the old page and the 4 of us; Banoffee, KatanaMangler, Jelly and myself, currently at the helm on FB, with Ash and Captain Chaos keeping the Pro-Boards forum running. We took it upon ourselves to revive OSS, and if you’re reading this, it’s possible that you find yourself in new but familiar surroundings.tumblr_nho2vhOKpf1ri1ymoo1_500

A lot of stuff has gone on behind the scenes and more then a few people have put in their time and hard earned money, just so we could get OSS back online. We’re still busy converting old articles to be available on the new home of OSS, and photo’s are being converted as we go. The old page was so full of info, that if we have chosen to add this over time, because otherwise it would’ve taken at least another year before we had anything to show for.

We understand a lot of you will have questions, which we will all try to answer in future posts in the not to distant future. A forum is in place with the same guidelines as the old one was. Sadly, we could not save what was left of the old forum, to be usable and live on this page, nor is there the possibility to migrate Ash’s forum to this one, due to Pro-Board rules. This makes it a bit of a hassle and we’re sorry for that, but there’s little we can do.

To tumblr_ncbjmeoBVT1tmt2lko1_500be fair; some of you don’t know me and will raise an eyebrow as to “why this crazy Dutchman has taken over our page” I’ve heard this more than a few times but I can tell happily tell you; I’m not taking it over, we’re not taking it over. It has been trusted to us while originally formed between a few Dutchmen and ran by people that didn’t even live in the same country, the English language was chosen to cross borders and that is exactly what it did.

In this OSS has succeeded more then anyone could ever wish for. OSS is known the world over, from the Northern most tip of Finland where they race on ice with Proboost equipped slabbies, to all the way downunder, where a fair few members race their GS’s and Katana’s and come out on top.

And then there’s all of us in between; OSS is bigger then just us, and we should treat it that way.

We welcome you into this new chapter in the OSS and ask you to be a part of it. It’s been a bit of a bumpy ride the last few years leading up to the point where we are now, but all is in place to give the place it’s second lease of life.

Go build, race, restore and modify your bikes and make sure you keep us informed about your findings.

And pictures, we like pictures.

Rene EFE

Discuss here

Bandit Coil Spring Conversion

Words & pics: Lee Workman

Bandit clutch conversionBandit Clutch

The clutch assembly fitted to all Bandit 1157 motors is, frankly, shite.

Based on the same principle as the GSX-R Slingshot unit, it’s diaphragm-sprung with ten driven plates and ten drive plates of 225mm diameter (the GSX-R’s are 230mm diameter which doesn’t sound much, but offers a huge increase in surface area for friction) and has a cheap cast alloy basket with a steel reinforcement strap fitted in an effort to stop it flying apart (as opposed to the large all-steel basket used in the GSX-R).

Under normal circumstances this unit is fine but, as soon as you start giving it a reasonable amount of abuse or tune the engine, it will struggle to cope with the extra demand and eventually slip. Heavy-duty diaphragm springs are available and will slightly improve matters at the cost of a heavy clutch lever, but the whole unit is better off in the bin. Trust me …

To convert your Bandit 12 clutch you’ll need the following parts from Suzuki,

No. Description Suzuki Part Number

Qty

Price � (ea.) Source Model

1

Clutch inner hub

21410-06B02

1

49.46 GSXR1100 G,H & J

2

Pressure disc

21462-06B00

1

23.49 GSXR1100 G,H & J

3

Coil springs

09440-20013

4

1.31 GSXR1100 G,H & J

4

Spring spacers

09180-06174

4

1.72 GSXR1100 G,H & J

5

Washers

09160-06020

4

0.53 GSXR1100 G,H & J

6

Bolts

01107-06307

4

0.71 GSXR1100 G,H & J

7

Drive plate (Fibre)

21441-48B00

11

9.53 All GSXR 1100’s

8

Driven plate (Steel)

21451-48B00

10

5.47 All GSXR 1100’s

9

Clutch Basket

21200-40814

1

176.53 GSXR1100 K,L,M & N


Yep, you’ll need to replace that crappy clutch basket, they are expensive new, but you could get one from B12 Clutch 1a breaker, you can use one out of any Slingshot model. Beware – they look identical to the earlier Slabside one, but the 1052cc motor has different gearing on the crank. The primary driven gear at the back of the clutch basket of Slabside engine has 73 teeth. The bandit primary driven gear (being essentially a 1mm over bored 1127 motor) has 72 teeth – the same as a slingshot one.
Follow the previous instructions for the GSXR’s then, once the inner hub is completely off, remove the outer basket also.
Pull the basket partially out, then push it back in again, this will expose the needle roller bearing and the spacer, remove these from the shaft then remove the clutch basket and alternator/oil pump drive gears careful remove alternator oil pump gear from the b12 basket and fit it into the slingshot basket
If its still stuck to your clutch basket, you will need to (carefully) remove this bandit drive gear, and fit it to the GSXR basket.
They are totally different; the alternator/oil pump drive gear off a GSXR has different pitch teeth and will foul your bandit alternator driven gear and your oil pump driven gear.

Once you’ve done this you can fit the new GSXR Basket using the original thrust washers in their original places.
Ensure the alternator an oil pump drive gears are engaged with the driven gear behind the basket
When positioning the basket on the counter shaft and sliding it ‘home’ – take extreme care to line up the alternator/oil pump drive gears with the alternator and oil pump driven gears, if they are not fully engaged, and you tighten the hub nut, it WILL snap, and they cost around £80!

Fit the new coil spring hub assy just like the GSXR procedure with one exception, –
The counter shaft of the bandit engine is again longer than the Slabside one, but it’s different to the Slingshot counter shaft, the dimensions for the bandit spacer are 35mm O.D, 25.5mm I.D and 6mm thick. Also as the original bandit hub has a different thickness base to either of the gixxers, it still works out that you need a 10mm ball bearing to take up the slack between your original bandit pushrod, and your push piece.
Again secure the hub using your original nut & washer on the new spacer fit the new GSXR clutch plates and pressure disc assy as above.
And you too have a GSXR spec, coil spring clutch!, Again you can go and fit a lock up straight on if you wished!, Or leave it as it is and go and do stoopid stuff, safe in the knowledge that you’re clutch can take it!
Now, extra hints and tips.
Tip 1: When you do the job, put the bike on its side stand and carefully lift the front wheel and chock it on a brick – this will stop you losing any oil when you remove the clutch cover.
Tip 2: When buying new clutch plates, use only genuine Suzuki parts – I know they’re more expensive, but it’s false economy to put cheapo plates in. I know, I’ve tried ALL the super-trick/heavy-duty ‘performance’ clutch plates and they just don’t compare with the genuine stuff. You have been warned!
Tip 3: With this particular conversion you fine-tune the biting point by changing the ball bearing – if it drags too much (assuming you’re using the correct grade oil and the steels aren’t warped), then you need more travel so try fitting an 11.5mm one instead. If it slips (assuming the fibre plates and/or the springs aren’t worn), you need less travel so pop in a 9mm one. It really does make a difference!

Also take the time to make the special tools, they’re a piece of piss to make, and really make life easier.

Special tool one: You’ll need two pieces of steel bar that are 200mm long, 25mm wide and 5mm thick (ish …), drill two 6mm holes in each bar with the centres 165mm apart then, at one end of each bar, fit a M6x30 bolt and secure it tightly with a nut on the underside. At the other end, open out the 6mm hole to 8mm and join the two bars together with a M8x70 bolt and loosely secure it with a nut on the underside. To use it, the M6 bolts will neatly fit into the slots on the diaphragm pressure disc and the M8 bolt will fit straight into the swingarm spindle – once the slack is taken up, you’ve got both hands free to undo/tighten the big 50mm holder nut!

Special tool two: First get one 400mm long piece of square section (20x20mm) bar and two old GSX-R clutch driven (steel) plates. Put the plates on top of one another and drill three holes equally around the diameter and secure them to the square bar using two M6x60 bolts and 20mm spacers and a couple of M6 nuts (this way, you can support the basket really well and reduce the chances off slipping, as the plates will be deep inside the unit). Finally put a small M6x10 bolt and nut through the remaining hole to secure the plates together. This is a wicked tool to have, when you’re trying to remove/secure the hub nut at 160Nm!

Anyway, in preparing this article I’ve been down to my local Suzuki dealer to get the correct part numbers for you to order and latest prices (all, are + v.a.t.,and correct at August 2002), and to ensure that those of you using second hand stuff from the breakers get the right bits off the right models. I’ve already checked to see which part numbers are superseded by later ones and that the information given is correct to the best of my knowledge and experience etc– aren’t I good to you lot, eh?

GSX-R Coil Spring Clutch Conversion

GSX-R COIL SPRING CLUTCH CONVERSIONS

Words & pics: Lee Workman

Before we start, I’m no journo, so you’ll have to forgive the lack of long and rambling intro and humorous asides throughout. I’m an engineer by trade and have been messing around with Suzuki’s big bore oil-cooled motors for ages and I’ve picked up a few tricks and developed a few of my own along the way.
I’ve done this coil-spring clutch conversion a few times on later GSX-R’s (and Bandit Twelve’s too). It’s cheap, very effective and it’s a piece of piss, so here are the facts.

There are the two types of clutch unit fitted to the GSX-R range and Suzuki’s first attempt, the coil spring type, is definitely the best. Fitted to all GSX-R Slabsides from 1986 through to 1988 (the 1052cc G/H/J models), it uses ten steel driven plates and eleven fibre drive plates and is clamped together with four coil springs acting on an alloy pressure disc.
With any clutch, the limiting factors are the unit’s overall strength, the surface area available and the clamp load on the drive and driven plates. The design of the Slabside coil-spring unit excels in all three areas – this unit can easily cope with even the most ham-fisted wheelie/burnout merchant and on the road it should handle over 160bhp as stock.

OLYMPUS DIGITAL CAMERA

For the heroes or for strip use, it can be still further improved with the use of heavy-duty coil springs, and for the serious drag racers out there, there are a couple of aftermarket ‘lock-up’ type conversions, which bolt straight in and replace the existing pressure disc. The lock-up is the ultimate in super-strong non-slip clutches.
Then there’s the diaphragm type. Fitted to all GSX-R Slingshots from 1989 through to 1991 (the 1127cc K/L/M/N models), it uses a similar clutch basket and the same driven and drive plates as the earlier Slabside clutch (with the exception that there are only ten drive plates in this unit), but the plates are clamped by two diaphragm springs acting on a different pressure disc design.
This unit is fairly robust and is less prone to ‘judder’ than the coil-spring type, but it starts to struggle with more than 140bhp and if you like your wheelies and burnouts or if you launch it hard on the strip, it’s not long before it gives up the ghost .

There is already a conversion kit on the market from APE, costing around £190, which converts a Slingshot diaphragm clutch to a coil-spring unit like that of the Slabbies and, therefore, allows the fitting of a ‘lock up ‘ kit at a latter date if necessary. But I’m going to tell you how to do it (using quality components) the cheap way. You can either get the stuff from breakers for around £30 or, using NEW genuine Suzuki parts for about £80 – about half the cost of the over-the-counter unit. And in a later article, I’m going to tell you how to fit one into your Bandit Twelve motor too, so keep any eye out for that, okay?

Anyway, in preparing this article I’ve been down to my local Suzuki dealer to get the correct part numbers for you to order and latest prices (all are plus VAT and correct in August 2002). And to ensure that those of you using second-hand stuff from the breaker’s get the right bits off the right models, I’ve already checked to see which part numbers are superseded by later ones, and that the information given is correct to the best of my knowledge and experience etc. Aren’t I good to you lot, eh?

Firstly for those of you starting with a Slingshot GSX-R 1127 (a K, L, M or N model), you’ll need the following parts:


No. Description Suzuki Part Number

Qty

Price � (ea.) Source Model

1

Clutch inner hub

21410-06B02

1

49.46 GSXR1100 G,H & J

2

Pressure disc

21462-06B00

1

23.49 GSXR1100 G,H & J

3

Coil springs

09440-20013

4

1.31 GSXR1100 G,H & J

4

Spring spacers

09180-06174

4

1.72 GSXR1100 G,H & J

5

Washers

09160-06020

4

0.53 GSXR1100 G,H & J

6

Bolts

01107-06307

4

0.71 GSXR1100 G,H & J

7

Drive plate (Fibre)

21441-48B00

1

9.53 All GSXR 1100’s

The parts needed for the conversion. What You'll Need

Then you’ll need two extra components – a 10mm steel ball bearing from your local bearing factors, and a hub nut spacer too. You’ll need to get one of these knocked up by someone with access to a lathe or any local engineering firm should make you one for around a fiver. The dimensions are 35mm OD and 25.5mm ID and it needs to be 10mm thick.

Got all them? Good, so here’s how you actually do it. Firstly, shift the transmission into first gear and remove the nine screws from the clutch cover. Then take off the clutch cover and remove the large circlip in the centre of the hub before you take out the pressure disc lifter and the push piece and its bearings. Hold the pressure disc from moving using the special tool no.1 (see below), undo the big holder nut and remove the diaphragm springs and the spring seat and then the pressure disc.
Remove the drive and driven plates, followed by the wave washer and its seat, then hold the hub with special tool no.2 (see below an’ all) and undo the hub nut and remove the nut, washer and hub assembly. Important – ensure the long (steel tipped) alloy pushrod and the thrust washer between the basket and hub is still in place or you’ll be buggered. Now fit the new hub.
Problem number one – you’ll notice that the hub nut and washer will not now tighten down because there aren’t enough threads on the countershaft. This is because the Slabside hub has a thinner base and the Slabside countershaft is shorter, so this is where the spacer is needed on the driven shaft. Fit it over the shaft, then you can secure the new hub using your original nut and washer using special tool no.2 to hold the hub while you tighten the nut to the correct torque (140 to 160Nm or 102 to 115ft-lbs).
Now re-fit your original clutch plates (as long as they’re not fucked, check the fibre ones for the correct thickness – 2.52 to 2.68mm / 0.100” to 0.106”) and check the steels for warpage using a feeler gauge and a piece of plate glass (max limit 0.10mm / 0.004”), starting with a fibre one, then steel and so on (you should finish with steel, if you’re not a complete wazzock). Now fit the extra fibre one you’ve just bought.
Problem number two now rears its head – because of the differences in the length of the countershafts, your clutch push rod is now, effectively, too short. This is where you fit the ball bearing – it will take up the gap between the alloy pushrod and the push piece. Fit your push piece complete with its thrust bearing and washer and then fit the new pressure disc using the new spacers, springs, washers and bolts and secure the bolts in a criss-cross pattern to the correct torque setting (11 to 13Nm or 8.0 to 9.5 ft-lbs).
Re–fit the clutch cover, check the oil level and you’re away! You’re now the owner of a coil-spring clutch – told you it was easy!
Now, extra hints and tips.
Tip 1: When you do the job, put the bike on its sidestand and carefully lift the front wheel and chock it on a brick – this will stop you losing any oil when you remove the clutch cover.
Tip 2: When buying new clutch plates, use only genuine Suzuki parts – I know they’re more expensive, but it’s false economy to put cheapo plates in. I know, I’ve tried ALL the super-trick/heavy-duty ‘performance’ clutch plates and they just don’t compare with the genuine stuff. You have been warned!
Tip 3: With this particular conversion you fine-tune the biting point by changing the ball bearing – if it drags too much (assuming you’re using the correct grade oil and the steels aren’t warped), then you need more travel so try fitting an 11.5mm one instead. If it slips (assuming the fibre plates and/or the springs aren’t worn), you need less travel so pop in a 9mm one. It really does make a difference!
Also take the time to make the special tools, they’re a piece of piss to make, and really make life easier.

Special tool one: You’ll need two pieces of steel bar that are 200mm long, 25mm wide and 5mm thick (ish …), drill two 6mm holes in each bar with the centres 165mm apart then, at one end of each bar, fit a M6x30 bolt and secure it tightly with a nut on the underside. At the other end, open out the 6mm hole to 8mm and join the two bars together with a M8x70 bolt and loosely secure it with a nut on the underside.

To use it, the M6 bolts will neatly fit into the slots on the diaphragm pressure disc and the M8 bolt will fit straight into the swingarm spindle – once the slack is taken up, you’ve got both hands free to undo/tighten the big 50mm holder nut!

Special tool two: First get one 400mm long piece of square section (20x20mm) bar and two old GSX-R clutch driven (steel) plates. Put the plates on top of one another and drill three holes equally around the diameter and secure them to the square bar using two M6x60 bolts and 20mm spacers and a couple of M6 nuts (this way, you can support the basket really well and reduce the chances off slipping, as the plates will be deep inside the unit). Finally put a small M6x10 bolt and nut through the remaining hole to secure the plates together. This is a wicked tool to have, when you’re trying to remove/secure the hub nut at 160Nm!