
ral
Members-
Posts
172 -
Joined
-
Last visited
Reputation
55 ExcellentPersonal Information
-
Location
Derby
Recent Profile Visitors
The recent visitors block is disabled and is not being shown to other users.
-
Is or does number 4 kick in at higher revs when the fuel supply through the carb changes from idle to main jet, From memory the emulsion tube has small holes along its length, these need to be clean so ensure you remove the emulsion tube for cleaning, did number 4 carb have fuel in the float bowl prior to pulling the carbs off? Also confirm the tiny passage in the float bowl is clear, they are a arse to check and clean as can be fairly gunked up. Again from memory the brass tube at the rear of the carb locates into a passage when the float bowl is offered up for re assembly, this passage has to completely clear all the way through. I find that you have to completely remove all the brass type components I.e jets,emulsion tubes, choke slides and not rely on the ultrasonic to clean them, if any are blocked it’s unlikely they will clean in the bath. Use a mild acid ( like liquid aluminium cleaner ) and swill the brass parts in this, just don’t leave them in to long, they should come up like a new penny, remember to swill them off to remove any trace of acid after, clean fuels good at this. If you can get hold of a number 9 E string of a guitar this is perfect for passing through the tiny holes in the float bowl passage. Good look, they are a bugger to get perfect.
-
Dyno set up all day long is the way to go, you won’t regret getting the set up bang on.
-
Will be there on Saturday, will call in to say hello.
-
My guess is the carbs are still not clean enough, I had similar issues to your description and it took three carb strips to get the internals squeaky clean, have you had the emulsion tubes out and cleaned all the holes out for example. Once spotless get it on a dyno to set up optimum delivery and you won’t regret it, he’ll of a difference when done right.
-
Workshop manual states pressure of above 1.42 and below 7.11 psi, not a lot is it. Measurement taken at 3000rpm
-
Changed the switch over and the flickering stopped. Thanks again for you imput folks.
-
Thanks for the reply’s folks, I’m aware that the switch requires an earth signal to illuminate, funny thing is the switch wasn’t initially making the earth thus no oil light, I put this down to it being covered in what looked like a varnish coating from old dried out engine oil, there was no continuity when checked with a meter, stripping the switch components and cleaning did the trick, maybe it’s too clean Ive a couple of these anyway so will try changing to see if that makes any difference, it’s only flickering when stationary and ticking over, stops as soon a the throttle is blipped. Next step is to confirm the wire connection push fit on top of the switch as it’s 40 years oldrest of wiring is all new.
-
As heading, light flickering on below 1500 rpm on GSX1100ET but only when warm, any ideas folks, just back from riding it and if the pump was faulty I would think it would have seized by now. Are there alternatives to the std factory switch???? As I’m not convinced that wire connection is great as it’s quite a loose fit.
-

Is this wire SUPPOSED to be connected to something?
ral replied to BlatantNoobery's topic in Air Cooled
On a recent complete rewire not a single workshop manual showed or matched the original loomes wire colours exactly, and I’ve got three different manuals for the bike in question including factory manuals with revisions. So don’t expect the diagrams to always be 100% correct. The important information is that the connections joining up each component are correct, a good black and white diagram is in my opinion essentially better than colour, let’s face it you could use all the same colour wire in a loom to achieve the desired result. Looms will also contain some unconnected wires as across the model range different accessories can be fitted, as in your diagram, there is no parking light as Captain Chaos has pointed out. -
79 is the vac hose ( small bore pipe ) 81 the fuel hose ( large bore pipe) it’s a struggle to get them on the tap the wrong way round as the smaller bore vac pipe would be difficult to fit onto the large bore fuel outlet. Pri= prime, and opens the fuel tap to flood the float bowls that’s why you’ve got fuel flowing, turn it off prime and stick a hose onto the small bore vac side of the tap, suck on the vac pipe and fuel should flow from the fuel tap large bore outlet if alls well. leaving it on prime will test your float valve shut off action, if any float valves are not sealing you can get fuel filling a cylinder, first you will know is if you go to start it and it locks up. Can also bleed fuel past the rings into the crankcases.
-
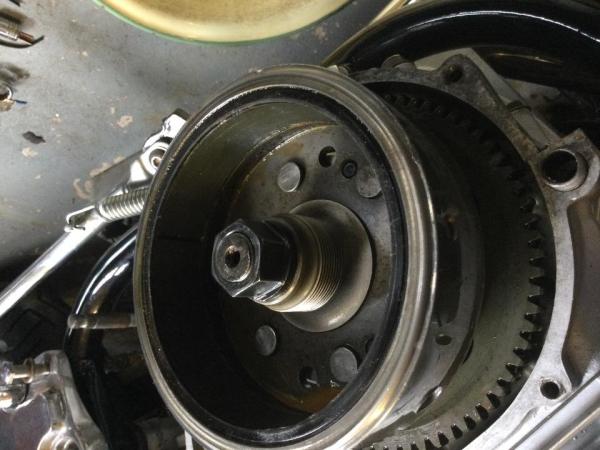
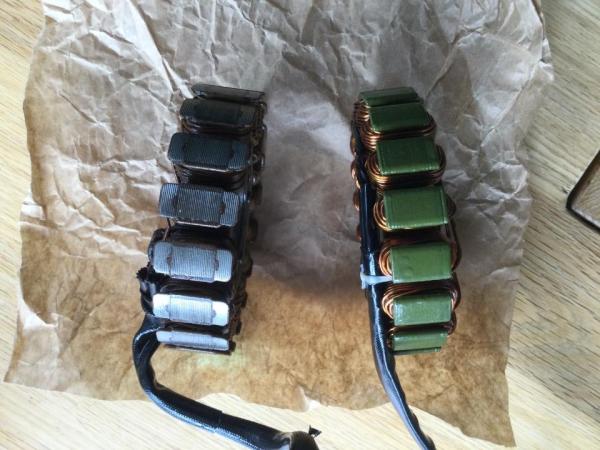
9So here’s the problem, as Toni says the gap is fixed, however this clearly depends on the inside diameter of the Rotor and the Outside diameter of the stator, the new Stator/Generator is 103mm and as listed by Electrex world for 1980 gsx1100, the inside diameter of the rotor is 104.4mm, the Stator will fit inside the Rotor but I suspect there will be contact one I fire up the motor as there will no doubt be some runout between the two, the air gap seems to be too small in my humble opinion. The old stator however is also 103mm but looks to have been running or making contact with the magnets on inside of the rotor.
-
So here’s the problem, as Toni says the gap is fixed, however this clearly depends on the inside diameter of the Rotor and the Outside diameter of the stator, the new Stator/Generator is 103mm and as listed by Electrex world for 1980 gsx1100, the inside diameter of the rotor is 104.4mm, the Stator will fit inside the Rotor but I suspect there will be contact one I fire up the motor as there will no doubt be some runout between the two, the air gap seems to be too small in my humble opinion. The old stator however is also 103mm but looks to have been running or making contact with the magnets on inside of the rotor. New on the right.
-
Can’t find any spec for this in the workshop manual, As far as I’m aware the stator size can be 101mm or 103mm This I would have thought would mean the rotor would also have two internal dimensions. But what would or should be the air gap?? Anybody know this????
-
Thanks folks, have looked on eblag and there are sets at £10 a set look ok but I’ve doubts that at a tenner there suitable enough, seem to have had sold lots, anybody have any experience of them. like you say might be best to get a newer Suzuki set.
-
Not any more, spoke to him last week and again fully booked until November at earliest. works from home now and collects and delivers bikes that he’s got booked in. looks like I will be doing it myself if it’s to be done sooner rather than later


