djayedot
-
Posts
40 -
Joined
-
Last visited
-
7/11 Oil Pan Debacle
djayedot replied to djayedot's topic in Water Cooled, V-Twins, Singles and 2-strokes
Thanks for the reply bro. Yes header style differences are definitely (well at least in my opinion) why they made these pans different (also, they probably wanted to save money by running a pancake style heat exchanger on the lower-heat models). Now, here's hoping the 750 headers are tall enough to work on my wonky ass setup... How much taller is the 1100W deck height compared to a 750??? I'm worried tops of primaries may be awfully close to bottom of oil pan... -
7/11 Oil Pan Debacle
djayedot replied to djayedot's topic in Water Cooled, V-Twins, Singles and 2-strokes
UPDATE: I stared at these drawings for a solid 1-2 beers and have made a few observations (please correct me if I'm wrong here). 1- I believe my arrows for oil cooler flow path are actually backwards, hole with the restrictor orifice down it's bore will actually be cooler RETURN. 2- It is definitely important AF that however I do this, the PRV is UPSTREAM from the newly installed restrictor orifice (upstream in terms of oil pump discharge path). If not, a pump overload situation may occur at high RPM. -
7/11 Oil Pan Debacle
djayedot replied to djayedot's topic in Water Cooled, V-Twins, Singles and 2-strokes
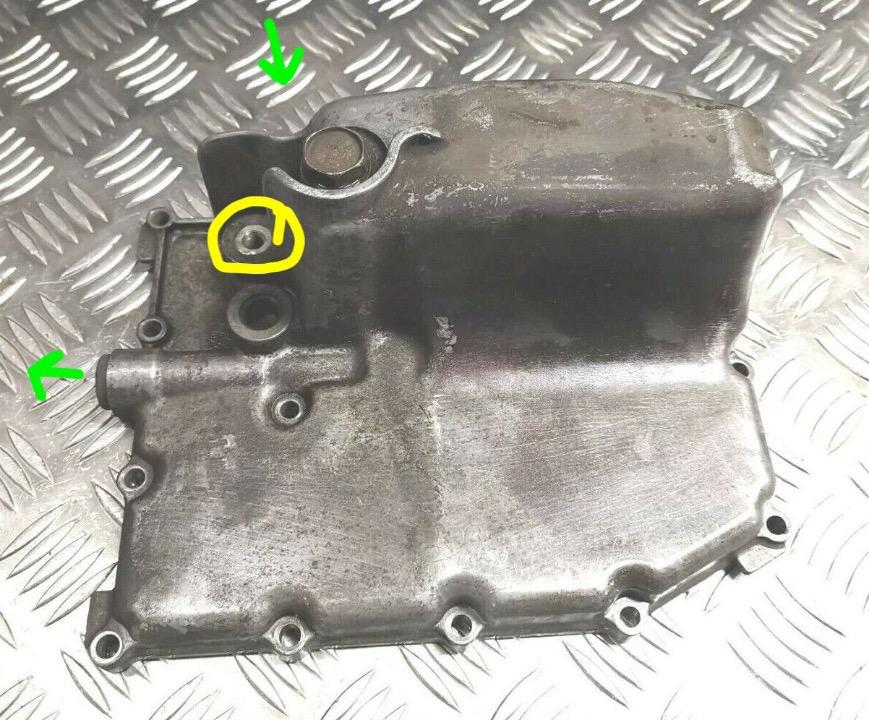
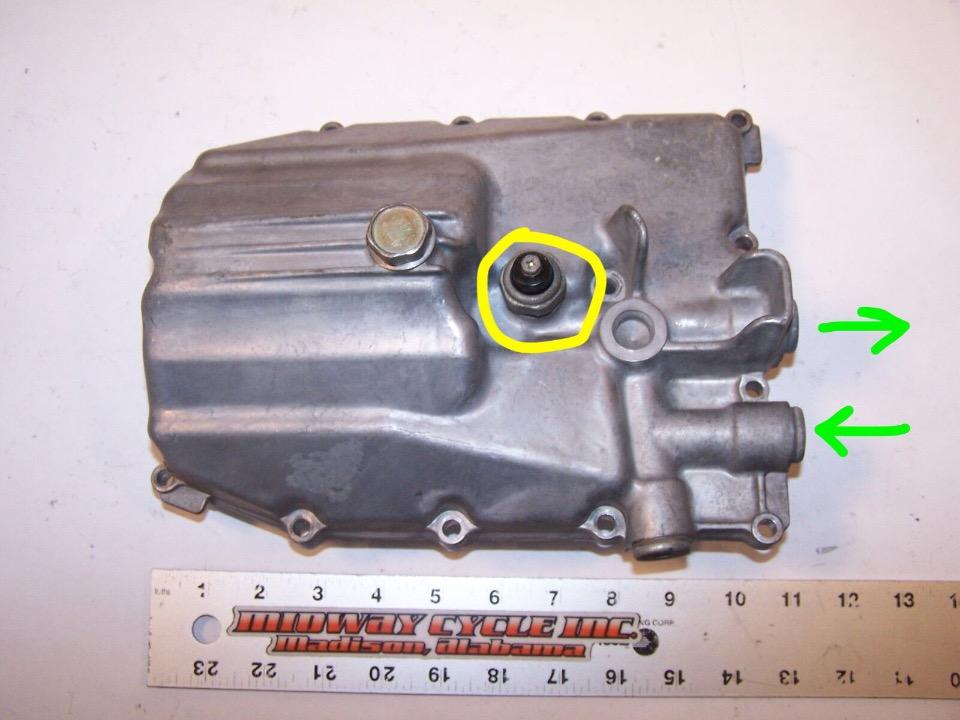
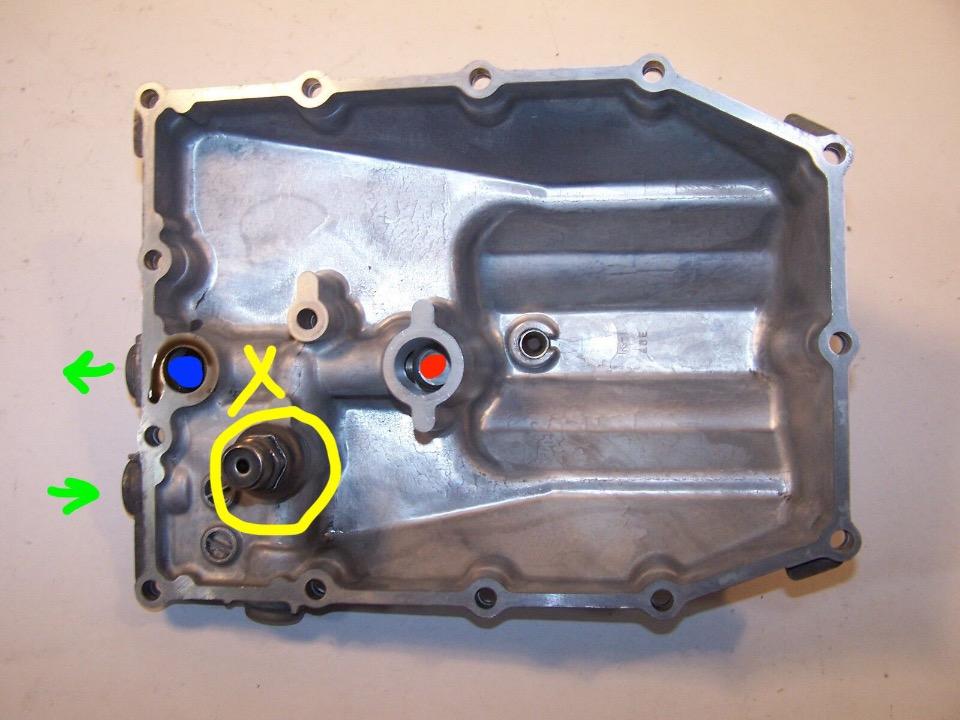
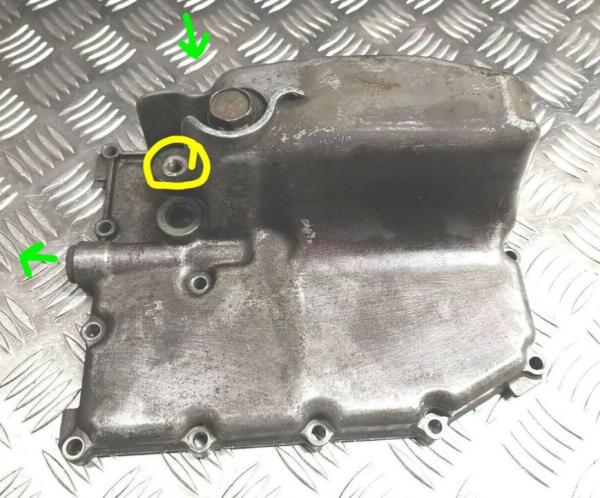
Alright guys, I keep going to my shop and forgetting to take pics of the new pan, so forget it, I just pulled some pics from some various Eblag listings to illustrate what I'm trying to do here. First two photos are of a stock 1100W pan (this is exactly how my bike is set up right now). RED Dot = oil pump discharge BLUE Dot = oil flow to filter pad (oil filter inlet) YELLOW = Bypass valve and oil pressure sensor locations (different between the two pans) Also denotes location of the STOCK oil flow restrictor orifice plug "X". GREEN = Original 1100W external oil cooler flow path. Second two photos are of 750W pans. RED Dot = oil pump discharge BLUE Dot = oil flow to filter pad (oil filter inlet) YELLOW = Bypass valve and oil pressure sensor locations (different between the two pans) PINK = Proposed installation area for OEM oil flow restrictor orifice plug GREEN = Proposed oil cooler flow path (return line will be custom AN line to allow return in to side of pan) Soooooooo with all of that said.... What do you guys think the chances of me blowing my shit up the second I hit the starter button is, if I decide to attempt this??? It seems simple enough, but the PRV's and oil pressure switches being in different locations has me a little worried, lol. Thanks in advance.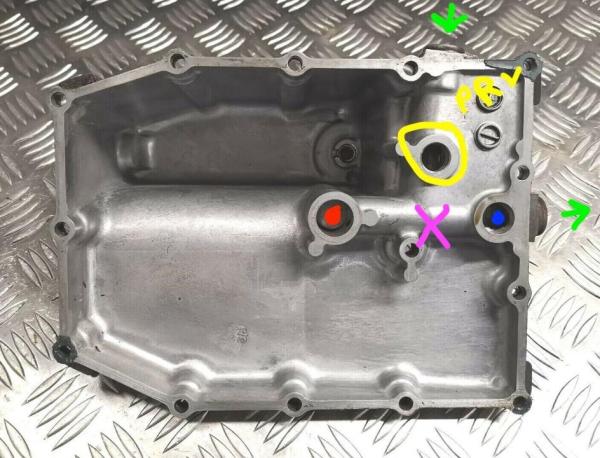


-
7/11 Oil Pan Debacle
djayedot replied to djayedot's topic in Water Cooled, V-Twins, Singles and 2-strokes
Will do, I JUST brought the damn 750 pan back to my storage but I'll go get it soon and draw some diagrams over it, to make some of this nonsense clearer... -
Hi Guys, hope I don't ramble on too much here (if any of you have seen my other posts, you'll know it's a very real possibility)... Been super busy relocating my shop lately, and haven't been able to pay much attention to my poor beloved watercooler... Nonetheless, I have (lazily) pressed on with some side quests in the background. One of which is to get my favorite exhaust system back on to the bike (I had to shelf my preferred exhaust during the 1100 swap due to time constraints. Ended up going with a garden variety Yosh 4-1 1100W header with a BOGUS POS SC Project silencer for the remainder of that season.) That 4-1 header has now cracked pretty bad at the collector after a light season of use, and I'd rather not repair it. The "preferred" exhaust in question is a (somewhat uncommon) ti/cf WINGS exhaust (manufactured in New Zealand, IIRC) originally intended for a KTM 1190 Adventure bike. I acquired this silencer via my old job years ago, and I like the way that it sounds ALOT. I built the setup back when the bike was still a 600 with a Yosh 4-2-1, and fabbed up a pretty nice Cerakoted midpipe for it (at the expense of my period-correct Yoshimura piece which I probably shouldn't have cannibalized, in retrospect.) I still have the headers, midpipe, silencer, and bracket. Would love to just throw it on but of course, there is the pressing issue of 600/750 vs. 1100 oil pan... (1100 has a mostly centered sump while 600/750 is smushed off to one side). I got a little trigger happy the other night and ordered a 750W oil pan, pickup tube, and gasket, thinking that I had the whole scheme figured out. Guess I had a few too many beers, because I overlooked the whole oil cooler port issue... Oops. I've been studying the two pans side by side for a minute and have come to a few conclusions... One- in an 1100W application both sides of the cooler are fed by the exact same oil pump output gallery??? And Two- the only thing that induces pressure differential/flow across the cooler is the little orifice plug which is inserted in to the 1100 pans only??? (Looks like a 1/8" NPT pipe plug with a hole drilled in it, Suzuki part number is: 11532-46E00). With all of that said, here comes my real question: can I remove the front plug in the 600/750 pan, tap the bore (further back, past the first vertical hole, just as it is in 1100 applications) for the oil jet in question, and run my OEM 1100W external oil cooler? (The return port would be via AN line back in to the location of the SIDE plug in the 600/750 oil pan). It makes sense in my head, but I've been wrong plenty of times before... I guess I'm a little gun-shy about this because 1- it's literally the most important fluid system in the entire bike, and 2- the oil pressure sending unit is in a different location vs. 1100W equivalents. I've thought about it a little, and I believe the oil pressure warning light will still function as intended, only difference being if there is an abnormal restriction in my external cooler the light may not trigger if there is another failure further down the line??? Am I tripping balls or on the right track here?
-
Factory Pro FCR Emulsion Tubes
djayedot replied to TJS's topic in Water Cooled, V-Twins, Singles and 2-strokes
I always wondered why FCR engineers decided to omit the mixture holes in the emulsion tubes (also always wondered WHYYY the hell there's only bearings in 3 out of the 4 slide wheels). Were any major jetting adjustments required to make these run right? Also, as a side note since I'm considering upgrading carbs soon- would you happen to know if anyone's figured out a decent way to run proper filters over FCR's with the velocity stacks still intact? Maybe some kind of base plate behind the stacks for filter mounting? -
suzuki gt 750 kettle resto mod
djayedot replied to busa ash's topic in Water Cooled, V-Twins, Singles and 2-strokes
wow dude this build is sick!! can't believe how well that gsx1100 headlight works with the rest of your setup! -
Also, hi fellas I'm back from a little hiatus and there is some progress! A very kind gentleman on this forum (who coincidentally lives ten minutes from my shop) sold me a beautiful 94-95 750W braced swingarm!!! That checks ONE rare item off my list at least, leaving just a 40mm BST rack and that sexy ass SBM cylinder block to go... I also got my 5spd trans back from the machine shop, they said it cleaned up well. I believe they had to do a little work to 1st and 2nd, all other gears looked good. I mated the cases a couple nights ago and tossed the motor in the frame, will try to finish up the install tomorrow evening. The swingarm swap will have to wait a little bit (I have an S4, a Cummins, and my trusty Ford Ranger all in a billion pieces that desperately need my attention first) but fairly soon it will be going in. While I'm ahead, I want to get an idea of what I'll need. I did some reading and it looks like the pivot shaft is an easy solution, and brakes/wheel axle/etc all swap over no problem. I see the chain buffer is a bit different and will pick up a new OEM one if I can manage to source it. But my current questions lie within the linkage- I understand that the dogbones are of a different design (I have them), but can I use my 600W "cushion lever" and shock? I was in a rush and took a quick look at the microfiche and it looked like the linkage was the same between models, but upon closer inspection it looks like I misinterpreted the fitment data... I like my cushion lever, it's nice and clean, and has all new bearings and seals. And I DO NOTTT want to part with my shock. I have no idea who set it up, nor what specifications it was set up to, but I am in love with the feel of it and very confident on the bike thanks to it. I would hate to have to go to a 94-95 750W shock and go back and forth with a suspension guy to get it set up even close to this old one. Anybody got any pointers? -Austin
-
Hey Wombat, how hot does your bike run with that kit? What's your CR? Just trying to get an idea of what's ahead of me lol.
-
Not sure if this info is of any value to you but I did 1100W Tokico 6 pot's on my 93 600W and the improvement was absurd. Although, I can't say for sure how much of that improvement was from the calipers themselves because at the same time I did fresh EBC full metallics, -3 AN lines, fresh (to me) low mileage OEM rotors (round hole style instead of slotted, not even sure what they were originally off of at this point), and a newer K5ish GSXR1K radial Nissin master cylinder which I rebuilt with OEM kit before install. Honestly, feels better braked to me than many newer Brembo machines... If nothing else, we can say 600W/750W 4pot's should slap right on, but why is it you want to downgrade to the OEM Nissin 4pot's? PS: For those saying that the 6pot's don't feel as nice as the 4's- when you did your conversion did you run the math on caliper piston area vs master cylinder bore and adjust accordingly? Because I would imagine that if I retained my original small bore master it would indeed be quite terrible. -Austin
-
Ah yes good idea, thank you for the specs let me give my set a look!
-
Man you know what, I'm really starting to think I have a 96-97 SRAD trans here... Did some more digging and it looks like 96-97 is NEARLY identical to the W transmissions, then 98+ they went to an obviously different style input shaft and one of the bearings has a half-moon clip slot located in the middle. This box looks weak AF I'm about to just send my 5spd out for undercutting, lmao Do we have any SRAD experts here that could lend some info?
-
Just took some quick measurements and my 1st gear window is about 3.85mm deep in the cut, and 3.55mm deep outside of the cut. 1100W is like 7.15mm uncut (unfair comparison I know). But, that's CRAAAZY
-
Now see, that looks normal to me. UGH... So either my set has already been undercut (and clearly needs it again because it looks WAY torn up, which is probably not possible as there isnt much material left at all), or is some other bogus gear set with super weak looking engagement points... I can see why they would cut the windows deeper, but even then, without those cuts it seems more shallow than what it should be. The hell is going on here lol
-
Good deal man, at a glance it definitely appears the same as what I've got. Did you notice quite shallow engagement points as well? -Austin