


Devilman
-
Posts
125 -
Joined
-
Last visited
Content Type
Profiles
Forums
Events
Posts posted by Devilman
-
-
20 hours ago, Gixer1460 said:
So how do you explain a Dual Pod equipped GSXR1100 working fine with just the addition of a DJ kit ?
Yes, a DJ kit modifies the way the slide responds but doesn't require intake 'modification' of airflow.
Just turn the rubbers upside down then you aren't wedging the foam against the frame ?

And forgive me for noticing but the carbs in the pictures above are slide types so will virtually function quite well without any sort of induction modification IMO.
")
I was replying to a post regarding Bandit6 carbs, on a thread about Bandit 6 carbs.
The issue seems to be much more prevalent on bandit 6's for some reason.
Seen plenty of GSXR11's with Dual Pod K&N and they were just fine.
But a GSXR1100 is not a Bandit600. -
It depends what the linkage ratio is, which will be different from bike to bike.
What bike are you looking to raise the back end on? -
18 hours ago, Archie said:
Same - everything I read when trying to find new pods for the gsx / 600 thing said bandit 600s run crap on them. Was gonna go with ramair foamies, but was too tight to pay £20 odd a filter. Got some new cheapyish ones like that were on there and we’ll see.
if space is an issue there were some universal real slim line ones on the net, but who knows what quality they are
The pod filters in-and-of themselves are not really the problem.
The real problem is that 99% of the time when someone fits pods, they stick them straight onto the carb mouth removing / disposing of the rubber "velocity stacks" that are built into the stock airbox-to-carb rubbers. (K&N Dual Pods are very notable for this, there simply is not enough room to use the stock airbox rubbers)
As shown by @yantoshabove, if you include the rubbers from the airbox (and with the right foam filters) it greatly helps with getting them to run nice")
-
From memory Bandit 6's are very prone to rough running without the airbox, to the point where I've heard people say that jet kit(s) didn't really help at all, the only thing that fixed it was Dyno time.
-
1 hour ago, Omegasteve said:
Also, im guessing its mk1 bandit carb rubbers that will be the replacement ones?
Not certain on that one, but you could try using one of the online parts catalogues (such as cmsnl or fowlers) to cross-check the part rubber numbers to see if they're the same
")
-
Forgive me if this has already been suggested, I've not had the chance to read all the recommendations made by others....
I had a similar issue with a 750J a while back, no matter how hard I tried to get the carbs balanced, I would end up with the idle "hanging up" like you describe.Turns out it was vacuum leaks due to cracked / perished carb rubbers (and the O-Rings behind them).
Could be worth a try?-
 1
1
-
-
As far as I am aware all the stems should be the same across the GSXR's.
Is it possible you either haven't pressed the stem in far enough, or do you have any "Custom Yokes" that may be thicker?
Bit of a cheeky blag here but I'll give it a punt anyway....
I am in need of a Bandit stem and I have the front-end from a 750J sat here in my garage ...
Perhaps you would be interested in a trade? (Your Bandit Stem for my 750J Stem)

-
1
-
-
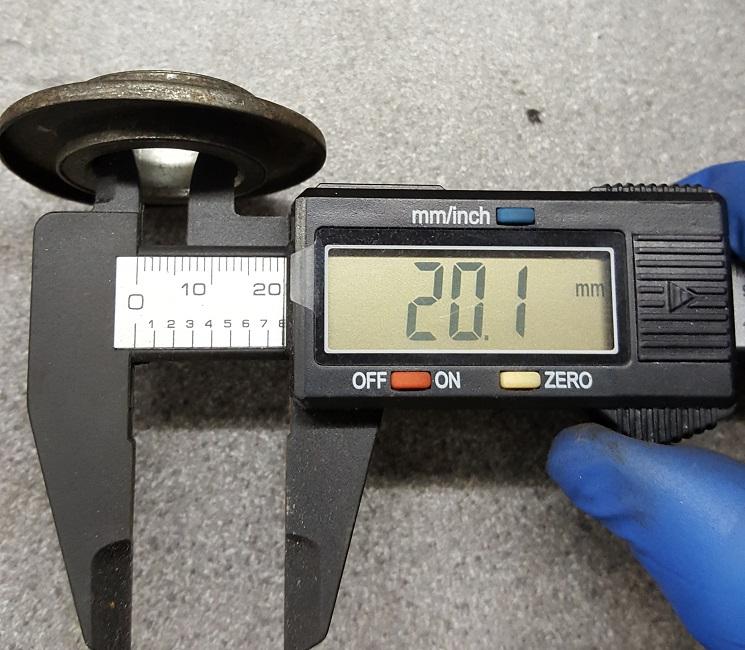
12 hours ago, slayer61 said:
I've always found less math to be easier. Measure from the east side of 1 to the east side of the other & be done.
And 58, it is.

While fundamentally I agree, in this particular case what you suggest is unlikely / unable to be used.
Calipers cannot measure from "inside" to "ouside" on the same part in the manner you suggest. They measure outside-outside OR inside-inside, so either way you gotta do some math
-
1
-
-
9 hours ago, Joseph said:
Which is still 59mm
Sure is...
However I was simply providing people with the means to figure it out accurately and reliably themselves should they want to-
1
-
-
If you're trying to eye-ball it center-to-center with a pair of calipers, I can see why you're having problems
Just screw a couple of studs into the bolt holes, measure across the outside of both studs, then subtract the diameter of 1 stud.
You now have your center-to-center spacing perfectly
-
3
-
-
Makes absolutely zero difference to a stock motor.
What you more than likely felt was a combination of placebo and the cooler weather causing a denser air-charge. -
3 hours ago, spiderpig said:
Pretty sure someone on here is running 1340 in std b12 liners
If I remember correctly 1246cc (82mm) is the largest you can go on stock B12 liners, they just get too thin after that.
1340cc (85mm) would be impossible on stock liners. -
42 minutes ago, Dezza said:
Dunno: they are in a box under 2 tonnes of junk so I will have to wait a bit to get to them for measuring. Another point is using a complete slabby top end on a B12 bottom end (with slabby 1100 clutch). Would this maintain high compression due to a slightly smaller combustion chamber? The potential problem here I see is due to the differences in the cam chain and whether an 1127/B12 cam cover will work on a slabby head, seeing as the chain tensioner thingy in the cover is completely different.
If they're for a slabby which has 58mm stroke, then those pistons will be 78mm dia.
From what I remember from another thread, the cover should be inter-changeable to suit which chain you're running.-
1
-
-
3 hours ago, rider384 said:
Ok, so fired it up and took it for a spin earlier. The clutch is definitely still dragging, and it's dragging to the point where the engine will actually stall out when put into gear when warm. I can't hold it back from moving with just my feet, have to use the brakes. I replaced the 2x 2mm steels with 2x 1.6mm steels in an effort to give the clutch a bit more room to disengage, but it made no difference.
So, a brief summary of what I know:
- The alternator/oil pump drive gear is FULLY seated on the clutch basket
- The steels/frictions are stacked in the correct order, verified several times
- The spring washer/retainer are installed in the correct orientation at the base of the clutch pack
- The washer between the input shaft seal and the clutch basket is installed
- The washer between the clutch basket and the clutch sleeve hub is installed
- The system has been bled many, many times
Anyone have any ideas? At this point I'm thinking master/slave/wrong washer somewhere, but the clutch feels completely normal, same engagement point as before I disassembled the bike, doesn't bleed pressure when the clutch is engaged, pumping makes no difference, basically just feels completely normal and functional.
Edit: Also, is there something that's supposed to go in between the slave cylinder push rod and the main push rod? I didn't see anything in the manual but I'm kind of surprised they're just supposed to butt up against each other with no buffer.
Do you have any visible signs of wear on either the inner or outer basket?
Sometimes even a little bit of a "lip" at the edge of each plate can make them hang up and drag. -
2 hours ago, wraith said:
 there's always a gremlin hiding somewhere
 Only if you feed the Mogwai after midnight
-
2
-
-
Took this pic off Eblag for reference...
It definitely appears you do not have the gear on far enough, on the following pic you can see the only place the splines from the gear are visible is in the lower "lands" on opposite sides of the shaft.
-
1 minute ago, coombehouse said:
Looks like the cam cover gasket has been leaking for a very long time.
Yup, this is the conclusion I came too also. The 4th and 5th picture clearly show that classic "oil and dirt" caked to the chain tunnel, right up to the cam cover.
-
3 hours ago, davecara said:
Nice, that's an awesome calculator, should prove very useful to some folks
*Edit* Just to say... I wasn't really sure how to make the mods aware of my following suggestion without "spamming" the thread or creating another one just to ask it, so I have "reported" (not in negative terms) your post and asked the mods to create a "Useful Resources / Links" thread that could contain such very useful resources such as this and keep it pinned to the top of the board.
I Pray it does not cause any issues or trouble for you or the mods, It just seemed like a prudent way to bring their attention to something very useful -
1 hour ago, spiderpig said:
Cheers gents.
Plan is 1052 bottom, busa pistons and rods, 1127f barrels, ported and skimmed dot head with reground cams.
I know the head was skimmed that much that it needed a base spacer to lower comp when on a 748 race motor.
Not exactly straight forward, but fuck it, why not
I'm thinking between the skimmed head and busa rods ill more likely have reduce the comp. Will have to wait and see unless one of the brains on here can fill in the gaps for me
From memory Busa rods are 2.5mm longer than GSXR rods, so even with the 1mm shorter stroke of the 1052 crank, you'll need some kind of spacer to prevent piston-to-head contact

You should end up with around 1195/1196cc but as to compression ratio, that will depend greatly on how much the combustion chamber volume has been reduced by the skimming, and some math with the swept volume of the cylinder, etc.. etc..
There may be calculators out there now that you can punch the numbers into (bore, stroke, chamber capacity, squish band, valve-pocket capacity on the piston crown etc..) but I don't know of any personally.-
1
-
-
That's no mongrel, that's a monster! Really nice combination of parts, should be a fantastic engine
Combine it with a 1052 clutch and it's pretty much my ideal engine
What clutch are you planning to go with? "Top-hat" style from the earlier 1052, or diaphragm clutch from the 1127?
Regarding the chain, I'll echo what @FJDmentioned above, have you already got the tensioner installed in the back of the barrels? If so you'll quite possibly be fighting against it
-
1052, 1127 and 1157 barrels are all interchangeable, Dot head will fit all of them too, obviously need to use the correct chain / sprockets to suit the crank.
However, 1052 has 1mm shorter stroke, so barrels are shorter which conversely means if you were to put 1127 barrels on a 1052 crank, you'll lose compression and open up the squish band, robbing you of performance.
I guess you could get the barrels "decked" to shave 1mm off them, but they might be difficult to sell on if you ever wanted to, as a set of 1127 barrels that are only 58mm stroke might not find many buyers.
*Edit*
Not sure how thick a standard base gasket is and whether or not if you had really clean and flat mating surfaces you may be able to do away with it in favor of "form in place gasket" (RTV basically) to regain a bit?-
2
-
-
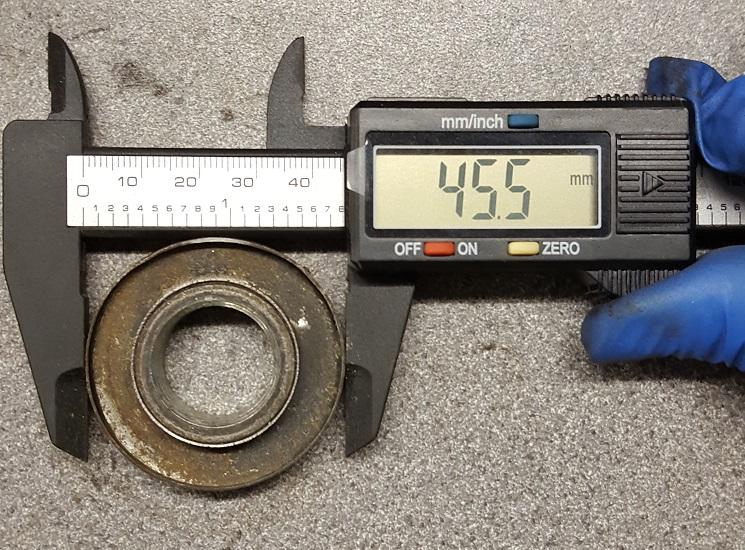
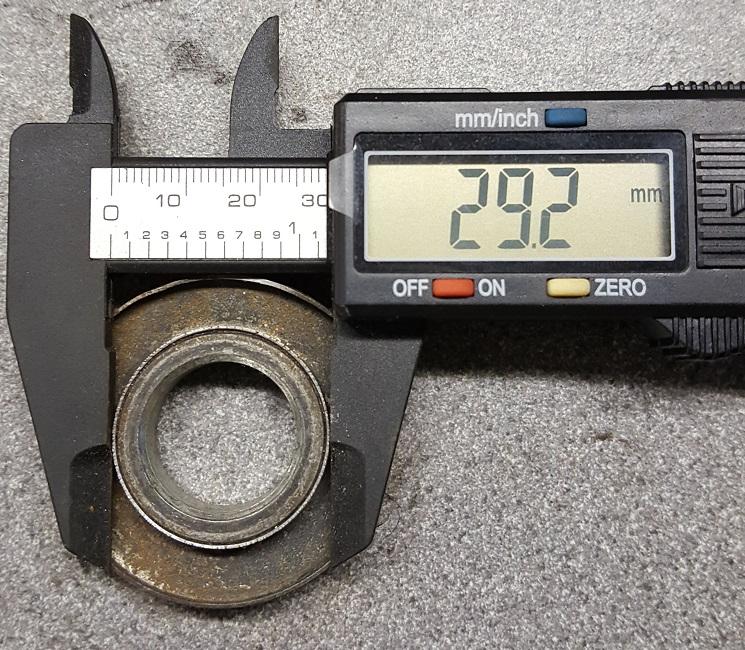
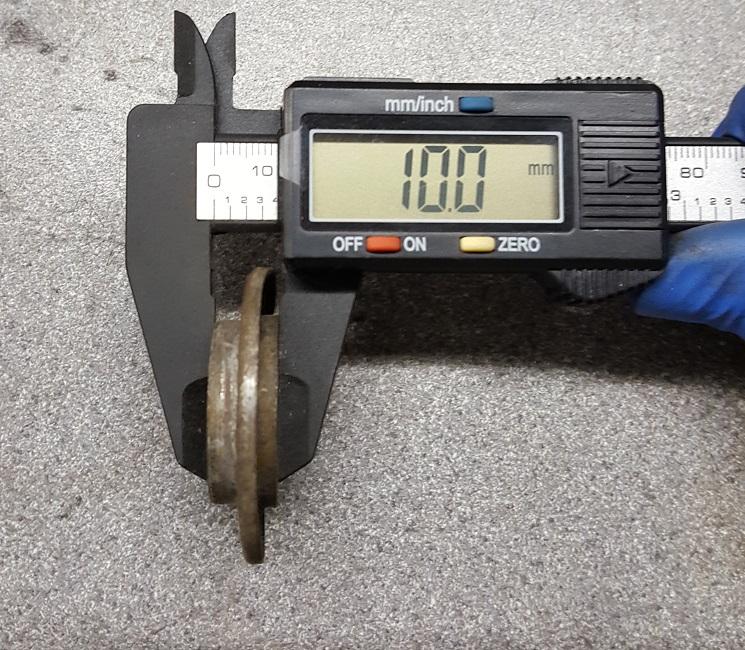
Grabbed a few pics to avoid any possible confusion with the different measurements
(Everything in millimeters, obviously)
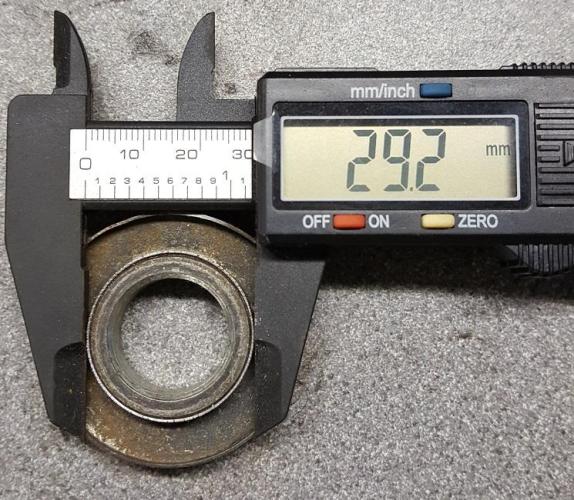
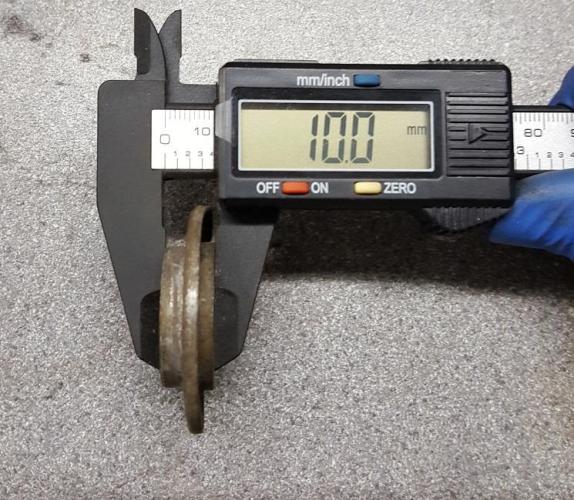
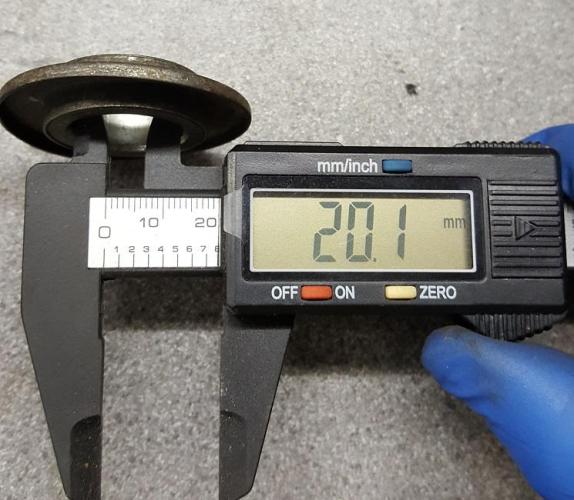
Hope that gives you all the dimensions you need-
1
-
-
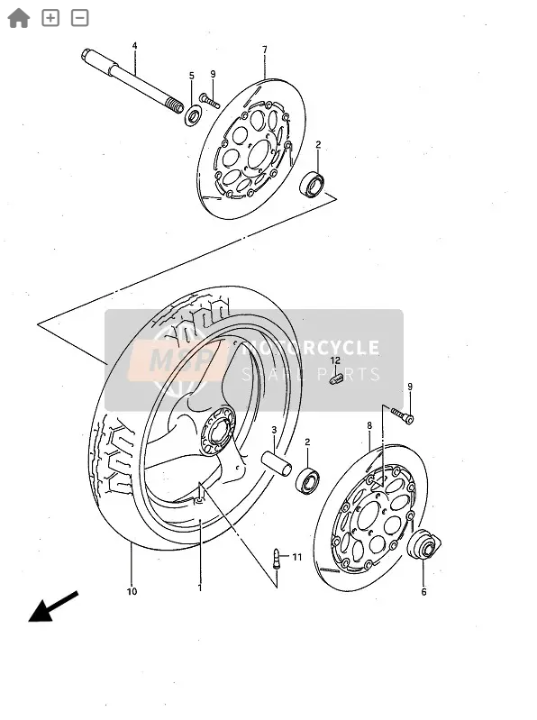
29 minutes ago, carlinmidarlin said:
Hiya
anyone got the sizes of the front wheel dust seal for the 750/1100 M/N please
I just need the spacer measurement as I not got it with me
cheers
When you say Dust Seal, do you mean the shielded metal spacer on the right-hand side of the wheel?
(number 5 in the pic)
This bit? :-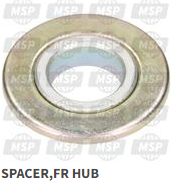
If so, I can go out and measure the one off my 750M forks, they're currently stripped apart on the bench
-
High RPM with Wide Open Throttle is gonna be all about the Main Jets.
What you could do, is try a "plug chop" to check the colour, might give a hint of she's going lean at high RPM / load.
Basically ride the bike into the situation where you're experiencing problems and then shut it off via the Kill-switch while you're still in "that problem range"
Then take a plug or two out and check the colour, if it's lean they will be white / ashy
switch issue
in Oil Cooled
Posted · Edited by Devilman
Very much agree with this.
Testing continuity using a load can be a very effective way of finding a problem.
Rather than using a multimeter, use a (fused) supply from the battery, a bulb and route the wire you're testing to earth.
Can use a variety of bulbs to simulate different loads.
60w Headlamp bulb is going to be around 4.5-5A depending on battery voltage.
21w Brake Light bulb is good to simulate a 1.8(ish) amp draw, etc..