


nlovien
-
Posts
622 -
Joined
-
Last visited
Content Type
Profiles
Forums
Events
Posts posted by nlovien
-
-
13 hours ago, colinworth79 said:
td 04 turbos all use the same exhaust side wheel . The turbine housings( exhaust ) vary on size and shape . Volvo are probably most compact . Compressor wheels vary and so do the housings . Td04 13 (basic scooby )mate uses loads of them to turbo mx5 cars and they do 250hp at the wheels on the dyno . Get an old one off the bay then purchase a new core for £150 then swap over off you go .
from my previous SAAB tuning days - the 9000 TD04 has a 6cm housing, the 9-5 or 9-3 use a 5cm housing - both are 15T - a brilliant upgrade is to fit a compressor wheel from the garrett GT28 - best to use the 9000 6cm housing for this, the GT28 outperforms an 18T compressor upgrade - and although you may get a tad more top end using a 19T compressor, the 19T is difficult to tune where as the garrett 28 compressor is very easy - I did not observe any noticeable lag when increasing the compressor to the GT28 - also where using the mitsubishi compressors (18 or 19T) you needed to run 1.4+ bar where as the GT28 made good flow nearer 1.2bar
the GT25 turbo's from the same cars are also good, spool is a bit quicker than the TD04, only losing out to the TD04 at the top end
-
Dezza has nailed the fault find - if its the starter - think about new brush's - seen ones that look ok - plenty life in them yet fitting new cured a sluggish motor
a wee safety note: when yir jumping big current draw - sparks can fly - i've exploded a wet battery doing this- be mindful of where the battery vent is
-
 1
1
-
-
did you do the compression check after the fuel in cylinder issue ? if not take a look again - could be a bent rod to add to yir wow's
-
1
-
-
maybe there's not a question here
Fitting the bandit motor gets you going - loads of fun - no major headache work to fit and in the future you have the option of selling on the motor
the original can aquire dust on the well preserved lubricated parts - or as time and funds allow, progress to something interesting
maybe there is a question - are you typically a long or short term owner
-
1
-
-
bunch of stuff in yir post
fork seals that don't last is often a sign of worn bush's - often a good idea to renew these with new seals
generally changing oil weight has a pro and con - pro = heavier oil will improve your rebound, down side is it will also increase your compression damping - so watch out for a bit of harshness in the fork response - i.e. treat this as your stop point
a "springy" rebound maybe also affected by the oil level - not enough air gap = air spring - maybe this is linked to failed fork seals
are these forks cartridge internals ? - dunno - you may have the washer stack that controls damping sticking open / the belvel shaped washers have gone soft and flattened out etc.. i.e. maybe worth getting into the detail measurement of these things when you strip it
springs - progressives are a good general all round improvement and click n buy available - getting the right spring stiffness for your weight is better - but finding a UK supplier at a decnet price ? don't know - would like to know - I get mine from the states ( when someone I know dares go there on holiday ) Sonic springs are generally $85 a set and they also have a handy "calc my required springs"
-
1
-
-
friend has a CMR RS1000 replica frame - very nice
 you spent wisely
-
12 hours ago, Jpich85 said:
I show a few of my mates and the wife and they just say... Oh yeah that's nice. And don't realise the time and headaches I get trying to make things.
yea, get them together and you can observe the synchronised "la la la la rolling of eyes moment - is he finished wafflin yet ?"

 no worries - your not alone
-
1
-
-
gut feel is - you are one of us who gets the satisfaction in building a bike - as much from taking on solving and making the long list of parts with the tools available to you - each part is in itself a job done, the sum of the parts leading to a complete bike is the end game but not the goal - really appreciate this and for me its a key part to the success of this forum that attracts like minded " quality bodgers" - end result will be a bike that can be looked over with interest taking in all the unique individual parts more so than the sum of parts / complete bike
ps - 100% agree, cost of argon is a real burden - keep yir joints as tight as possible so your fusing parent to parent without filler using a smaller tungsten and flip the cables and revert to stick for any bigger none fussy stuff - brazing / alum TIG is very Argon hungry - preheating helps speed things up / reduces argon consumption - my "moto" for this is - cost of argon is just one of them need things - like bog roll, you just have to have it
-
3
-
-
Ron - for the want of maybe a bracket to match the mount holes - that rear brake M/C is just a typical example of just about any of them - noting that its a 14mm bore piston
i.e. maybe adapting any half decent 14mm one could be a better route - maybe your keen to keep things as was
a quick peek on the bay and you'll find chinese assemblies c/w reservoir and brake link for less than £15 - or loads of 2nd jap / european bike ones for not much more
-
1
-
-
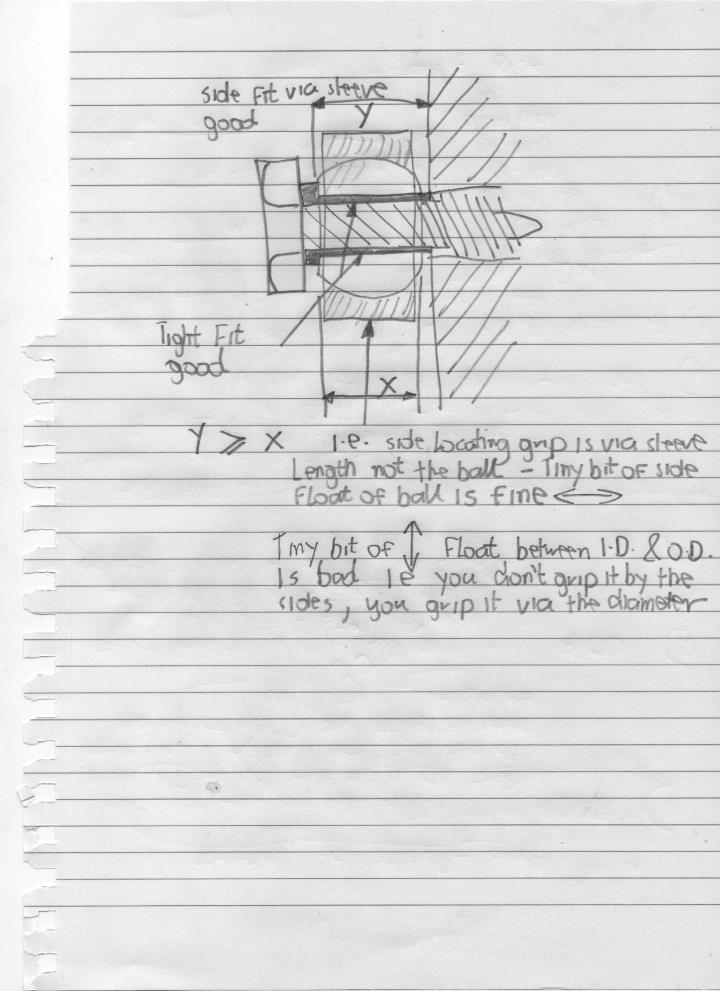
you don't need to be making a hard grip on the side - this can give you a false indication thats its good ( gripping on side versus supporting through the hole ) - key is to get a nice snugg no play fit of the bolt through the hole - I rarely achieve this with a bolt - they are just not ID/OD matched - so I make a bush - so you make the bush length = to or a tad slightly longer than the width of the ball - so when you nip the bolt up it shoulders on the bush - not the ball
If you machine a stud to match fit the ball ID then achieve the same by making the stud shank length = to or slightly longer - as above
but don't think that by gripping tight on the sides it will prevent chatter in the suspension if the bolt OD isn't a tight fit on the ball ID - it will work loose quickly

-
3
-
-
13 hours ago, ron said:
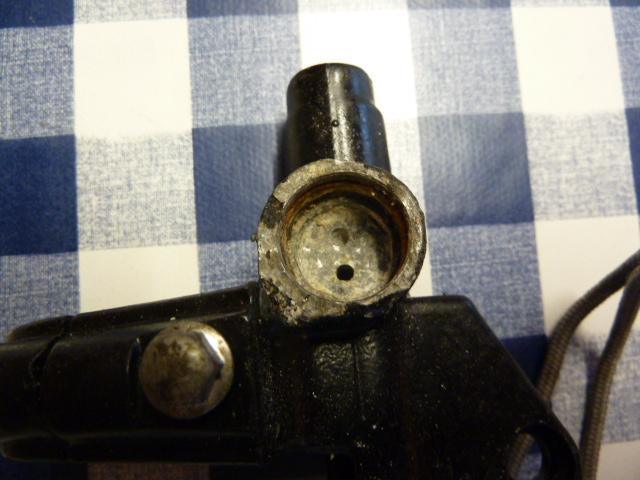
this looks nothing like my master cylinder I dont have a photo of it as yet i cant tell where the holes are in your pic . would they be under where the pipe from the inlet reservoir fits into the M cylinder ?
yes - if you remove the "plastic ?" nipple fitment that your reservoir hose fits - what you see in the pic will be similar to whats underneath it
. when you mentioned the small hole i thought you meant actually inside cylinder you can only see that hole after taking piston complete with two rubber seals and the spring out of cylinder.
it does feed through into the cylinder but unless you've got very good eye's you'll not see it - its very small - on the pic its more obvious because there's a dimple on the other side that leads to the hole
If these holes are under the inlet of the cylinder why would the small hole completely stop fluid getting into the cylinder surly the bigger hole is the feed for fluid and the small hole is just a release of expanded fluid back into the cylinder however i will try to get the feed pipe out and have a look
see attached picture - can you see how, when you back flush you can not get to the main supply hole because its blocked by the primary cup seal, the bleed path is only open to the second "relief" hole
, im a bit dubious of this as mine is like your pic broken on one side and looks fragile but as it is its not leaking so far , more investigating is needed i think and ill see if my local bike shop can get me some new piston rubbers thank you for your help im at a loss at mo
-
1
-
-
aye see pic of a typical one full of crud, what you see here in front of the big hole is just the dimple pocket the wee hole is centred on- under all the crude is the tiny pin prick of a hole that needs clearing
-
1
-
-
in your master cylinder there is two holes - one is obvious, the other is a tiny pain in the arse slightly fwd of the big hole- sounds like the small one is blocked ( what you describe is what happens ) you need the thinnest of needles to poke wiggle and generally work its way through this hole - it can be blocked by alloy corrosion crud hence why you sometimes need to work it - I don't stop until I see the tip of the needle coming through into the MC piston chamber
it is important to clear this hole - this is where any brake fluid thermal expansion bleed off occurs - without it your brake can lock on as it heats up
-
1
-
-
early 80s yamaha 750 Seca ( yeuk ) only ones I know of that had both a leading front axle and an anti dive device located rear below the axle axis -
-
appreciate also the detail - this issue is also there with RS carbs, or at least I've got measurable rod wobble on mine
-
at M14 x 2 I don't see an issue with SS ( use it myself - no issue) - always wary of HT bolts in a cyclic shear position ( stress fracture ) - std 8.8 is best overall
one thing to watch for - if your using track rod ends - often had an issue getting a sleeve fit with a std bolt through these things ending with a bit of free play chatter in the whole suspension link set up - sorted by making to fit bolts or using undersized ones and making a sleeve
-
1
-
-
very nice - we all got our preferences, for me, this is the best of the GS / GSX1100 styles and yours is a great example
-
15 hours ago, markfoggy said:
Not something that you are going to see on a Dyno.
I've only seen it on a stop watch and heard 'He just comes off the corners so good'.
And to be honest I think that was without a TPS.

If you have a well tuned engine on a std ignition @ WOT then stick a 3D ignition in then you may not see any dyno improvement - @ WOT - i.e. you could say your not going to get a bigger pub talk dyno figure, however for most of us we spend very little real time @WOT or only when its safe to do so ( i.e. down the straight ) - getting the drive onto the straight, or where most of us are = the part load condition that we typically don't tune for - kinda daft really when you think about it - now we can and what you describe "he just comes off the corners so good" is part of it - limiting negative tuning due to - knock / pinging is another good one - you don't now need to hold back the whole engine op. range due to say a relatively small rpm window in the midrange
If they are not using a TPS - I think you can still map via an air mass sensor, might even be a better solution dunno but either way, the whole thing is based around the ECU now knowing more than RPM input ( 2D) - it now knows RPM + some form engine load input (3D)
some great feedback ref: use of dyno - can imagine this could put some folks off the idea ( idea of cost / hassle / fear of imminent engine destruction )- it is also easy to play with this mapping via seat on bum + ears ( for tinkling sounds ) - ok maybe not to the same level of gain via a dyno - but definitely better than not having it at all, best in order to get the mass's converted is the sharing of proven base maps - maybe knocked back a few degrees as a precaution
-
would be neat if you could write up a bit of blurb on why being able to map relative to throttle position / load as an alternative to a typical fixed ( full throttle ) map system - especially on the older air cooled motors / combustion chambers - suspect there's more to be gained than what is initially obvious
be nice to see this evolve where the topic of map exchanges become part of it
-
or maybe a smaller airjet for the pilot circuit ( I think with these carbs - not sure - the idle needle is a volume control and the mixture is via the air and fuel jet )
I see CV,s more as load condition versus rpm / throttle position - steady cruse = you could get an idea if its needle versus idle - if its cruze on light load - idle, same but now climbing a hill say = needle - i.e. watch your throttle position as you hold the cruze relative to the load needed, if you note your having to open up to hold the cruze and this is where its fluffy - needle - if you find your backing off to hold the cruze and its fluffy = idle
also - you maybe hovering around the point of ignition advance - dam't hassle if its a fixed ignition curve - maybe an ignitech 3D system with a TPS is what you need
-
have a chat with John Neate or his sons - ok not everyone is in support of their choice of engine but they do know a thing or two about setting up these frames / suspension
Last year they made an improvement by fitting a longer swing arm - hence a chat
-
1
-
-
plug condition isn't much use unless you back it up with the known operating condition at the time you cut the ignition - get her nicely warmed up - long enough to clean up any cold start effects
mark your throttle in 1/4 steps to give a rough idea of what carb circuit is primarily active ( noting that they overlap i.e. although primary, other circuits still play a part )
hold the bike at your selected 1/4 throttle position - ideally with the bike under load ( find a nice straight hill ) - hit the kill switch and stop ( thats a nice hill with a layby )
1/4 = mainly idle circuit
1/4 to 3/4 = needle jet to needle, if its rich nearer the 1/4 then possible the tube ID versus needle diameter is too big - if its rich nearer the 3/4 then try lowering the needle - you may also lean off a bit earlier by lowering the needle - suck n see
3/4 to wide open = main jet
it's worth trying to get these very basic steps as good as you can before the dyno so your dyno time is focussed more on fine tuning - however if your Mr dyno knows his stuff he may have a good base set up - worth asking before you go
also give your ignition circuit a good look over - clean terminals etc.. - you don't want to waste time chasing a dodgy spark thinking its fueling - likewise ref: valve clearances
the above is very old school but the basics still stand "for direct lift carbs"
-
1
-
-
difficult to follow your path of observations - bit of randomness that in itself is a clue
see when you found the carbs out of sync - adjusted and now have high idle, did you also follow through, confirm the carbs are not hanging on the cables - adjust idle on the throttle stop then fine tune via the idle screw adjusters
when you fitted new coils - did you check the power supply circuit to them to see if you have high resistance / volts drop via a poor connector / switch - or a poor earth
it gets frustrating but when your chasing and replacing, you often have to go back over checks and adjustments and you sometimes need to look at all the bits that connect to the changed ones in order to find the root cause versus chasing the effects
are you getting a consistent and good fuel flow ?
-
1
-
-
3 hours ago, Sheep said:
Just put it down to the bikes character...something most modern bikes do not have....it makes older bikes more interesting
Rattly cams=character
Oil leaks=character
Clutch needing man hands=character...
")
brakes that don't work
frames that can develop terminal wobble randomly
suspension with more bounce than an easy ladies nicker elastic
tyres that are narrower than a Scotsman's wallet
and just about enough ground clearance to not bother getting too excited about leaning off
aye - and they were / are great fun - with all the above, as you suggest Sheep a wee head rattle is the least of our concerns
-
2
-
another jetting thread and cam timing
in Oil Cooled
Posted
be interesting to see what fix's this - thanks for posting, going to learn something here - if you follow the graph through to what you'd expect peak HP @rpm then you can see a reasonable output - to me its like its hitting a restriction / limiter
you don't happen to have a restricted set of carbs preventing full lift ? - or maybe you need softer lift springs - i.e. dynajet kit setup - dunno ??? - i've got a set of 36's part dyna worked if you want to try them - i.e. borrow