


nlovien
-
Posts
622 -
Joined
-
Last visited
Content Type
Profiles
Forums
Events
Posts posted by nlovien
-
-
I got mine from the states - the emulators were on amazon.com at a fraction of the price as quoted from racetech - springs also sorry can't remember where I got them but cheaper than race tech - they have a handy weight calculator which atleast for me turned out to be spot on ( yi got to be honest about your all up riding weight
") ) I used 100lb springs
) I used 100lb springs
the other really handy "trick" I learned from a wise man on here ref: slabby forks - I needed +/- another 15mm fork length - I got more than this by simply using the GSXR1100 rebound springs versus the 750 - as the 1100 is about 50% length = you gain the difference in overall length
I also used the 1100 servo anti dive units versus the 750 - easy - cut off the servo unit and pull out the gubings - I then machined a plug out of black plastic and glued it in to seal off the top - i.e. you don't need to make the hydraulic bypass plate to replace the anti dive - the std anti dive housings work fine with the gubbings removed
One thing I didn't progress but thought would be a good idea: down side to the emulator is the hassle with adjusting them - basically take out - tweak - re fit - yeuk, how about make a thin rod that connects to the emulator adjuster - run the rod up through the spring and drill n seal it through the ride height adjuster = external adjuster - forsure i'm making it sound simple - but overall its a doable thing with a bit of imagination
another one more: I used the best bits from 2 sets of forks - noted with both of them the original cupped washers which meter the damping were fooked - well flattened - folks who race these bikes and keep such things in good tolerance probably find the std fork decent, the rest of us just live with it - forget that the fork might have been ok in its day and suffer the consequence - so part of the improvement is just using a different method to replace old worn ineffective bits
-
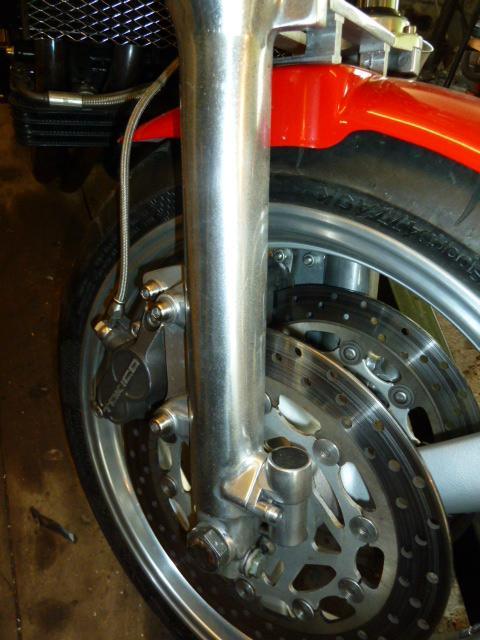
been enjoying a build project of late that has a set of GSXR1100 slaby front forks - ok pritty old school design and a tendency to replace with more modern cartridge type forks etc..
fitted springs weight matched to me and the bike along with emulators - got a few things to sort out with this bike but the front fork isn't one of them, this set up is working great - i'm bumping along typical Scottish B roads etc.. the forks are just doing their job - nicely controlled, good feed back - no harshness, just the right amount of brake dive etc.
TBH I have another project with maxton tweaked 45mm gayblade forks - very nice - well the basic GSXR fork with these minor tweaks is not noticably anything less
previous use of these forks with springs of unknown weight ( right enough to get a static setting ) and std damping - recall what you expect, kick off sharp bumps/ pot holes etc.., bit of floaty feel yet also a bit harsh
basically take yir old school forks - add a few minor tweaks to match them to you and the bike = can be surprising just how effective they can be - dam't sight better than chucking on different / modern stuff without looking into the matching set up - keep it old school!
-
icing on the cake today for me reading this - yi got a good mate there, me also suspects yir also a good one

-
 1
1
-
-
sounds like there's a demand for a mod kit to fit a more efficient rare earth type alternator from a more modern bike
also wondering if you could piggy back a 2nd alternator ? - once did this by using a housing from an engine that had an alt that wasn't direct on crank ( plenty options ) - made an adaptor plate to fit in place of sprocket cover and spun the alt. via a direct link to the front sprocket bolt - ok not much use when stationary but it did provide enough added juice when used in anger - could be using the 1st option - more modern alt would make this option better - - idea copied from some old school endurance bike set ups
-
being a tight arsed Aberdonian things like relay's - fuse box's, etc.. - generally find lurking inside scrap cars - in addition to this charging use, use for live feed direct to coils and for headlight where a 5 pin switching unit is handy ( dip is live on ignition, high beam is switched using the high beam handlebar switch = removes need for an on/off lights switch )
basically any high load use circuit, put the live feed direct to source via relay for the cleanest supply and use the mess via the switch gear etc. as the low load signal to relay where loss's are not an issue and thinner wires can be used
-
1
-
-
when working with a mag 3 frame - quite surprised at the lack of symmetry and also the quality of the tube bends - obvious bending die marks - tube ovaling etc.. - cutting into some of the bronze welded joints - you can find in some patches pretty significant gapping between parent parts in sections - great thing was - given quite severe tube damage - post crash - when jigged - the steering head was spot on perpendicular to the swing arm axle - the bit that counts - it was though 2mm off centre if you were to presume the frame was supposed to be centered between the inside faces for the swing arm pivot - wrong presumption
It is valuable info for any home builder - getting things right is always right but it shows that you can have some flexibility in how you get there
I had a P&M frame stripped at the same time - now thats different, no die marks, ovaling and very much closer symmetry - I didn't open up any of the welds but I'd suspect they are as tight as a nuns stockings - overall workmanship here is in a different league
-
they are a pain to fit - can cause supply issues - look nasty and are not needed if the tank side is clean and you have reasonable in tank filter screens - hmm what does that sound like ? - an elastoplast fix
going to wise up and take a better approach - forsure use them during initial build - sort out - its a right pain chasing a flooding carb - will circulate a good few tanks worth through em - then remove
-
if i'm fitting inline filters - I use x 2 - ref: to reduce flow restriction
apart from oil contamination - important to prevent carb leakage because this can lead to a bent rod ( hydraulic lock when turning over ) - if I spot this - 1st turn the engine over slowly by hand - or take the plugs out
-
bloomin good man
 - 50+ is a good age - yi might not have the care not attitude and quick reactions of youth, but you do have the maturity of common sense ( maybe ) - have fun
-
1
-
-
3 hours ago, nachopa said:
In fact I bought it yesterday. Well, it's still not in my garage cause we have to do papers and all that stuff but the current owner told me that it's mine so... There's a new owner in the forum

good on yi
another one hopefully about to be resurrected. We all have different approaches to how we 1st tackle such purchases - opposite sides of the scale are
1) take a punt - charge up battery, put some oil n fuel in it - see if it runs and work around the gremlins as they appear ( not my prefered method with a bike you don't know the history and has been left sitting for a few yrs - the satisfaction of actually breathing any life into it is often lost with the continual niggles and maybe cause for accelerated wear / damage )
2) presume the usual niggles ( many already suggested ) - don't go mad and try and get it to run - off with the cam cover carbs and plugs - get it all nicely lubed up inc. a wetting down the bores - turn over by hand to get a feel that nothing nippy is occurring - then take each main part, one at a time - carbs / wiring / detailed engine service / steering head wheels and swing arm bearing inspection - brake strip and re seal - - etc.. etc... a lot of work but worth it in the long run and can often be less work versus the hassle of quick fix gremlins - -and in this process you may uncover a big one ( damaged bore, rockers etc.. ) that will focus your direction before rather than after you invest a lot of time and effort
only downside to option 2 is project creep - as you fix / improve each part, the level of fix desired goes up - often resulting in upgrading / parts change - - -- how often do we end up doing this anyway ? - fix the std front end and brakes - then just as yir doing the final brake bleed - och you decide bugger it, fit a different front end
- ok now needs the matching rear wheel = diffrent swing arm and on - and on - 5yrs later you may get bike of month
-
sounds like a fair bit of work going on to the tank - ok so fit a raised filler cap - - sledge hammer to a nut fix
-
On 4/30/2018 at 2:33 PM, yyt said:
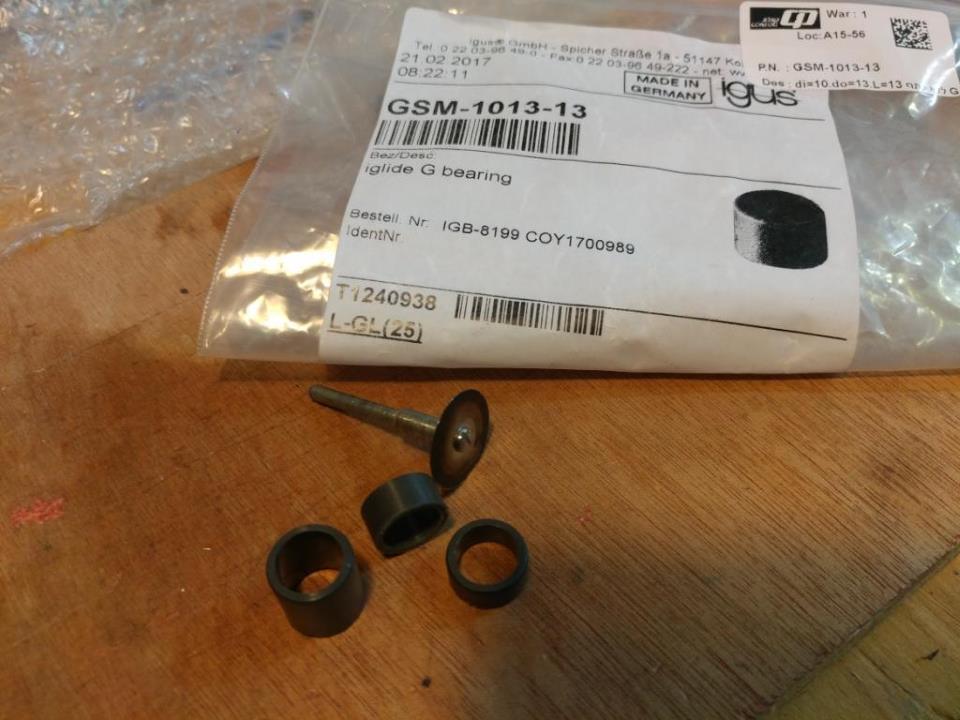
I don't have any experience with other carbs shaft diameter, for the VM's I chose the IGUS Bearing:

The important diameter is the shaft, the length can be relatively easily cut to what you like with a dremel bit or small saw and trimmed/ chamfered with scalpel/model knife.
I had to cut 2 bearings extra short for the Throttle/return spring bits on the shaft.
On the carbs where the shaft is, there is a felt ring (after 30 years is useless) held in by a brass cap.
The bearing goes in the cup, a bit of a tight fit.

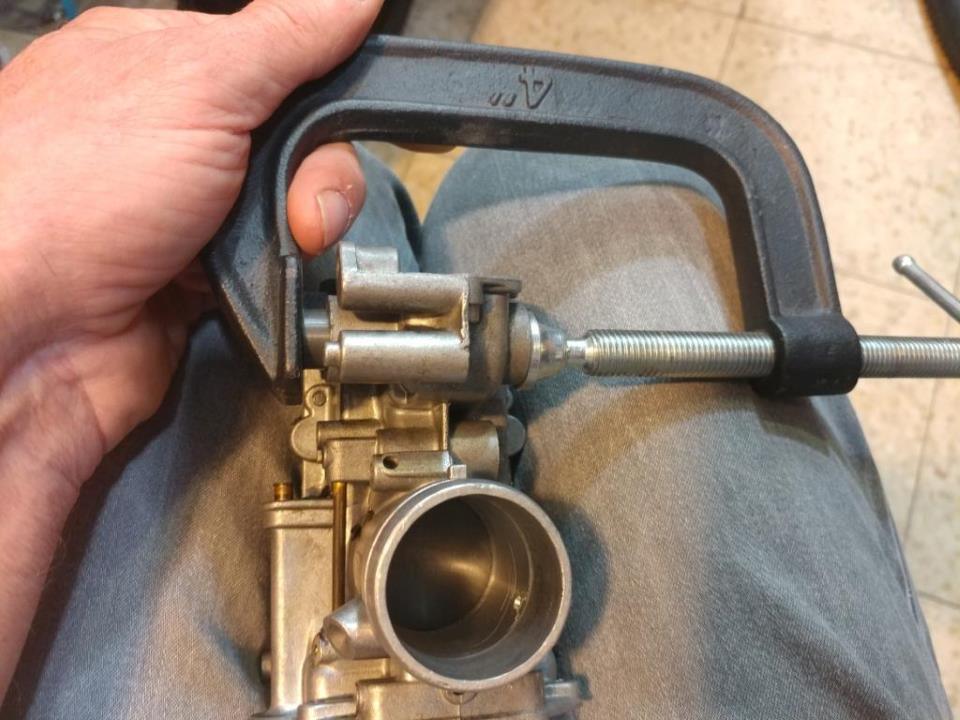
The bearing is press in with a clamp, don't press too much, the bearing just has to be sited in the cup.

After inserted, you can move the bearing slightly for proper alignment for the 4 carbs (can use a 10mm drill to align).
I started with one of the center carbs, connected the upper and lower plates to the chosen carb.
Than 1 by 1 I aligned each carb, bolting to the plates and making sure the shaft turns freely.
After all 4 carbs are connected to the plates and the shaft moves freely, small notches are made with a dremel bit (3rd pic. of first topic).
Than the Epoxy Adhesive is applied so it attaches to the bearing and the aluminum carb body.
That about it.. think writing is harder than doing it

recently did this to a set of RS38's which had a fair bit of wiggle on the slide lift shaft - had a random tendency to hang when closing - these have x 2 needle bearings and x 6 felt washers - pop out the felt washers and replace with 14mm x 10mm self lub plastic bush's = no more wiggle and "garage" testing - they now settle to idle quickly - no sign of the random hanging - a bit slower to self close - probably a bit more friction on the shaft as its now got a tighter clearance across all four - ok so increase return spring pre load
do I think this neat cheap tweak works - yip
for me
-
1
-
-
for me - pic looks like the the engine is sitting high at the back - I generally aim for the sprocket c/l +/- 5 to 10mm below the line between rear sindle and swing arm pivot - when the arm is raked maybe 10 to 15 deg
reason ? - copying - seems to be the ballpark and hence can only presume works ref: squat - also - imagine the suspension bottomed out - will the lower chain run clear the swing arm ?
-
i'm up for a set of 4 but i've got one niggle to clear in mi head - this holds the needle firmly and it then locates such that the needle can't spin ( original issue I believe ) - my niggle is, does there remain enough wiggle room to enable the needle to effectively float into the emulsion tube - or is the needle so firmly located that there is no wiggle room i.e. - if the needle is just a tad off centre relative to the emulsion tube it will then be cocked to one side - possibly even forced to wear on that side ??
I'm sure the answer is - it has wiggle and this is not an issue - its been a tried n tested fix for a while etc.. - would just like to nail this one though
thanks
-
are the worn needles alloy ? - if so then likely dynojet also - and if so yir quids in - send them back to dynojet and they will replace free of charge - recently done this with a set of 38's
-
one thing I found with the gsxr motor was the loose fit of mi bolts through the cases so I reemed out the mounts and machined up inserts to get a nice snug fit - ok a bit pedantic but mi take is - where you can - these little tweaks can all add up - my learning example is a P&M frame - when you see the level of detail they go to to achieving a really snug engine to frame fit
plenty scope to playing with that rear top mount via doglegging the spacers - i'd think of - the short LH side a solid bush with x 2 off centre threads and the longer RH side = weld the bolt off centre and thread the otherside - you assembly these spacers to the engine 1st then align with the frame - just an example
-
1
-
-
7 hours ago, philwright said:
Thanks, Emulsion tube holes were clear it was the pilot jets that were blocked.
")
-
obviously we don't know just how far the level of initial cleaning ref: the flow ports and jets was - - i'm suspecting you are maybe chasing your tail around the same issue - maybe getting partial success - noted you had observed blocked emulsion tube holes - for me that's a good sign you had more crude in more delicate places yet to be sorted
I don't bother with all this vapour blasting / ultrasonic cleaning stuff - sure makes things shiny but often doesn't get to the important bits - you can get the primary jet circuits clean and check they are flowing by stripping out the parts - a can of carb clean and by blocking off the various ports by finger - use an airline to confirm each port is clear - a few pointers
1) the idle air jets in the carb inlet - these can be a bugger to get out - the brass is soft and easy to damage - rather than risk this ( if they don't come out easy) then leave these in when cleaning
2) the 3 holes you see inside the carb outlet - confirm you can see daylight through them - -using the one carb that doesn't have adjustment as your base - use the throttle cam adjuster to bring the thorttle plate down to these holes - aim for the plate to divide one by half then balance each other carb to this - you'll be very close to carb balance with this as a starter
3) when you remove the idle screw - check their tips are still there and make sure you get the wee o-ring out - and check to see if a previous owner didn't - then refitted this screw jamming into the lost o-ring and blocking the idle circiut
4) and a common one that I didn't see mentioned ( maybe you have already checked ) - take a really good look at the top of the main needles and the exit of the emulsion tubes for any signs of wear / errosion
see them granny magnifying lenses commonly advertised in them mags that start appearing in the post around this time of yr - the ones yi hang around yir neck ? - bloomin good for this sort of thing - even better is an e-bay special cheap pair of loupes - great for this sort of thing
-
few yrs back I stuck a gsxr1100L into a mag3 originally for a gpz1100 - i.e. plenty room - I did bias towards fwd weight versus getting the sprocket as near to swingarm pivot - maybe by 10 to 15mm after much suspension tweaking I just loved how this bike could be pinned on the front end ( ok also had 16" 130 section front wheel) - - the only bit I would say was noticeable was when driving hard out of a corner whilst still cranked over it needed a fair bit of counter steer input to hold the line - wrecked the bike before I sorted this - could have been rear squat effect related - could have been something else - noting only observed when pushing hard
since then my solution would be - as per dupersunc's good advice - then, if you want to play with fwd weight bias ( usually a good thing with these older chassis ) then fit eccentric head bearings - i.e. pull the rake back by maybe 1 deg. - - not for the trail - you need to work this via the yoke offset afterwards - - but to pull the front wheel back and hence get some more fwd weight bias - can also be improved by a longer swing arm
-
2
-
-
forsure - I have also read folks commenting it is the opposite way around - i.e. swap the above around - don't have any personal experience with this but my consideration would be on the benefits of the Ti strength to mass ratio - i.e. you have room to increase the cross section of the Ti rod
anyway - this is where I picked the comment up - this guy seems to know what he's doing, a bit whacky in his approach but some interesting stuff http://www.mototuneusa.com/power_news_--_the_factory_superbike.htm
-
On 10/20/2018 at 8:32 AM, Reinhoud said:
Do con rods stretch that much?!!
recently read up on an interesting take on this, so your on the performance trail and have a bit of dosh to go exotic - ok so a set of Ti rods - forsure less reciprocating mass is a good thing - but hold on, Ti doesn't stretch as much as steel - so you replace your steel rods and away yi go - except there's an edge off the the top end - hmm - soo the steel rod stretches as you hit high rpm, the squish closes up - = faster burn and a bit more compression - the engine kinda gets - self faster the higher the rpm you go - -- swapping in the Ti rods without any other tweeks and you loose this
ok this is the sort of stuff when you've already got everything else everyone else has and you still want to find that little bit extra
 - eh - i'm usually happy if all cylinders fire up in the desired order of things
rod stretch isn't a bad thing - not accommodating for it is
-
3
-
-
- i'm not referring to the actual torque value - just to the precaution when using HT bolts to be more focussed on not exceeding the recommended torque because of the method of failure - a precaution for anyone who may not be aware of this
another one with HT bolts when the load is across the bolt - try to get a short shanked bolt versus a full threaded one such that the shank is across where the load is - less prone to crack fail across a shank versus a threaded part
-
i,ve aye presumed the reasoning behind a CV carb typically being +/- 3mm larger in throat to a direct lift is because the slide is fluttering - not being held open - it will initially lift to full open when you whack open the butterflies, then it finds a position relative to the engine draw - not necessarily full open even if the butterflies are
always wanted to see if there is a way to convert a CV to direct lift - to see if you can take away this characteristic and benefit from the bigger throat - probably remain in the bin box of like to do versus ever getting around to it
-
spot on - the latter - you can get away with a bit of +/- on the lower tensile - more ductile bolts but the HT you should be more accurate and set to the prescribed torque due to being more prone to crack failure
Cylinder head STUCK!!!!!!!!!!!!
in Air Cooled
Posted
the following are known tricks for another engine prone to stuck barrels - necessary because of rarity of said barrel , if the one you have is reasonably easy to find replacement then i'd seriously consider your 1st though -- sledge hammer! ( possibly a grinder and slice n dice as a better option for killing it ) - - and after you've got serious with heat and tried locking nuts together to extract the studs etc.. type things
1) drill pilot hole near base of none oil return studs - so your lub can be seen to circulate down to the stuck area
2) make a crude thin wall sleeve with a few bottom teeth - something that can sleeve over the stud and rotate / work yir way down whilst continually washing out the crap
3) fook it - back to 1 and drill through the stud as well = now a weak point - try and shear the stud off - fix the mess later
4) split the cases and see if there is any purchase on the barrel from underneath - probably not - you might get lucky via a soft block across the liners and a bit of tapping but prone to damaging the liner entry - you can make a soft expander - see a cheapo tube expander for example - this will grip inside the liner where its well supported by the barrel - you can have a top plate secured on the studs but not sitting on top of the barrel and via a thread n nut pull on the expander - or you could tappity tap on the bottom - risk is, does the liner come out before the barrel comes off ?
5) order the replacement barrel and get the grinder oot