


skunkrider2
-
Posts
126 -
Joined
-
Last visited
Content Type
Profiles
Forums
Events
Posts posted by skunkrider2
-
-
Im finishing the build of my gsxr 750 wr streeetfighter, and am after a definitive answer to what oil cooled 1100 motor will fit into 750 wr frame?
I was led to believe the 1100 M motor (but can't find one) would fit but would like to know for definite before I start looking for a 1100 motor. (don't want to buy a motor that won't fit) Has anybody actually done an engine swap in the water-cooled frame? (don't particularly want the water-cooled 1100 motor, would much prefer an oiled cooled lump)
Also if somebody has done this swap what other parts will be needed (carbs form the 1100? ect, ect)
Any ideas would be appreciated
-
Just now, skunkrider2 said:
Job completed, small seal in freezer overnight, next warmed up petcock body and in it slipped (oh thats starting to sound wrong
 )
)
Job done. F**k knows if it works as tank is away for paint.
And no im not having sex with a animal of the sea before anyone starts.
That was a couple of year ago, and I've done my time, and regret it. (well that what I told judge)

-
On 1/3/2019 at 11:12 PM, skunkrider2 said:
I know what your saying but you cannot push it through as the bottom of the filter gauze blocks any way of pushing from rear. It looks like a push fit from front but you cannot do opposite to remove.
Ill take some pictures tomorrow to try and explain a bit better.
Job completed, small seal in freezer overnight, next warmed up petcock body and in it slipped (oh thats starting to sound wrong
)
Job done. F**k knows if it works as tank is away for paint.
-
8 minutes ago, Madb said:
You will need to undo the screws that hold the shaft in . Then push it though. If i remember correctly. But i may have remembered.Wrongly. It has been known.(to often receintly)

I know what your saying but you cannot push it through as the bottom of the filter gauze blocks any way of pushing from rear. It looks like a push fit from front but you cannot do opposite to remove.
Ill take some pictures tomorrow to try and explain a bit better.
-
I ordered a petcock rebuild kit for my 94 750 WR. All straightforward to fit apart from 1 piece which I can't work out how it comes out of petcock. When whole thing is disassembled, your left with main body which has fuel filter gauze attached, there is a round rubber Gromit attached to what looks like a bearing (its not a bearing) bout the size of a 1p piece, rubber on one side. I can't work out how it comes out of body, as you cannot push from rear? I know it must come out as there is a replacement in the rebuild kit.
Just wondering if anybody done one of these before?
-
Theres a lot of headers off 750 srad's quite cheap on evil bay, but don't know whether these are a straight fit?
The idea im after is a can under engine exiting under swinging arm pivot (as in previous post) but my headers are 2 pipe and was trying not to cut link pipe up.
-
Has anybody fitted headers off a different model to a 1994 GSXR750 w.
Im wanting to fit a under engine can but the standard headers are 4 into 2 into 1. Im wondering if any 4 into 1 headers are a straight swap?
-
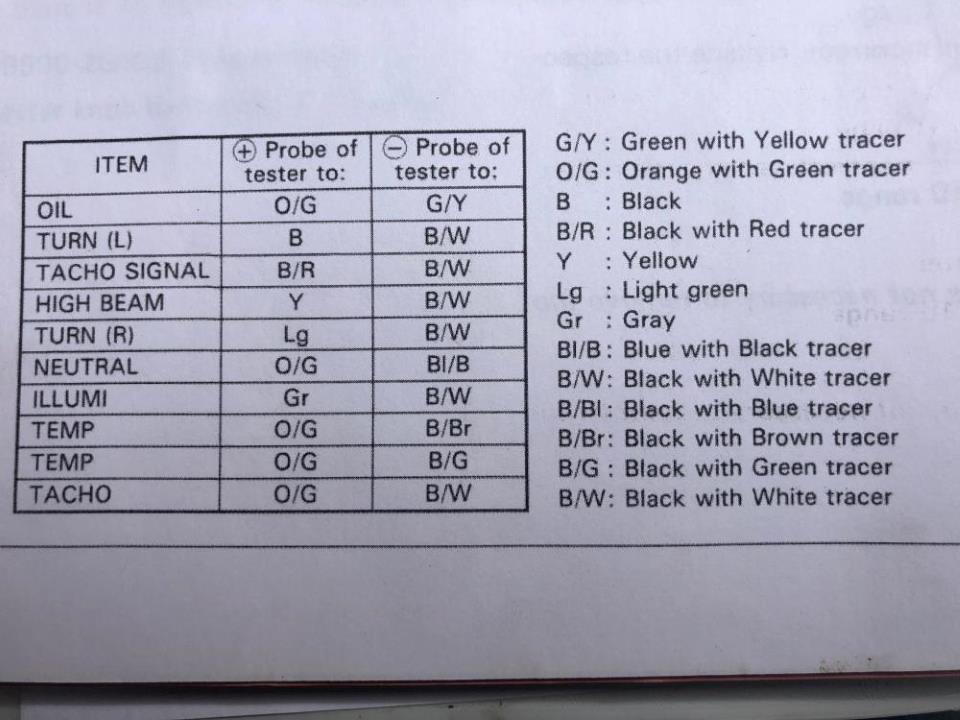
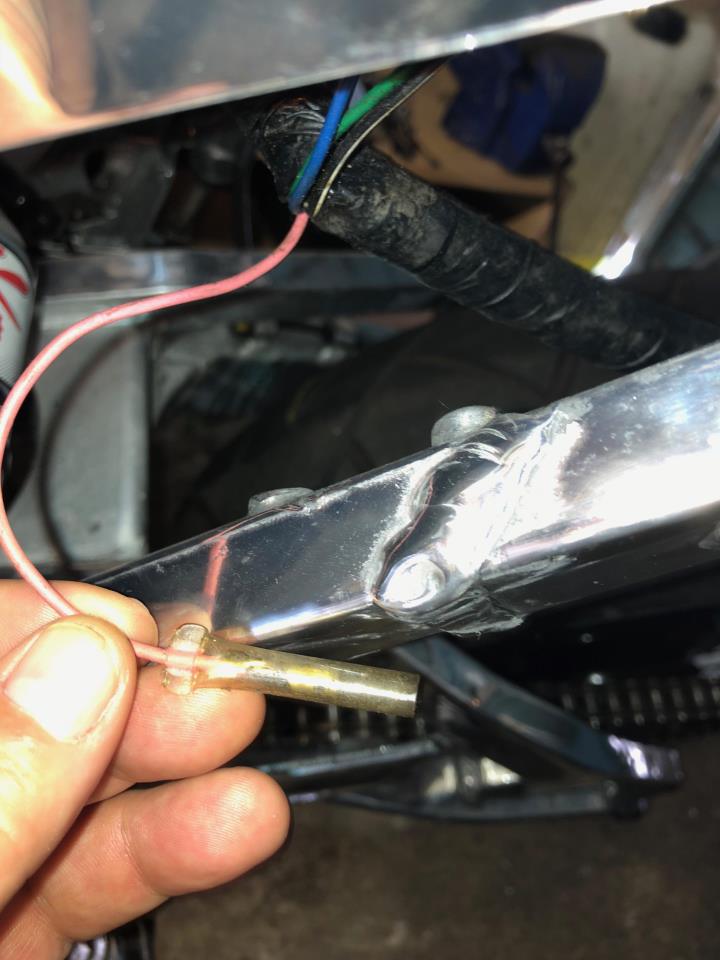
Ive got the same wire, and unconnected same as yours. My bike is in the build phase and cannot find what it plugs into. looks like a indicator (but I know it aint) being a bullet connector?


-
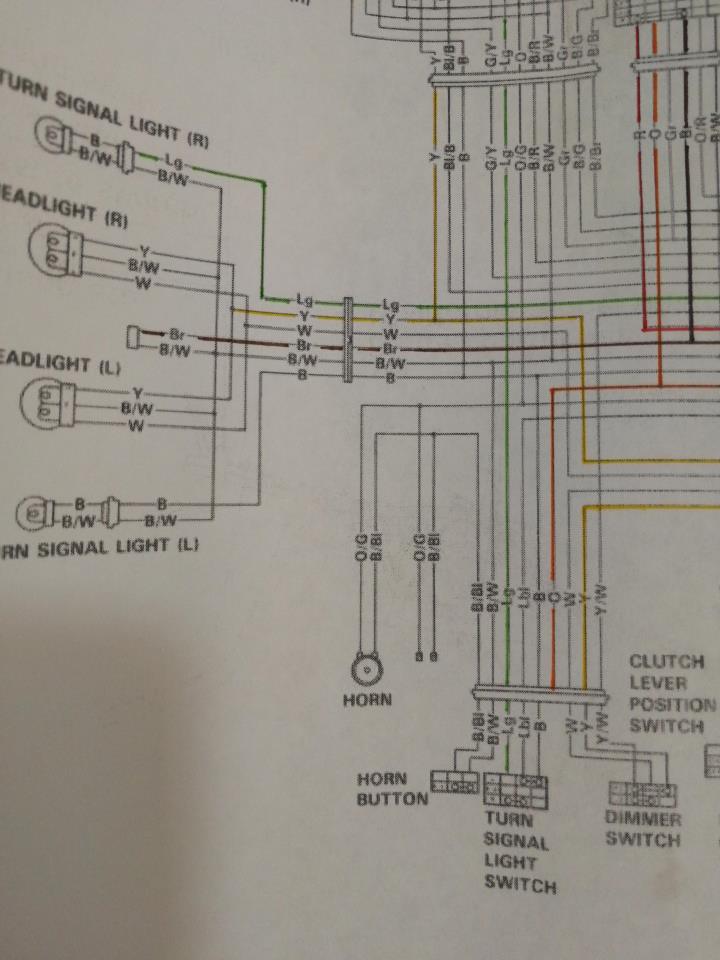
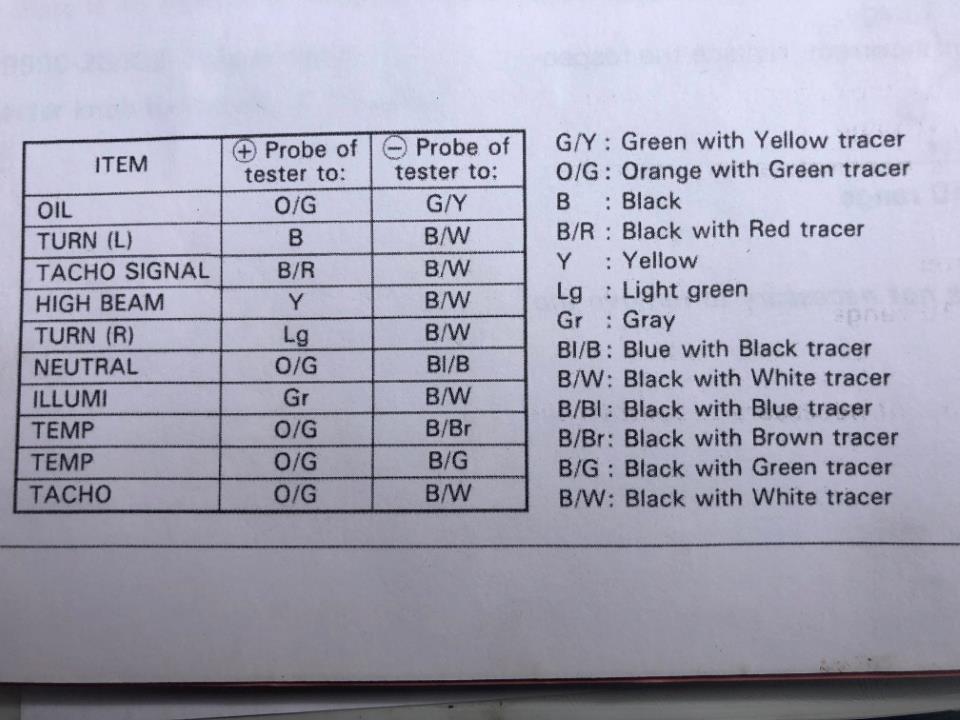
28 minutes ago, Spadge said:
Anyone know what the orange with green tracer and black with blue tracer wires connect to?
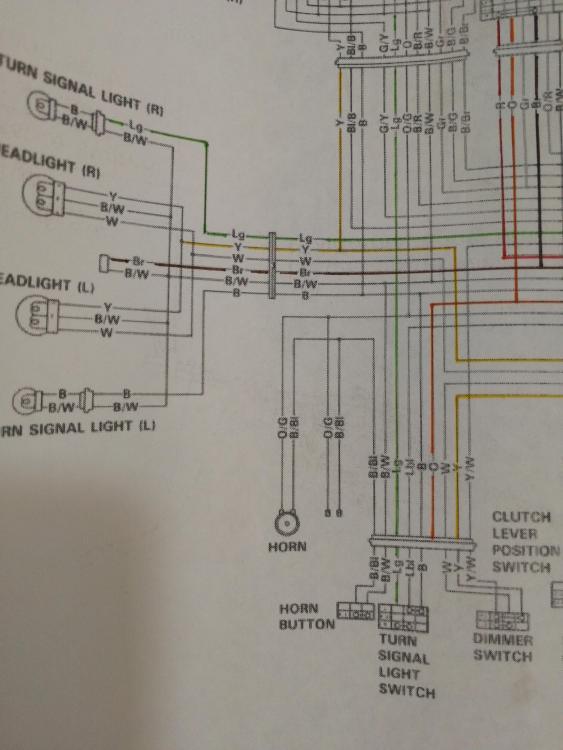
Neutral, Dunno if this is any help (this is from a WR)
-
On 2/7/2018 at 8:54 PM, Spadge said:
Thanks for this. Do you know what size bushings? Can you post a link here if you have seen the info somewhere?
Ive just done this, no bushings are needed. only turn the dog bones to gain clearance.

-
On 1/24/2018 at 5:01 PM, Spadge said:
Hi again,
Has anyone put the tail from a different bike on their 750? Is there a subframe and fairing that will work with little modification?
Going back to proper old school look with a Ducati seat look (jacked high)
-
 1
1
-
-
1 minute ago, Spadge said:
Thanks for that. I've converted to a street fighter and I got rid of that bracket so no dampner for me then. At least I know where I'm at with it now. Cheers for the help.
I ve done exactly the same (hence I wasn't sure myself) I kept all the old brackets though just incase. Thats what took so long as I had to find steering damper and bracket in a box of bits.
Pleased I could help, although its not the answer you hoped for.
-
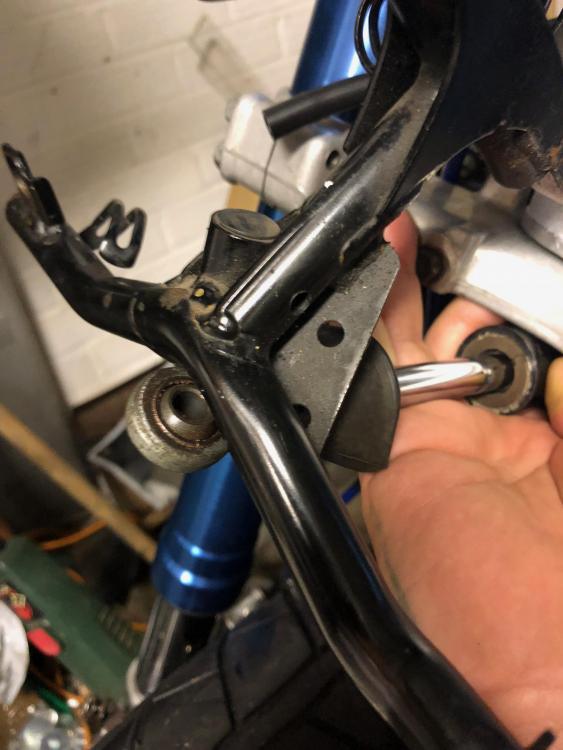
2 hours ago, Spadge said:
A photo would be excellent thanks
Here you go, hope this explains what im trying to say
-
On having a second look at brackets taken off my bike, its possible the other fixing point is underneath the bracket that holds clocks and headlights. I can photo if needed.
Richy
-
4 hours ago, Spadge said:
Thanks for this. Any idea where specifically on the frame bolt 5 attaches to (pics would be awesome). I'm really struggling here.
Actually your right (I took my damper off a couple of year ago and never replaced it) it’s reverse of what I said bolt that goes through steering damper body goes under bottom fork clamp (see photo below) and I can’t work out second one

-
Front end (bolt 9) screws up to underside of bottom yoke and rear (bolt 5) screws up to under headstock as far as I can remember?
-
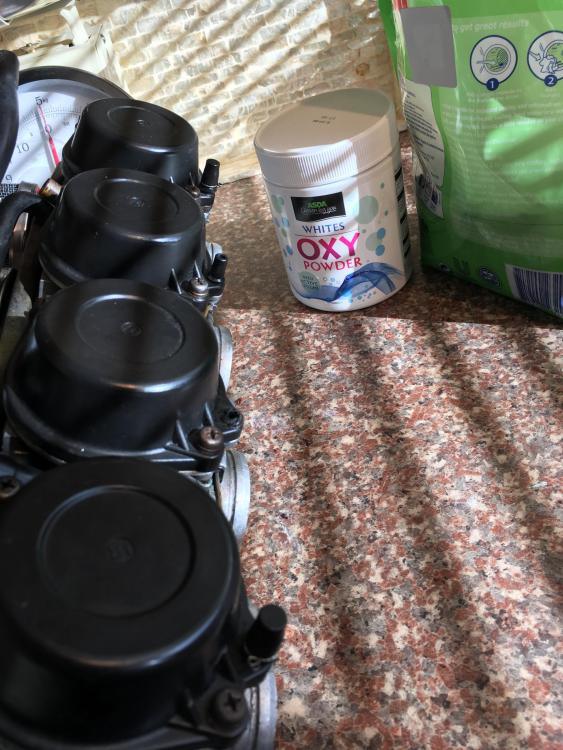
Well after spending 10 year or so standing, i blocked the holes with blue tac (was all i had to hand) put the carbs back on, charged battery and hit the button. She fired!!! Ran for the amount of fuel in the bowls. So new diaphragm cover ordered (didn't want to risk drilling) and for £24.00 wasn't worth it. (melted starter relay fuse into holder in process, so ordered one of those too) So just a quick thanks to Captain Chaos for the invaluable web site!!! Second hand carb tops are like rocking horse shit?? £30.00 form USA & £15.00 postage for a used one??? Ehhhh no thanks.
-
1
-
-
Been really enjoying your write up. keep it going please.
-
12 minutes ago, Captain Chaos said:
available new from Suzuki, part no. 1350217C00
Thats great, If i cannot find a used one this is the next option.
-
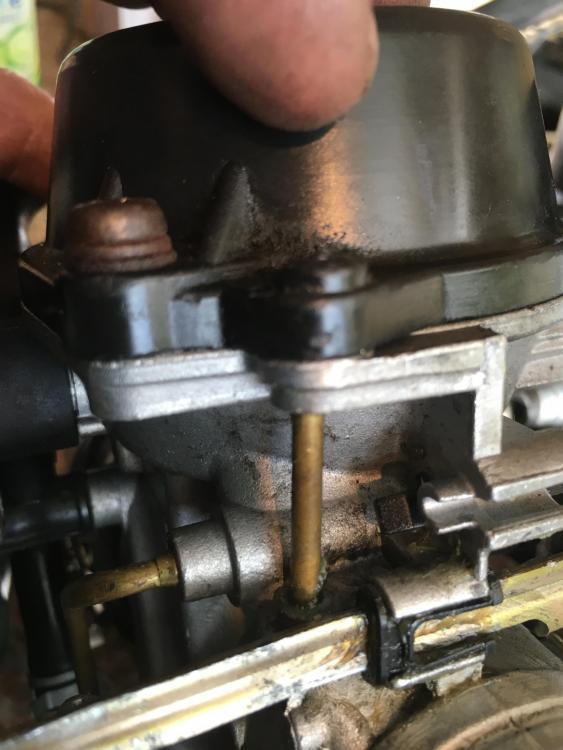
3 minutes ago, Fula28 said:
I've repaired these before, if your super gentle and carful, you can drill the Bakelite top enough to slip short piece 3/16" of flared copper brake hose(car shite) into hole and bond it in there.The flared end is under neath and you can bond it in there. You will need to countersink the underside of the carb top, with say 1/4" drill bit by hand only.
It works a treat and costs pennies to do.
Good luck.
Thanks for that, are these supposed to be sealed? i.e. would it cause problems starting the way they are? (Still trying to find out if this was the non starting issue when i bought the bike last year)
-
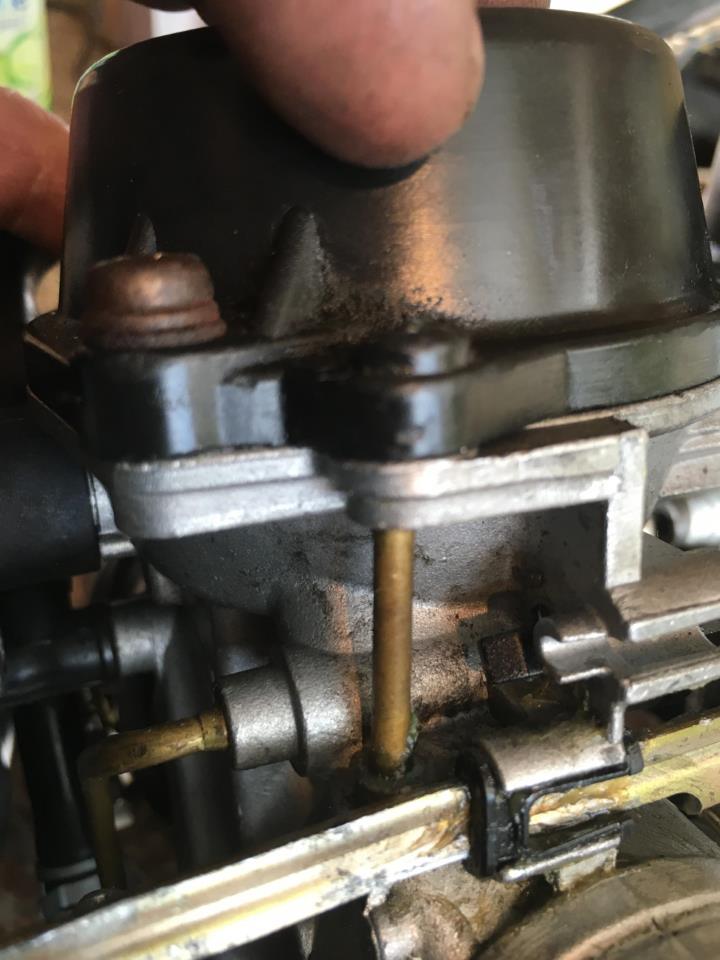
After some help please. Took the carbs off bike tonight (stood for months after buying it as a non runner) On the top of the carbs there are 4 plastic diaphragm covers. Each one is held on by 2 allen screws. Each one also has a rubber cap covering a short stalk. (I'm guessing this is where you would plug balancing gauges???) Any way one of the 'stalks' is snapped off and a second has no rubber. My question is, are these supposed to be sealed? (to keep vacuum) When i bought the bike the last owner said it would not start possibly due to sucking air in?? Im hoping I've found the cause in this snapped off pipe. Second question, if this is the cause, where would i find a diaphragm cover?? Ive tried the usual, Eblag ect, but dealers seem only to want the sell the whole bank of 4 carbs. Ill post some pics when i get a chance. Thanks in advance.

-
Cheers, think the bmw ones will be expensive
-
Anybody know which shocks bolt straight into the above, its 1994 model
-
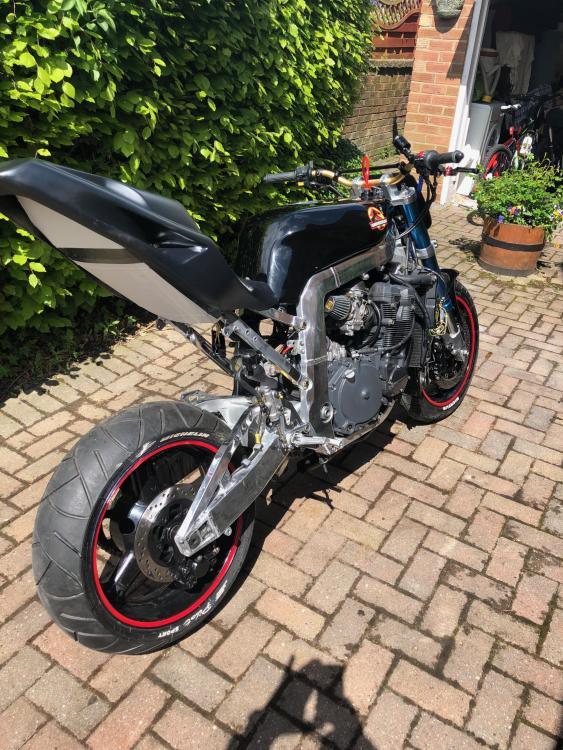
Beautiful bike


GSXR 750 WR motor swap|?????
in Water Cooled, V-Twins, Singles and 2-strokes
Posted
Cheers Madb, its worth looking at as 1100 oil cooled motors are a fortune. Ill decide over next few month exactly which way im going to go. Might finish and sell, then start again????