


RickC
-
Posts
98 -
Joined
-
Last visited
Content Type
Profiles
Forums
Events
Posts posted by RickC
-
-
Thanks guys,
That saved me a bit of messing around.
Cheers,
Rick
-
Hi all,
I'm chipping away at my 7/11 build, I want to keep it sort of original at this stage with the Snowflake pattern wheels.
I picked up a rear wheel from a 1992 GSX400S which has the snowflake pattern but it's a 4" rim not 3.5" (Thanks John for the advice) it's on the way over from the UK.
I was probably planning on putting Battleaxes on it but they only go out to a 150mm rear, this is based on my memory of tyres from 30 years ago.
I think with the 4 inch rim I should be able to get a 160 or 170mm rear on perhaps an Avon or Metzler.
Does anyone know how wide I can go on a 4" rim before I get clearance issues?
I'd be happy for any tyre advice, keeping the 19" on the front.
Cheers,
Rick
-
GS750
in Air Cooled
10 hours ago, Swiss Toni said:@RickCIf your front 'guard is in good condition, give the underside a good clean. Silicone all round the mounting bracket, to stop water & mud getting behind it (this is where they rust). Then, coat the underside of the 'guard with either Hammerite or a rubberised under seal. Then it'll last for years!
")
Thanks Toni, it is in good condition, I wouldn't have thought to do that but it sounds like a good idea.
-
Here's a link to Ventura - their bags are OK, you could do better if someone would make you a rack but for light loads their gear is OK.
https://www.ventura-bike.com/fitments/suzuki/suzuki-gsx-1100-efe-ese/
-
GS750
in Air Cooled
On 9/3/2019 at 8:12 AM, ccroaker said:thanks for the offer lad.... but i was kinda looking for a standard one only in chrome ....its not a big deal....i get these mad thoughts every now and again...even the stance on your one with the exhaust seat and front mudguard looks mean and really suits it...it looks fast just parked up...
I think a chrome chain guard would set your GS off nicely, it would tie in well with the chrome front guard, mounting holes aren't a show stopper - a piece of stainless or alloy and a couple of rivnuts of similar and I'm sure you could get one to fit, BTW I bought one of those chrome GS front guards to hopefully put on my 1100, I like the look of them.
-
GS750
in Air Cooled
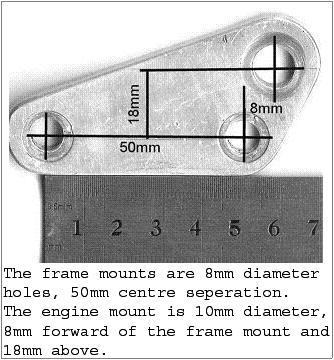
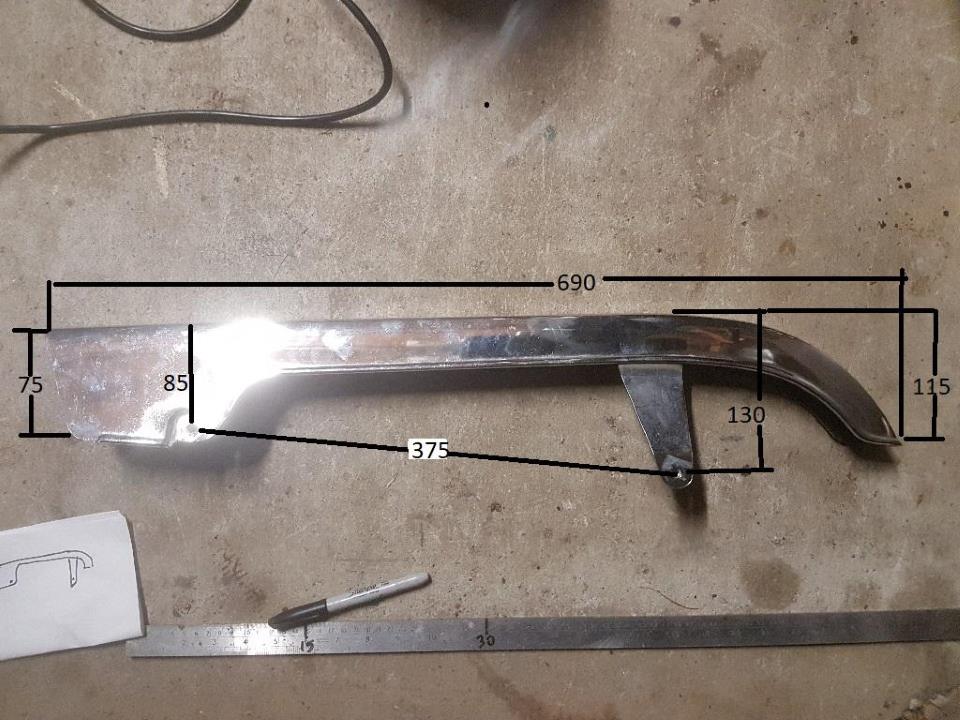
I'm not sure if a GSX1100 chain guard will fit but here are some measurements to rule one in or out.

-
 2
2
-
-
12 hours ago, johnr said:
this one? saved from the old site
Thanks a lot JohnR.
Rick
-
21 hours ago, Gixer1460 said:
Hope you've got the right size - there are two.......ask me how I found that out LOL!
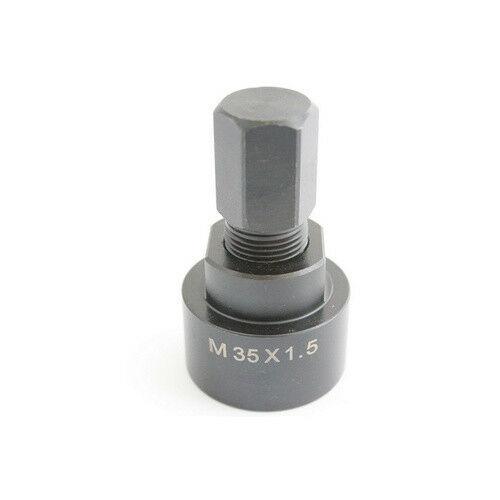
I knew I should have measured it. Hopefully I got lucky I just measured 35mm on the outside of the rotor nut.
-
-
10 hours ago, Jonboy said:
Yes it is, cant remeber which though, but if you have a large billet of something you can make a slide hammer and remove rotor that way. Just make sure you have full thread engagement
Wouldn't the thread engage into the Crankshaft? The Oem tool picks up on an external 35mm thread on the rotor.
Googled a guy using a screwdriver to apply pressure to the two locating holes one at a time whilst tapping the centre bolt but for the realitively cheap price of the tool, it seemed better than screwing the rotor.
-
Nut rattled loose very easily with the rattle gun, 35mm puller on order, I've split the cases and pulled the
crank off with the rotor on for the short term.
Thanks again Toni and BigT.
-
Thanks guys, Puller ordered, will rattle off and replace the 3 bolts wih red locktite.
-
Hi All,
Next dumb question; how do I remove the Alternator Rotor nut off a GSX1100et?
Can I rattle gun it off?
I don't have the special Suzuki holder.
I have a puller set which should hopefully get the rotor off once the bolt is loosened.
I've tried a strap wrench but it just wants to slip for me.
Cheers,
Rick
-
Gammaboy,
It's all good mate; I'll get one drawn up and share it here.
Thanks for trying to help.
Rick
-
1
-
-
Thanks everyone; good advice all round.
-
Hi all,
I've just removed the clutch basket nut from a GSX1100et with a rattlegun, it came off easy enough.
I tried using locking plates from another GSXR thread on here but I could not get them to work with GSX1100et.
A question for the knowledgeable, can I rattle the nut back on when I come to refit?
Should I make up the 2 steel clutch plate tool and torque up or is there another way to torque up that I'm missing.
Thanks,
Rick
-
7 hours ago, baldrick said:
why not just post up the dimensions?
from the bottom bolt centres
I can do that, I have to pull out the 750 engine and finish stripping the 1100 engine down to a bare case so it may be a week
or three depending on what else I have going on.
-
1
-
-
11 hours ago, Gammaboy said:
Unfortunately, i've discovered that I've got it as a mastercam file, which i can't open. sorry.
No worries,
Thanks for taking the time to look.
I will put one up once I get it drawn up, cut and proved.
Cheers,
Rick
-
I can understand using a cad drawing for a “complete” motor mount plate fab.... but just for the lower mids ??? you already have the frame hole centers on your original bracket...,surely you can make the one remaining hole
 or are you just lazy ?
Yes I could make one, I spent two days making an 15mm thick aluminium dovetail as part of my apprenticeship, but I would rather spend the time on something else, the cost
of a pair water jet cut out of stainless or alloy is well worth me not doing it and I get to support a fairly priced local business that doesn't rip off locals wanting small project jobs done
in between their larger jobs.
-
14 hours ago, Gammaboy said:
I just realised I have the cad for that bracket at home somewhere - will dig it out.
Thanks Mate, You would be a legend if you could find it.
-
Rick,
Would you consider VHT Gloss Black? S100 Engine Brighter or inox seems to keep it looking good.
Cheers,
Rick
-
Reinhoud,
I don't know much about wrist pins but the thicker ones may not be stronger as metal technologies developed the lighter 2.5mm ones might be stronger,
Less weight on the conrod seems to be what modern engines are aiming for.
Cheers,
Rick
-
13 hours ago, yoshi said:
hi rick I think the breather box on top of the cam cover is a tight fit may need a bit of work on the frame there from what I can remember
yoshi
Yoshi,
The 1100 engine is tight in the 1100 frame so it wouldn't surprise me if that is the case, Thanks for the heads up.
Rick
-
1
-
-
The solder on those joints don't look like they are doing you any favours, if you have access to a soldering iron, it would be worth going to
an electronics shop or online and buy some de-solder wick, you place that over the solder and heat from the other side through the wick with a
touch of solder to the tip it creates a heat bridge and draws the solder out, clean and tin you wires and put a dot of solder onto your tip and solder
on, you want to not move the joint once the right amount of solder has been fed in, the joint should look nice and shiny if it is going to have good electrical
properties, clean up with Iso Propyl alcohol if you have it but Metho would do an honest enough job to last for 15 years or so.
-
1
-
Roller bearing runout
in Air Cooled
Posted
There's a lot more to putting a crank together that I ever realised.