

Danm54
-
Posts
604 -
Joined
-
Last visited
Content Type
Profiles
Forums
Events
Everything posted by Danm54
-
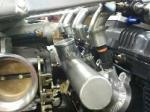
Bit later than planned but cams are in, valve clearances checked and cams dialed in Intake centerline is 108.5 Exhaust centerline is 110.5 Can put it back together now with plenty of loctite!
-
I was looking at more heat tolerant loctite the other day for the header and exhaust shield bolts. Not had chance to drop into the local engineering suppliers yet though. Shims arrived today so can get those in and the cams dialed in again. Will finish early tomorrow and get a good evening in the shed.
-
Bit chunky but made out of free bits, just need to pin the trigger wheels and get a slightly shorter bolt. Use a dial indicator down the bore for tdc, go a couple of mm down the bore either side and take the degree reading, tdc is in the centre of those 2.
-
Thanks, will give them a good clean and plenty of loctite next time. Checked the valve clearances and a couple had tightened up again so got some shims on order. Head bolts are ok and the crank gear looks fine too. Got a free degree wheel off a mate so in the process of making a proper mount for it off the crank, save a lot of messing about like last time.
-
I've got blue 243, much/any difference? Both are medium strength, oil tolerant and removable.
-
What grade loctite do you use?
-
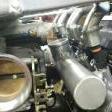
Seems I've lost the ability to tighten bolts up! Seen a few people snap the sprocket bolts so knowing I normally tighten stuff too much I got a small torque wrench for them. Never seen anyone have to lock wire them so I assume most people get them right. Friend told me about some new ring lock washers so may try and get hold of some, they should hold the sprocket in place as well as locking the bolt. Bit of a sod but I'm glad I caught it in time and like you say, I may find some more bhp now.
-
Checked the engine over tonight, not sure if I've been unlucky or got very lucky, or both! Lost an exhaust cam sprocket bolt and the other one has looosened enough to allow the sprocket to move. Intake cam is fine, both had loctite and were torqued to the specs in the manual. Removed the plugs but couldn't turn the engine over, had a peek down the cam chain tunnel... The bolt looks a little beat up so it must have been thrown around a little I'm now looking for ways to hold the cam sprockets in place and stop the bolts working loose. Came too close to serious damage so want to try and avoid the same happening again. Valve clearances seem a little tighter than they were so I don't think any piston to valve contact has taken place.
-
Garrett t3 hybrid with a 0.48 turbine, not sure on the compressor side.
-
Dyno session over and it was mostly good. Few bolts came loose during the afternoon, couple of header bolts and all of the cam cover bolts, they were torqued to the book so may need some locktite on them. Temps were steady but it did need a little cool off time which is to be expected really. Mapping is good with just the idle and low throttle openings to smooth out. Only issue is that it makes the same power at 70-80% throttle as it does at 100% but it requires more fuel. There must be something restrictive at 70-80% throttle thats holding it back. It makes boost really early as well which I didn't expect, could be causing the jerking at low rpm/throttle opening and I suppose could also be the restriction at higher rpm. Its a .48 housing so I thought it would be on the big side. Positive day though so I'm happy.
-
Dyno time booked for tomorrow, bit quicker than I expected. Ran it up today and it ran very rich initially like it did last time, so I dropped the fuel multiplier at cold coolant temps so I'll see how it starts tomorrow. Checked it fits in the van as its never been in there before, harder to load than the DR but plenty of room. Double checked a few ecu things with Specialist Components and its all ready. Hopefully it goes ok. Edit, also left it idling for a while before I turned it off and it doesn't make its breathing noise.
-
Suppose thats the only thing it can be really, anything else losing pressure wouldn't make a noise for that long.
-
Here it is! Not embedded as usual... https://youtu.be/cf7Vbwkr7aM
-
Should be, got the standard 10mm off the cam cover and a dash 10 off the clutch cover. Can't get a vid up, the photobucket link won't embed and youtube is having an issue uploading the vid!
-
Shut off as in turn it off. Could be possessed I suppose, would explain a few things!
-
Things have been full on the last few weeks but managed the odd hour here and there, pretty much ready for some dyno time but I did take it down the road to make sure clutch etc still worked. Got this weird breathing noise after shut off thats concerning me slightly though. I remember hearing it at the last dyno session and it may have made it before but I think its only been since the turbo was rebuilt. Thoughts? I'll try and upload a vid.
-
Possible RF project
Danm54 replied to Hayabuser's topic in Water Cooled, V-Twins, Singles and 2-strokes
The main frame is the same for the 600 and the 900, I think they use different brackets on the top of the engine though. Engine cases are the same fitment for the gsxr 1100/750 and rf 900/600 but as you say you'll need an rf9 head and carbs. You'll also need to modify a couple of waterway between the barrels and head but I dont think thats too much of a problem. Guy called Martin done an rf1100 that came out real nice but I'm not sure if he's registered on here. -
All welded up and fitted, new filter and some fresh oil in too, spun it over to get some oil around and make sure I had oil pressure, all good. Fitted the rad and filled with coolant, tank on then needed fuel. Quick run out and for a few litres, primed the fuel lines the hit the go button, didn't go first time but only needed a sniff the second time and it fired right up. Idled nicely, revved cleanly, steady .85 lambda and coolant temps only reached 70c after about 5 mins running. Toyed with the idea of putting the seat on and going out tomorrow but think I'll put it in for a dyno day first. Play safe and all that.
-
Well its in position and the outlet is tacked but I wasn't feeling the love for tig welding so I'm going to wait and weld it up once I've cleared some bench space.
-
This arrived yesterday Sadly the 38mm wastegate has a 44mm inlet flange so fitting was delayed. Got a mate to make a bush last night so fitting will begin later.
-
Just done a little googling and it seems you can run most pumps using pwm and there are controllers available that use map or tps to control this along with fuel rail pressure. How much the controllers cost is another thing and it may be a little over complicated for your needs but its interesting none the less. Another option would be to run 2 fuel pumps and have a higher pressure one coming on over a certain tps or map etc. Again the cost of controlling these might outweigh the benefits.
-
Thanks @minx thats close enough to the 750 to get the engine and charge circuit wired up. Also explains some of the random half wired plugs I have. @Solcambs, thats the same as minx linked to but hers is better quality, sorry mate....
-
Thanks for the link but I found incorrect poor resolution diagrams on my own. Was hoping someone would have one to save me clicking through random pop up filled sites trying to find one of good enough quality to zoom in on. Worked my way through the loom and figured out what was and wasn't needed to run the engine, a pile of old wire and crappy crimp connectors later and I'm left with a loom that works.
-
Anyone got a katana 750 wiring diagram? Ive got an engine and a very butchered loom, would like to get a running engine before I get too far in the build. Cheers Dan
-
I could stick with the flange type but its only £30 extra for the newer v-band type. Make changing springs piss easy and avoids broken gaskets.
