rider384
-
Posts
58 -
Joined
-
Last visited
Content Type
Profiles
Forums
Events
Everything posted by rider384
-
Knock monitoring on turbocharged oil boiler
rider384 replied to rider384's topic in Forced Induction
Thanks for the replies guys! Given the difficulty in getting a knock system set up on an oil cooled motor, what's the standard MO on tuning high load/high RPM situations? Just checking the plugs for signs of detonation after a while or are these engines generally not knock-limited in terms of spark advance? -
Hi all, wondering how people are monitoring for knock on their oil boilers. I was running 13 pounds on the stock engine and just checking the plugs for signs of detonation, but now that I've tossed an intercooler in and built the engine I'm both ready to start pushing the system and feeling a bit more protective of the engine now that I've spent so much time on it. How are people here generally setting/monitoring for knock? Acoustically or digitally? In either case, how are you doing it? Where is the sensor mounted? How are you isolating the knock signal from the inherent NVH of the engine? Sorry if these are super basic questions, I've done quite a bit of tuning before but I've never set up a knock monitoring system from scratch. Any advice is appreciated.
-
This will probably be controversial, but the idea that you have to spend a lot of money to go fast. My car makes ~800whp with about $5,000 in parts ($3,000 of which is in the transmission), and my Bandit ran 13psi on a $500 turbo kit and a $1,000 fuel injection conversion. Both of them have been phenomenally reliable for being modified vehicles, cheap parts notwithstanding. The standard triangle of "cheap, fast, or reliable, pick two" can be broken by someone who knows what they're doing. Reliability is rarely down to the parts chosen (to a degree), and more often about who designs it and puts it together. I've seen $4,000 fuel systems leak and break constantly, and I've seen $1,000 fuel systems last for years without an issue. Same with turbo kits, same with engine swaps, same with just about everything. Cheap != unreliable, expensive != reliable, expensive != good, cheap != bad.
-
I finally have a good update to share! As stated before, I decided that there was nothing to do but ride it and hope that it frees up, so I clamped the clutch lever down with a worm gear clamp and started gently riding it around. Slowly, it started getting looser and looser to the point where I could actually stop it in gear with the clutch disengaged and it wouldn't stall. Still drags a bit, but a tiny bit of throttle and it'll stay running. I actually had to stop and remove the worm gear clamp as I could no longer sustain speed with the clutch lever pulled in. Hopefully as I ride it more and more it starts to get looser and looser to the point where it's actually functional as a clutch. But for now, I'm just happy I can ride the bike with a marginal degree of safety.
-
I kind of like that idea, I'll see if I can find something on Eblag. I don't think the 600s are as common over here in America as they are in other parts of the world, but I'll see if I can get my hands on one. Interesting thought. I don't think I have any other pushrods lying a round as this is the first major motorcycle project I've ever done, but I'll see if I can't track down the specs on the stock pushrod and measure them up against mine. And on to some other updates: I rebuilt the master cylinder and replaced the frictions today, so at this point, literally every single component of the clutch system has been replaced/thoroughly inspected. The clutch pack itself has about 2mm of wiggle/movement when the clutch is fully disengaged, which should be more than enough that it doesn't drag, but here we are. I think I'll try doing another oil change just in case the oil I used was mislabeled or something, and after that just start riding it around as I'm not sure there's anything else to do at this point. Hopefully it either frees up or breaks to the point where the problem becomes obviously identifiable. Not sure there's much else I can do at this point.
-
Updates: Local dealership had a slave kit in stock so I rebuilt the slave cylinder Tried another set of steels that I had lying around Hit the edges of the clutch basket where the frictions slide in with a metal file and made sure they were perfectly smooth Built a longer push rod for the clutch at the clutch lever itself to take up some of the "dead zone" when initially actuating the clutch. It's ~1-1.5mm longer than the stock push rod No change in performance from any of these. So that brings it to either the master cylinder or something in the clutch itself. I'm definitely leaning more towards it being something in the clutch itself as again, the clutch feels completely fine and the hydraulics hold pressure, even over extended periods of time. I'm going to pick up a master cylinder rebuild kit anyways, but if that doesn't fix it, I will have literally replaced EVERY single component of the system. No idea where to go from here, any and all advice is appreciated.
-
Just whipped it off and cleaned it up, it wasn't actually that bad but there was definitely some gunk. When I was in there, I noticed that the slave cylinder piston retainer was actually bent out fairly severely. I tried to flatten it and it made no difference, but I think that points to potential issues with the slave cylinder. I'm going to order up a rebuild kit and new retainer and see what happens.
-
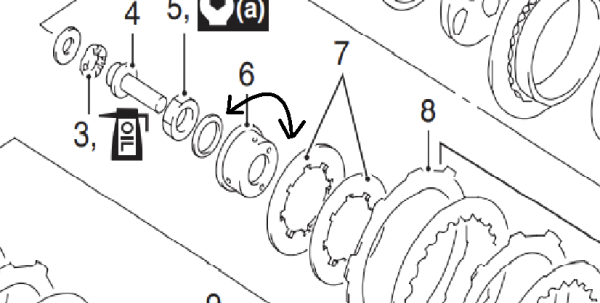
Are you talking where the frictions/steels slot into the assembly? If so, I have checked for visible wear and didn't see anything, everything slides extremely smoothly, no hangups or anything like that. Maybe I'll give them a quick bit of metal file just to be sure. Also, does anyone know if the diaphragm springs are supposed to be flat when the hub nut is fully torqued? It makes sense why they are, but it just seems off to me, and I don't have a working clutch to verify with. _______________________________________________________________________________________________________________________________________________________ Summary of everything done/checked so far: Verified that alternator/oil pump drive gear is fully seated on clutch basket Verified that clutch basket ring gear and crank gear are perfectly flush, which AFAIK means the clutch basket itself is fully and properly seated Verified stacking order of plates and frictions. Thicker steels are where they need to be, larger diameter friction is where it needs to be. Verified thickness of clutch plates and frictions - plates are all 1.59mm-1.61mm or 1.99mm-2.00mm, frictions are all 2.96mm-3.02mm Verified that washer between input shaft and clutch basket is installed, and that washer between the clutch basket and clutch hub is installed Verified that spring washer and spring washer seat are installed in the correct place and correct orientation (concave side facing out) Verified that all parts are correct OE via part number Verified that the frictions are able to be wiggled around when the clutch is fully disengaged. They have 1.5-2mm of total movement back and forth Verified that system is fully bled Diagnostic steps taken: Removed diaphragm springs, put bike in gear, and rolled it back and forth to make sure clutch pack itself wasn't stuck/binding up Put a couple washers between clutch push rod and "clutch push piece", effectively extending the length of the push rod. No change in performance. Moved washer from inside diaphragm spring holder to rear of diaphragm spring holder. Made no difference once alternator drive gear was seated correctly Loosened clutch sleeve hub nut and took the bike for a very short ride. Clutch performed as expected and did not drag, but clutch needed to be pumped to work properly and felt like garbage. Obviously not a permanent/sustainable solution by any means. Replaced the 2x 2.00mm steels with 1.6mm steels in an effort to "shorten" the clutch stack. No change in performance Potential causes for concern: Diaphragm springs are completely flat with the hub nut fully torqued. Not sure if this is normal, I can't remember what it looked like originally Clutch basket and input shaft roller bearing are not flush when installed. According to the manual this is normal, but it seems off to me. Screws that hold the diaphragm spring basket and clutch sleeve hub together are not installed, but they weren't when I pulled it apart and it worked fine.
-
Ok, so fired it up and took it for a spin earlier. The clutch is definitely still dragging, and it's dragging to the point where the engine will actually stall out when put into gear when warm. I can't hold it back from moving with just my feet, have to use the brakes. I replaced the 2x 2mm steels with 2x 1.6mm steels in an effort to give the clutch a bit more room to disengage, but it made no difference. So, a brief summary of what I know: The alternator/oil pump drive gear is FULLY seated on the clutch basket The steels/frictions are stacked in the correct order, verified several times The spring washer/retainer are installed in the correct orientation at the base of the clutch pack The washer between the input shaft seal and the clutch basket is installed The washer between the clutch basket and the clutch sleeve hub is installed The system has been bled many, many times Anyone have any ideas? At this point I'm thinking master/slave/wrong washer somewhere, but the clutch feels completely normal, same engagement point as before I disassembled the bike, doesn't bleed pressure when the clutch is engaged, pumping makes no difference, basically just feels completely normal and functional. Edit: Also, is there something that's supposed to go in between the slave cylinder push rod and the main push rod? I didn't see anything in the manual but I'm kind of surprised they're just supposed to butt up against each other with no buffer.
-
Update: Pulled clutch basket again in an attempt to further seat the drive gear. No luck, it was hard stuck at that point. Luckily I had a spare clutch basket lying around so I swapped the drive gear onto that one and it went on all the way. Must be a lip or something on my original clutch basket that was preventing it from seating all the way. The clutch now seems to be functioning fine. Still seems to drag a bit, but I haven't warmed it up or ridden it around yet. Fingers crossed.
-
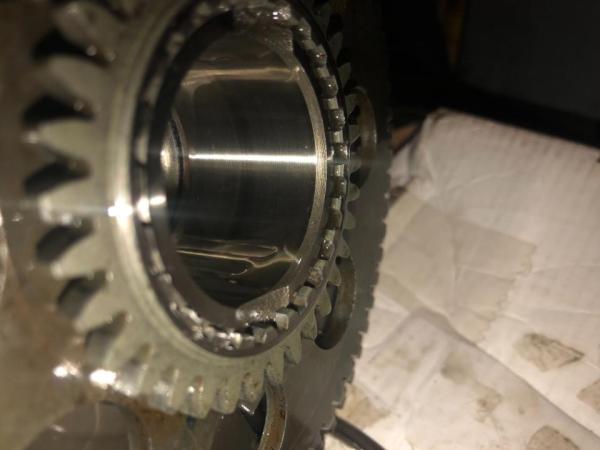
Pulled the clutch basket out again to check on the alternator/oil pump drive gear. Is it supposed to sit flush? I had to replace it during reassembly because I broke the original due to not fully seating the clutch basket the first time I installed it and didn't take note of how it sat. I beat it on with a piece of wood and a rubber mallet until it stopped going on further, but I'm wondering if it's supposed to sit flush. If so, it would explain both the issues I'm having with the clutch not disengaging AND why moving the spring retainer basket further away made the clutch start to work a bit.
-
As far as I'm aware, the clutch basket is fully seated. At least the drive gears on the alternator and oil pump are fully seated, confirmed via pulling the alternator out and peering in the hole. The one caveat to that is that I replaced the alternator/oil pump drive gear, and I'm now wondering if I didn't press it all the way down. The part is hard to find and fairly expensive, so I'm worried about putting any more pressure on it. As a slight update on the whole situation, I got the clutch to "work" by assembling it incorrectly. I moved the washer in the picture from the front of the spring retainer basket to the rear, effectively lowering the spring pressure when the clutch is pulled. The clutch now "works", in that the engine can idle in gear clutch pulled without moving, but it is dragging pretty bad, to the point where if I don't give it a bit of throttle when at a standstill it stalls out. Also, the dragging seems to get worse when the engine is hot, but I could have been imagining that. Not sure what this means in terms of what's wrong with my clutch, I'm hoping someone smarter than me can point me in the right direction of what to look for with what I've learned. And as a side note, all the washers listed/displayed in the service manual are in place in the correct place, with the exception of the one that I moved for diagnostic purposes.
-
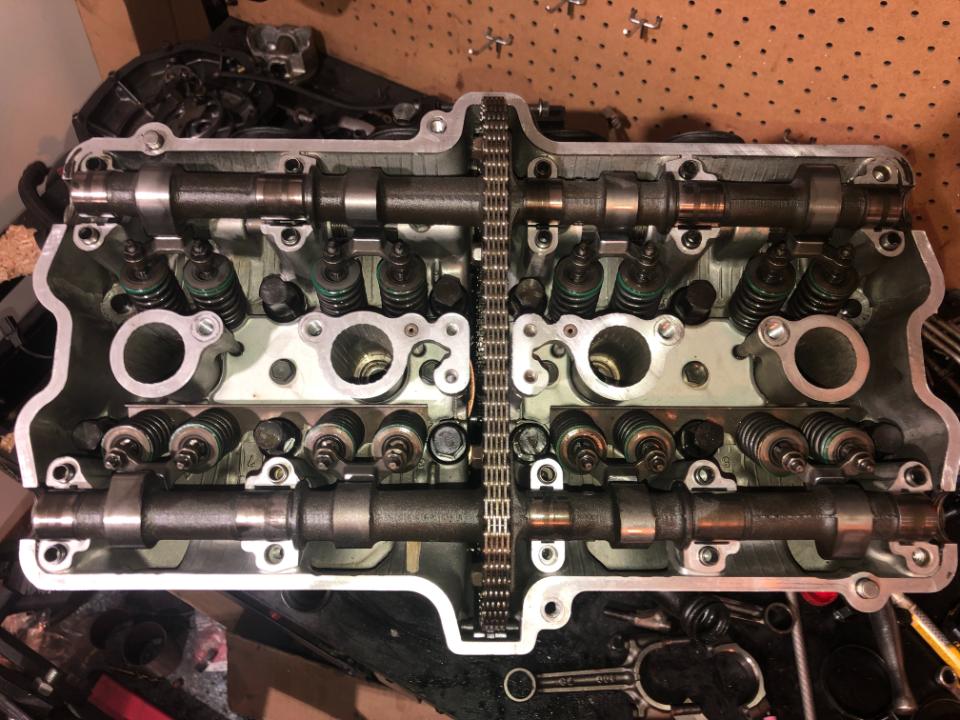
Got my built 1216 twin turbo back together, running well, and ready to go with the exception of the clutch. It won't disengage. Clutch lever feels completely normal and it does move the pressure plate. When the clutch is fully disengaged, I can wiggle the frictions around a bit. Not a lot, maybe 1-1.5mm, but the whole pack is loose enough that they can be moved by hand without much force. However, in practice, the clutch will not disengage. It's got enough clamping force that it will actually stall out the starter motor when trying to start in first gear with the clutch lever fully in. Stock clutch, no lockup, both factory diaphragm springs replaced with HD units. I have been through the clutch no less than 6 times at this point, each time paying VERY careful attention to the manual on the placement of all the different frictions and steels. The thicker steels are exactly where they're supposed to be, as are the different frictions. Frictions have been re-soaked in oil every time they've come out. I believe the clutch basket is fully seated. The input shaft/diaphragm spring nut is torqued to 110ft/lbs. A couple of factors that might be contributing: The alternator/oil pump drive gear was replaced with one from an '86(ish) 750, which, by part numbers, is supposed to be the exact same part. The diaphragm springs are completely flat with the nut torqued down. Not sure if this is right, it seems a little off to me based on the diagrams in the manual. The threaded part of the input shaft barely has any threads visible before the nut goes on. I can maybe get 1/2-1 turn out of it by hand before the assembly starts to clamp down on the diaphragm springs. Again, this doesn't seem right to me. Sorry for the essay, I'm just really lost on what it could be given that when fully disengaged I can wiggle the frictions around, but the engine is still solidly locked to the rear wheel. Any and all advice is appreciated.
-
Interesting, wondering if they were packaged incorrectly as I have a single long one. I got the two shorter ones figured out thanks to the workshop manual, I'm going to pull all of them and measure to make sure either way. Also, semi-related, should I be using factory torque specs with this bit of kit or is more torque recommended?
-
Hi all, this is probably a really stupid question so I apologize in advance, just want to make sure I'm getting this all correct. 9/12 of the APE head/cylinder studs work perfectly, no issues. Two of them are too short (top left and right studs in the photo). No way to get enough threads on the head nuts to get on, much less torque down. One of the studs is also longer than the others, and even with a factory washer there it won't crank down enough to clamp, the nut just bottoms out. I'm wondering if I'm missing something really obvious here, or if I ordered the wrong stud set. I ordered "CS1127GSX " for the studs and "CHN1000k" for the nuts. Thanks in advance

-
Ring Gap, Stock Valve Springs/Valve Questions
rider384 replied to rider384's topic in Forced Induction
I'm super skeptical that the turbos will hit 400whp on their own without some help, but we'll see. Looking at the compressor map, it should be possible but it just comes down to controlling the heat and detonation. The compressors might be out of their efficiency range to the point that the heat will be too much for any motorcycle-sized intercooler to effectively control. Though if it comes down to that, I have an Eaton M62 ready to be installed and fed via the turbos for a compound boost setup. That's a bit further down the line though, and dependent on me not sending a rod into the stratosphere with just the turbos. -
Ring Gap, Stock Valve Springs/Valve Questions
rider384 replied to rider384's topic in Forced Induction
Boost on the back of the valves can contribute to valve float. My turbo LS car floated at anything above 7psi on stock valve springs, but stock springs on the LS are incredibly soft. Though yes, it's usually more related to revs but boost can contribute as well. Yeah I'm asking a LOT of the motor - definitely a "split personality", so to speak. That's why I'm so confused on what I should gap the rings at. In regards to the CA gas, I'm hoping that an eventual water/meth injection setup will get me closer to my goal. I definitely don't expect to see 400 on solely 91 octane, just gonna push it higher and higher until the detonation is uncontrollable and go from there. Or perhaps an E85 tune for high boost and 91 with lower boost on the street... Not sure. Either way this bike has always been an experimental platform to mess around with to see what I can get away with. Thanks for the advice! A smokey startup is fine, so long as it's not leaving a blue cloud behind me once it's up to temp I can deal with it. Edit: oh, and it's naked and I'm 6'0 @ 150lbs so standing mile is going to be a lot more about my strength limits than the bike's at that point -
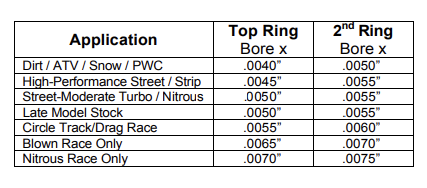
Finishing up my built 1216 and wondering about ring gap and valve springs/valves. Eventual goal is 400whp on pump gas. A couple questions I have: Unsure of what to set my ring gap to. I've attached MTC's technical sheet but I'm unsure of what category I fall in to. Bike is primarily street ridden with plans for standing mile stuff (non-competitive, for fun). So it has a huge mismatch of power to use case, making me fall into several different categories on the chart. Thinking 0.0175" top and 0.019" bottom, which corresponds to "circle track/drag race" category. Considering going up to 0.019" top and 0.021" bottom, which sits in between "drag" and "blown race only". At what boost level does the stock valvetrain start floating valves? At what power levels on pump do the stock valves start to burn? I know it varies heavily from setup to setup, but rough ballpark. Specs: Engine currently has: MTC Turbo Pistons w/ tool steel wrist pins Maxpeeding rods i-beam rods APR2000 rod bolts APE heavy duty case/cylinder & head studs And non-power stuff like new bearings and o-rings and such, etc. CR somewhere ~9:1, might toss a spacer plate in it to get it down to 8:1 or so, depending on how the detonation situation is when it's running. Turbo kit/Electronics are currently: Twin K04-015s EFI Conversion run via Microsquirt LS Coils 3" turboback with cat and muffler No intercooler now but obviously planning on adding a decent sized core once I figure out where to put it/how to fit it. Possibly water/meth injection, again depending on the detonation situation as I push the power levels higher and higher
-
Oil Boiler Blandit 1200/GSXR1100 Eaton Supercharger Setups
rider384 replied to rider384's topic in Forced Induction
Thanks for the advice and build threads guys! Definitely gives me some ideas to play with. Need to get the engine built and back in the bike and get my hands on an Eaton unit so I can start fabricating. The plan is to fit an intercooler between the turbos and the supercharger with a Florida-sized injection of meth after the supercharger. I would like to fit an intercooler after the S/C but space is already severely limited everywhere on this bike, I don't know if it would be feasible. -
Hi all, looking for any information on whether or not anyone has mounted an Eaton M45/M62 unit to their oil boiler and what the setup looks like. Mainly wondering about the physical placement of the unit - engine is currently out of my bike so I can't easily take any measurements. Also wondering about how the supercharger would be driven off of an oil boiler's engine. Ultimate goal is a sequentially twin charged engine (twin K04s feeding into an M45/M62) with a goal of 400-450whp. The bike as it sits will probably make it to 350whp on the turbos alone, but needs an extra bit of help for that last 100whp. The current TT setup works very well (so well it lifted the head on a 30psi boost spike), but I'm bored and want to mess with a supercharger. I'm a full time student so an S&R blower is cost prohibitive. Mainly looking at using an M62 because they're insanely cheap, especially since I'm in America and the junkyards are full of them.

-
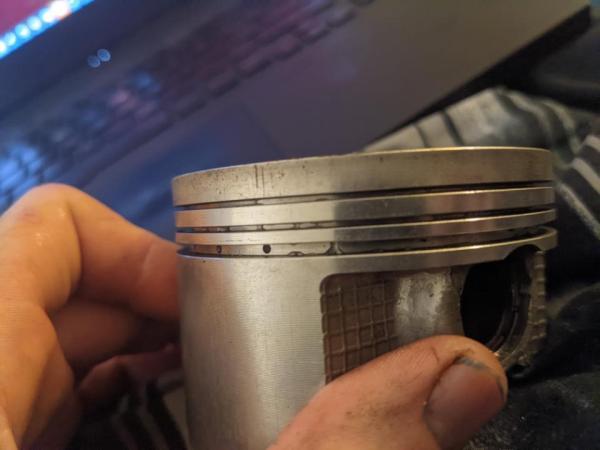
Hi all, small update. Started pulling the engine apart and saw nothing obvious that would lead to such an extreme loss of compression. I've attached a picture of the piston from the cylinder that was only making 30psi. Apart from some scoring on the top land, I don't see anything extreme. Ringlands are intact and un-cracked or scored. The head gasket was visually in one piece. Top end looks pristine, no scoring on the cam journal bearings or the cam itself. The rings themselves looked fine as well. Two of the piston pins were a pain in the ass to get out, but I assume that's fairly normal for an engine with 32k miles, 5k of which were at 13psi of boost. Anyone have any thoughts? Maybe the cylinder studs stretched and weren't sealing the head properly? Like I said it was a bone-stock unopened 1999 Bandit 1200 engine. I honestly have no idea. Suggestions on next steps? Already planning on taking the head to a machine shop and having them test it and clean it up a bit. Edit: Oh, and the compression gauge was verified and the test was repeated 4 times, each time with the same results, even with some oil down the cylinders
-
Thanks for the help guys! I'll look into having my pistons machined to lower CR rather than using a base plate spacer, along with going with an MLS head gasket. Thanks for the insight on the piston -> wall clearance, now I have something to tell the machine shop. I'll drop off a piston to work with just for safety's sake. Good to know about the squish clearance, and good to know about machining the pistons down. I've already decided on going 8.5:1 on the compression since I'll be running California, but wasn't sure what the best way of reaching that CR was. I know I'll have to calculate my CR for myself since different manufacturers rate their CR with different conditions - some with gaskets, some without, some theoretical, etc. Thanks for the insights on dishing pistons! When it comes to the rods, I know they're a risk, but I know of several people running their rods and pushing high numbers - not in the 1157 world, but the BMW world. I trust their products, the two K04-015s I'm running are maxpeedingrods brand and I haven't had any issues, I've also run them in my cars in the past with no issues. We'll see about the rods tho. As far as my means/understanding goes, where would the fun in life be if we always stayed within our capabilities? People said the same thing when I built my first turbo kit, then they said the same thing when I LS swapped my E31, and now I hear it about building an engine. Plus, if it blows up, it's an excuse to learn even more when I build the next engine. Thank you! I'll order the parts then, I was waiting on confirmation that they're indeed what I was after. I'm assuming the nitrous guys go with 40-50 thousandths to account for the extra heat and expansion of the piston/rings? I'll probably go towards the upper end for the sake of safety, I'll do a bit more research on it. Luckily I'm already running EFI by way of GSXR throttle bodies and a microsquirt, which I did specifically to gain control of the spark. I believe it is capable of controlling boost as well, but I'll have to look into that. Worst case I get a standalone boost controller. Thanks for the heads up on the washers, I'll add those to my order as well. Good to know. Luckily I didn't pay for the copper one, it came with my pistons. I'll order up an MLS one instead as you and Fredrik have recommended. Thanks guys, outstanding information to work with, I appreciate all of you.
-
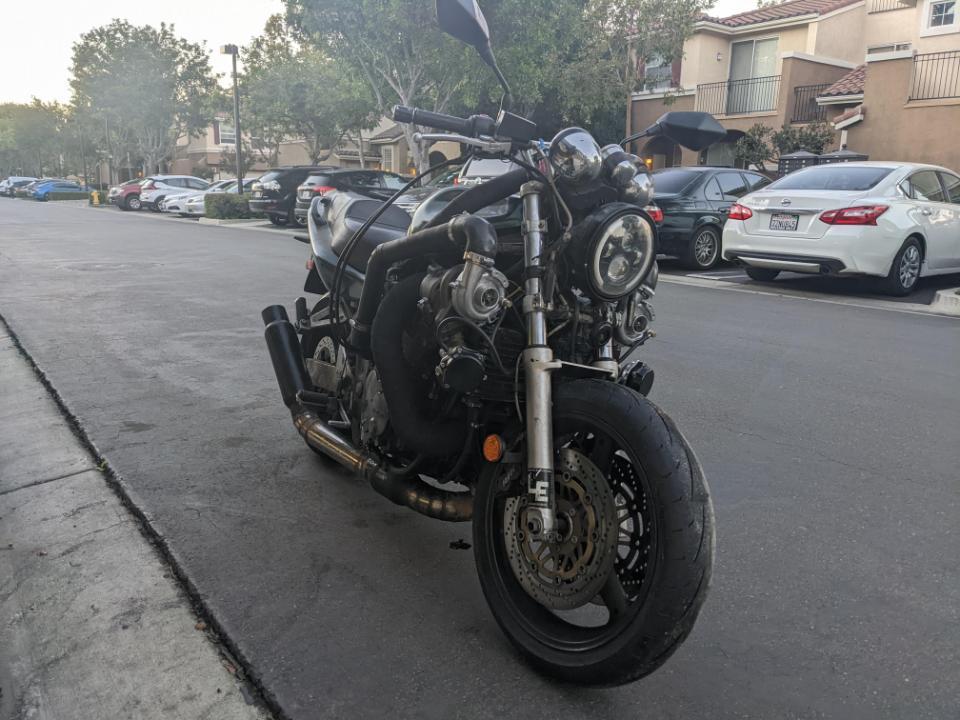
My bone stock 1157 motor finally bit the dust after my wastegate signal line popped off and it briefly saw 30+ pounds of boost from my twin K04 setup. Compression is currently 50-30-80-90. Luckily, this is an excuse to build an engine, but I have zero experience doing that. I have a workshop manual and friends who are more experienced/smarter than I am, so I'm not too worried about the actual physical assembly of the block, but more about the parts I'm going with, primarily whether or not I'm missing anything important. Bear in mind, the goal of this build is 400whp. Parts I have MTC 10:1 81mm Turbo Pistons (MTC-R1216T) Tool Steel Wrist Pins Maxpeedingrods H-Beam Rods (supposedly good for 600-800hp) Cometic 0.032" Copper Head Gasket C8191 Parts I am unsure about and need help with: Cylinder Studs: CS1127GSX - unsure of whether these will fit the Bandit 1200 block I've got, as it's listed as compatible with '86-'92 1127 blocks, but I believe the Bandit 1200 is an 1127 case, correct? Main Bearing Studs: MBS1100GSX - same note as above Head Nuts: CHN1000K or CHN10125-12, again unsure of which ones are correct. I believe it's the CHN1000K, but I just want to be sure. And of course the standard engine rebuild stuff such as gaskets, bearings, o-rings, etc. I'm not going to list it all, just after the big stuff. And for my very basic questions: What diameter base gasket do I need? The smallest diameter available is ~85mm, I guess it's the diameter of the sleeve? What sleeve is in the 1157 Bandit motor stock? I don't have the engine apart yet to measure for myself. How is compression generally lowered in the oil-cooled community? Is it by raising the head, or by raising the jugs? I've found both being presented as solutions. And, if a spacer is used, does it require 2 gaskets? Cylinder Jug Boring - what specification is used as the diameter to bore to? Is it just as simple as 81mm? People talk about 2mm over, but I'm unsure if that literally translates to a bore of 81mm for the jugs or something slightly different More questions to come I'm sure, but I'd like to start off with this as I'd like to start ordering the final parts and hit a machine shop. Any help and advice is appreciated! I've attached a picture of the bike in question just for fun.

-
1157 -> 1216 Forged Piston Question - Raising Compression
rider384 replied to rider384's topic in Oil Cooled
Thanks for the words everyone, especially Gixer1460! I ordered up some MTC 1216 10:1 pistons with upgraded tool steel wrist pins, part #MTC-R1216T Going to do my best to track down some sort of head spacer to drop the compression down to 8.5:1 to be a little safer and find someone to bore out my jugs (heh). -
1157 -> 1216 Forged Piston Question - Raising Compression
rider384 replied to rider384's topic in Oil Cooled
Phenomenal information as always Gixer1460, thanks for taking the time! Clears a lot of things up